PS利用图层蒙板制作漂亮的天空之城意境图
本教程是向大家介绍PS利用图层蒙板制作漂亮的天空之城意境图方法,制作出来的图片非常有意境,教程属于入门教程,非常适合初学者学习。推荐给大家,喜欢的朋友可以跟着一起来学习!

工具/原料
PHOTOSHOP CS5
城堡素材图片(立在高山上的)
天空素材图片
图层蒙版
方法/步骤
1、打开城堡素材图片,最好图片中的城堡是耸立在高山上的,城堡后面能看到远处风景,有明显的高度感。再打开一幅天空素材图片,要求内容简单些,主体必须是面积较大的成片云彩。
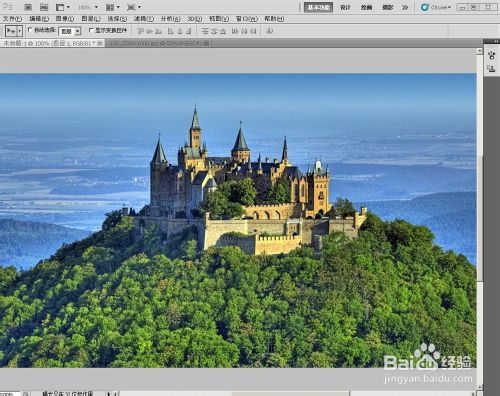
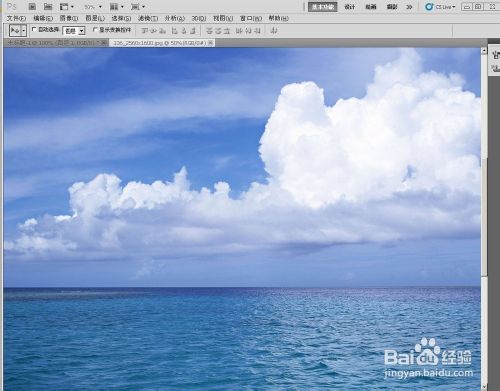
2、在打开的城堡图片窗口,点工具栏下方的“快速蒙版按钮”然后用笔刷迅速涂抹城堡连同山体部分,涂抹过程中,细微处注意调节笔刷大小,并用橡皮擦去掉不合适之处。
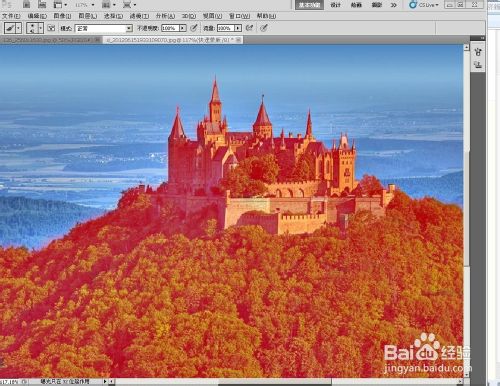
3、退出快速蒙版模式,恢复正常的编辑模式。现在就能看到刚才涂抹过的地方已自动生成选区(PS:小编经尝试发现这种办法要比之前用套索、钢笔工具作选区的方法快了N多倍,而且避免了挺多麻烦)
选择/反向保留城堡连同山体部分。再点[通道],新建通道Alpha1,并用油漆桶工具填充白色
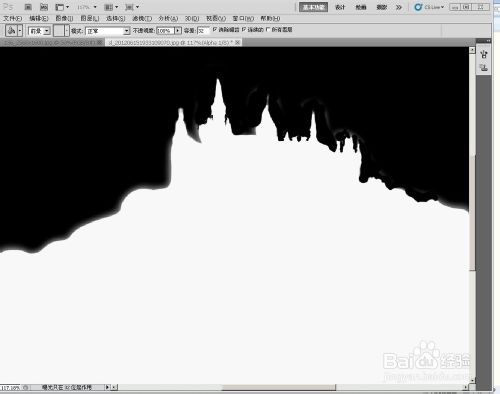
4、先执行滤镜/渲染/云彩,再执行滤镜/渲染/分层云彩。复制选区(即通道ALPHA1)再回到RGB模式,即背景图层上粘贴选区。CTRL+L调整图层1色阶。参数20,1.35,230.输出色阶20.更改图层1的混合模式为滤色。不透明度默认值100%
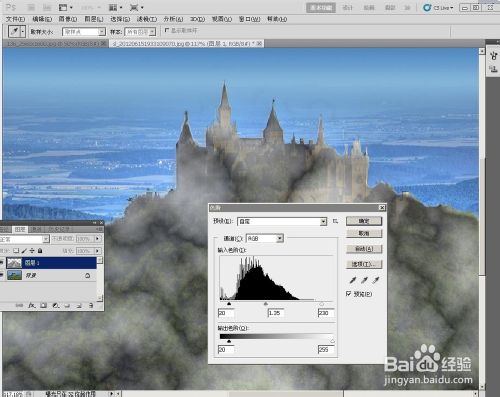
5、复制图层1生成图层1副本。选中图层1副本CTRL+T自由变换。将它调得相对小些,再用橡皮擦去图层1副本的城堡虚影部分。如图
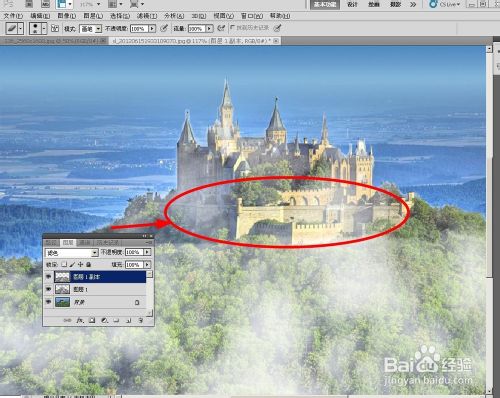
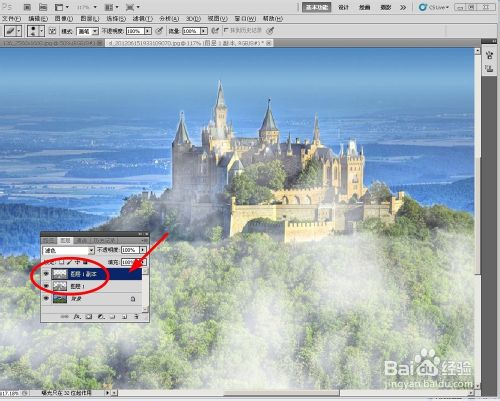
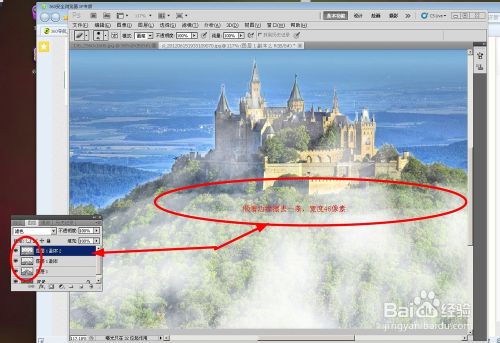
6、再复制一次图层1副本1,生成图层1副本2.这次仍是橡皮擦去一些,只是为要让云雾显得有些层次感,这次用橡皮擦去图层1副本2边缘一条,橡皮大小在46像素。
最后将四个图层全部合并。
补充:先将图层1的两个副本与图层1合并,然后滤镜/模糊/高斯模糊,设置图层1的高斯模糊值:半径5像素。最后再将图层1与背景合并。
7、再进入天空素材图层窗口。用魔棒工具选中云彩,并单击右键“存储选区”然后复制选区,并到空中城堡画面上粘贴选区。再CTRL+T调整粘贴过来的图层大小,使之与当前画面宽度一致。
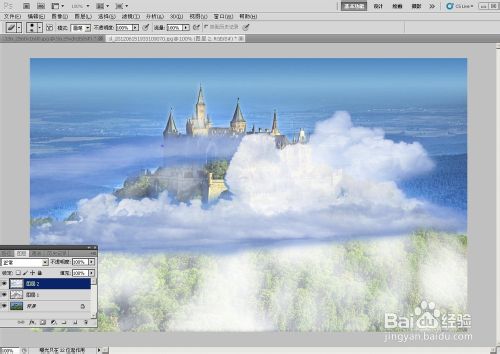
8、选中图层2,滤镜/模糊/动感模糊,角度60度,大小5像素。图层模式正常,不透明度80%。复制图层1.还是CTRL+T调整下大小、角度和扭曲。再用橡皮擦去少量云彩。图层混合模式正常,不透明度50%。先作下进一步模糊。再设置高斯模糊,半径4像素。
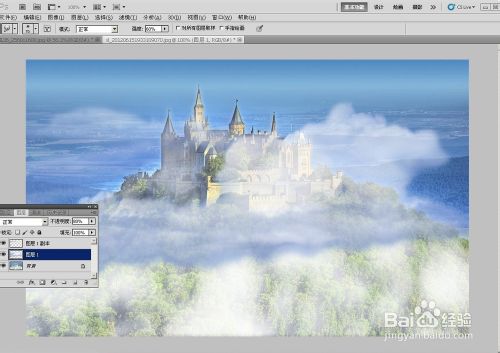
9、选中图层1,用涂抹工具在云层底边作下适当涂抹。合并图层1与图层1副本。调整一下图层1色彩平衡和曲线(曲线面板上选蓝色通道)。参数值自定。合并图层1与背景图层。再复制背景图层。
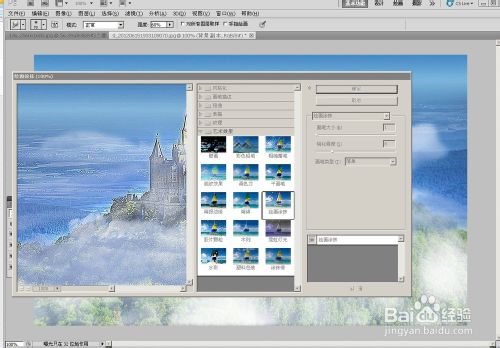
执行滤镜/艺术效果/绘画涂抹。画笔大小1,锐化程度8,类型简单。副本图层模式为叠加,不透明度50%。最后将背景副本图层与背景图层合并就OK了。看看自己做好的新作吧

END
注意事项
由于刚刚作完图层蒙版之后,背景图层上已经存在一个选区了,所以我们不能再新建一个图层再做选区了,那么会影响到通过蒙版自动生成的选区
以上就是PS利用图层蒙板制作漂亮的天空之城意境图的内容,更多相关内容请关注PHP中文网(www.php.cn)!

Hot AI Tools

Undresser.AI Undress
AI-powered app for creating realistic nude photos

AI Clothes Remover
Online AI tool for removing clothes from photos.

Undress AI Tool
Undress images for free

Clothoff.io
AI clothes remover

Video Face Swap
Swap faces in any video effortlessly with our completely free AI face swap tool!

Hot Article

Hot Tools

Notepad++7.3.1
Easy-to-use and free code editor

SublimeText3 Chinese version
Chinese version, very easy to use

Zend Studio 13.0.1
Powerful PHP integrated development environment

Dreamweaver CS6
Visual web development tools

SublimeText3 Mac version
God-level code editing software (SublimeText3)

Hot Topics
 1654
1654
 14
14
 1413
1413
 52
52
 1306
1306
 25
25
 1252
1252
 29
29
 1225
1225
 24
24
 ps serial number cs5 permanently free 2020
Jul 13, 2023 am 10:06 AM
PS serial numbers cs5 permanent free 2020 include: 1. 1330-1384-7388-4265-2355-8589 (Chinese); 2. 1330-1409-7892-5799-0412-7680 (Chinese); 3. 1330-1616-1993 -8375-9492-6951 (Chinese); 4. 1330-1971-2669-5043-0398-7801 (Chinese), etc.
 What to do if ps installation cannot write registry value error 160
Mar 22, 2023 pm 02:33 PM
Solution to error 160 when ps installation cannot write registry value: 1. Check whether there is 2345 software on the computer, and if so, uninstall the software; 2. Press "Win+R" and enter "Regedit" to open the system registry, and then Find "Photoshop.exe" and delete the Photoshop item.
 What should I do if the PS interface font is too small?
Dec 01, 2022 am 11:31 AM
How to fix the PS interface font that is too small: 1. Open PS, click the "Edit" button on the top menu bar of PS to expand the editing menu; 2. Click the "Preferences" button in the expanded editing menu, and then click "Interface. .." button; 3. In the interface settings, set the user interface font size to "Large", set the UI scaling to "200%" and save the settings, then restart PS to take effect.
 How to delete selected area in ps
Aug 07, 2023 pm 01:46 PM
Steps to delete the selected area in PS: 1. Open the picture you want to edit; 2. Use the appropriate tool to create a selection; 3. You can use a variety of methods to delete the content in the selection, use the "Delete" key, use the "Healing Brush Tool" , use "Content-Aware Fill", use the "Stamp Tool", etc.; 4. Use tools to repair any obvious traces or defects to make the picture look more natural; 5. After completing editing, click "File" > in the menu bar "Save" to save the editing results.
 Introduction to the process of extracting line drawings in PS
Apr 01, 2024 pm 12:51 PM
1. Open the software and import a piece of material, as shown in the picture below. 2. Then ctrl+shift+u to remove color. 3. Then press ctrl+J to copy the layer. 4. Then reverse ctrl+I, and then set the layer blending mode to Color Dodge. 5. Click Filter--Others--Minimum. 6. In the pop-up dialog box, set the radius to 2 and click OK. 7. Finally, you can see the line draft extracted.
 How to automate tasks using PowerShell
Feb 20, 2024 pm 01:51 PM
If you are an IT administrator or technology expert, you must be aware of the importance of automation. Especially for Windows users, Microsoft PowerShell is one of the best automation tools. Microsoft offers a variety of tools for your automation needs, without the need to install third-party applications. This guide will detail how to leverage PowerShell to automate tasks. What is a PowerShell script? If you have experience using PowerShell, you may have used commands to configure your operating system. A script is a collection of these commands in a .ps1 file. .ps1 files contain scripts executed by PowerShell, such as basic Get-Help
 Complete list of ps shortcut keys
Mar 11, 2024 pm 04:31 PM
1. Ctrl + N: Create a new document. 2. Ctrl + O: Open a file. 3. Ctrl + S: Save the current file. 4. Ctrl + Shift + S: Save as. 5. Ctrl + W: Close the current document. 6. Ctrl + Q: Exit Photoshop. 7. Ctrl + Z: Undo. 8. Ctrl + Y: Redo. 9. Ctrl + X: Cut the selected content. 10. Ctrl + C: Copy the selected content.
 PS copy layer shortcut key
Feb 23, 2024 pm 02:34 PM
In the PS copy layer shortcut keys, we can know that if you want to copy a layer when using PS, you can use the shortcut key [Ctrl+J] for quick copying. This introduction to the shortcut keys for copying layers can tell you the specific operation method. The following is the detailed content, so take a look. PS copy layer shortcut key answer: [Ctrl+J] Specific method: 1. Open the image in PS and select the layer that needs to be copied. 2. Press [Ctrl+J] on the keyboard at the same time to complete the copy of the layer. Other copying methods: 1. After opening the image, press and hold the layer and move the [New Layer] icon downwards. 2. After moving to the icon, let go. 3. The layer copy is completed.


