
 Software Tutorial
Computer Software
Basic step-by-step method for generating QR code using seewo whiteboard
Software Tutorial
Computer Software
Basic step-by-step method for generating QR code using seewo whiteboard
Basic step-by-step method for generating QR code using seewo whiteboard

How to use seewo whiteboard to generate QR code? PHP editor Zimo will take you through the basic steps and methods for generating QR codes with Seewo Whiteboard. Seewo whiteboard is a powerful teaching tool that can help teachers and students conduct paperless teaching and learning. This article will guide you on how to use the seewo whiteboard to generate a QR code so that students can quickly scan the code to join the class and achieve efficient and convenient teaching interaction.
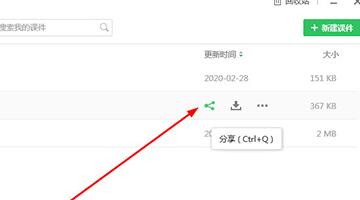
Enter the seewo whiteboard, find the courseware you want to share, and click the [Share] function. You can also directly use the Ctrl Q shortcut key to operate,
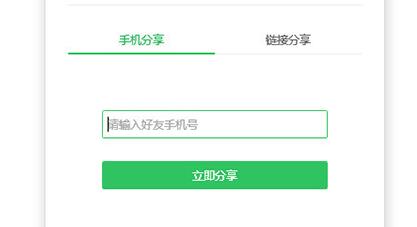
The courseware sharing interface pops up. The first sharing method is to share through a mobile phone number. You also need to enter the friend’s mobile phone number, and you can share it to the seewo whiteboard software of the account where it belongs with one click.
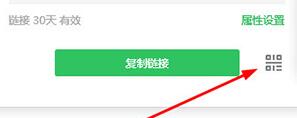
The second sharing method can be shared through links in the link sharing column. If you want to generate a QR code, just click the [QR Code] function in the lower right corner to generate it. By copying QR code and send it to friends. Friends can successfully obtain this courseware by simply scanning and opening the link.
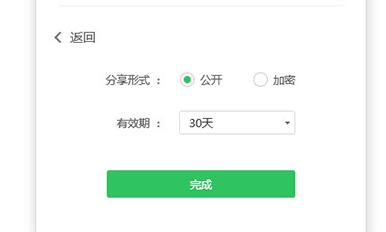
If you want to adjust the sharing method of this courseware, just click on In [Property Settings], you can change the public or encrypted status and select the link validity period.
The above is the detailed content of Basic step-by-step method for generating QR code using seewo whiteboard. For more information, please follow other related articles on the PHP Chinese website!

Hot AI Tools

Undresser.AI Undress
AI-powered app for creating realistic nude photos

AI Clothes Remover
Online AI tool for removing clothes from photos.

Undress AI Tool
Undress images for free

Clothoff.io
AI clothes remover

Video Face Swap
Swap faces in any video effortlessly with our completely free AI face swap tool!

Hot Article
Hot Tools

Notepad++7.3.1
Easy-to-use and free code editor

SublimeText3 Chinese version
Chinese version, very easy to use

Zend Studio 13.0.1
Powerful PHP integrated development environment

Dreamweaver CS6
Visual web development tools

SublimeText3 Mac version
God-level code editing software (SublimeText3)
Hot Topics
 1676
1676
 14
1429
52
1333
25
1278
29
1257
24
14
1429
52
1333
25
1278
29
1257
24

 How to use AI technology to generate a perfect ID photo?
May 15, 2025 pm 07:45 PM
How to use AI technology to generate a perfect ID photo?
May 15, 2025 pm 07:45 PM
With the ID photo generator, you can easily make the ID photo you need without going to the photo studio, saving time and effort. 1. First, activate the function of intelligently repairing old photos. 2. Select the ID photo creation option on the page. 3. Double-click to open the picture file you need to edit. 4. Wait for a moment, and the system will automatically generate a one-inch ID photo. 5. If you need other sizes, please select the appropriate size in the adjustment options. 6. Click the Change Background option. 7. Choose your favorite background color from the color background. 8. Click the Download Save button to save your ID photo.
