

Photoshop制作超创意的GIF人像动画效果图Cinemagraph

这篇教程是向PHP中文网的朋友介绍Photoshop制作超创意的GIF人像动画效果图Cinemagraph方法,教程真的很实用,很适合后期处理的朋友学习,推荐到PHP中文网,喜欢的朋友一起来学习吧
今天为大家分享一个非常不错的教程,是教大家利用Photoshop制作超创意的GIF人像动画效果图Cinemagraph,教程很不错,推荐过来,一起来学习吧!
在视频和Flash技术出现之前,人们在网络中可能看到的大量动态内容就是Gif图。这些Gif动态图给人的印象是画质粗糙、解析度低、颜色数少,但是它文件量小、短小精悍,非常便于网络传播,因此这些优势的方面从一开始就成为它有别于视频和照片的特色。

动态图片是由短视频或照片序列生成的“迷你视频”,一般以Gif格式存储。后来经过一些摄影师和设计师的创造,集创意、艺术化、拍摄和后期处理为一身的超动态Gif图便出现了,这便是“Cinemagraph”。Cinemagraph拥有远胜于普通Gif图甚至视频的动态内容表现能力,使用目前的摄影和后期技术已经能够获取画质细腻、色彩丰富、压缩较好的动态图片。
而Cinemagraph最重要、也是最鲜明的特色和灵魂应当是它独特的视觉语言和表达方式——在宁静的、充满电影感的照片中闪现出一丝局部动态的美感,每张Cinemagraph都在更加强化故事性,这样的照片惊艳而令人着迷。
本期,让我们一同走进Cinemagraph,并揭开其拍摄和后期制作的面纱。

Cinemagraph是什么
Cinemagraph是静态照片中神奇的细微运动技术。顾名思义,Cinema是电影摄影,graph是图片,Cinemagraph是动态摄影和静态图片的结合,因此它既不属于电影,也不属于照片,是介于两者之间的视觉语言和形式。
Cinemagraph这种艺术形式于2011年流行起来,始见于纽约Jamie Beck及 Kevin Burg的博客“From me to you”中,但其实Kevin Burg早在2009年就开始利用gif格式进行影像方面的试验和创作了。后来Jamie Beck和 Kevin Burg在纽约时装周(NYFW)合作中,创作并通过互联网分享了很多作品。本着作品能与观众有更多互动的愿景,Cinemagraph迅速发展起来。之后他们把博客改名为“Ann Street Studio”,另外同时建立了自己的网站Cinemagraphs。
Cinemagraph既保持了传统摄影的原则,又具有电影的灵魂和品质。摄影师的Jamie Beck和动画技师的Kevin Burg以他们的专业背景,把视频影像和摄影图像间做了有益的尝试和结合,他们把这一创作的过程和艺术形式命名为“Cinemagraph”,杜撰出这一专有的术语。通过社交媒体平台,Cinemagraph这种融合两种风格的影像和其术语像病毒一样迅速的流行和传播开来,正式确立了自身的身份和地位。而他们也最早把Cinemagraph应用在时尚摄影拍摄领域,商业上的成功和大量的实践又不断诠释着Cinemagraph的意义和精神。

富有创造性的Jamie Beck和Kevin Burg不但期待能够探索和开创未来显示技术在美术馆和画廊中的设置和应用,而且也想促进这种新的艺术形式和传播过程成为一种最好的方法——在数码时代,能够及时捕捉一个鲜活的生活瞬间,或者当我们需要形象地交流和立即分享时,能够创造出一个真实的、活生生的“人像”来。随着应用领域的扩大,或许Cinemagraph会成为未来网络广告和产品图片展示的主流。
2014年12月,美国商标和专利办公室把术语“Cinemagraph”的商标权正式授予加拿大软件制造商Flixel公司, Flixel公司以出品“Cinemagraph pro”IOS版和MAC版应用软件而声名大噪,并获得了2014年苹果软件设计大奖。该软件专门用于制作Cinemagraph,轻松上手,简单快捷,娱乐性极强,这使得Cinemagraph制作不再受专业限制,变得便于大众参与和传播, Cinemagraph这种形式受到大众更多的关注。

将静止的图片和视频结合在一起“解冻”了尘封在图片中的某一个时刻。Jamie和Kevin说:“比起一张静止的照片,我们想在照片中传达更多的故事;但又不想用冗长的视频。” 引用超级名模Coco Rocha的话:“more than a photo, but not quite a video(比照片包容更多,但不完全是视频)”,Cinemagraph的魅力正在于此。
Cinemagraphs让人耳目一新,也出现了相关的展览。笔者曾经在新加坡看一个展览的时候有一个展厅展出的全是这样的作品,它是在一种隐形的电子画框里面,你看不出那是个显示器,以为那是油画。如果你不太注意的话你会认为那是一张静止的作品,但是当你十分入神地去看那个作品的时候,它会在一个非常长的时间中突然间动一下,挺能让观众与作品产生交互。Cinemagraphs这种形式现在慢慢多起来了,并且笔者也非常喜欢这种形式。

Cinemagraph的拍摄
Cinemagraph需要让静止照片中某个位置以动态形式表现,其实是一个局部活动的 Gif 文件,通过视频素材转化而来。因此要想有动静结合的画面效果,在拍摄时要注意以下关键点。
1) 拍摄时使用有摄录功能的相机、摄像机、手机都可。必须使用三脚架进行稳定。拍摄一组序列帧照片或者一段视频短片都可。
2) 拍摄前先要构思好画面中什么地方静止,什么地方活动。活动的部分或对象最好能够循环往复、自然衔接。运动的特点应该是重复、循环、细微。静止和留白的画面空间要占大的比例,这样才能让活动部分更加凸显。
3) 拍摄时使用M手动挡,包括白平衡与对焦也要使用手动,以减少画面变化,防止画面闪抖。
Cinemagraph的后期方法
Cinemagraph动态照片的制作原理其实并不复杂,其基本原理是利用了蒙版的遮挡,但最重要的是对图像的优化要做好,否则图像会非常大而且不便于传递。如果你想追求高质量及永久保存的作品,则需要花很长时间通过 Photoshop 、After effects等专业软件来制作。
如果你手头有一部手机,想在生活中拍出动态照片,那么有很多专门针对Cinemagraph制作开发的APP应用软件就非常适合你了。这些APP应用只需要用手机拍摄短片然后动动手指涂抹“想要运动”的位置,就可以生成动态照片了,还可以随时分享到社交网站,非常简单好用!最有名的APP如Cinemagraph(Flixel公司开发的APP,有IOS手机版也有MAC版)、Kinotopic、Cliplet(微软开发)等等。
用PS如何制作Cinemagraph
利用Photoshop也可以制作Cinemagraph!核心技术要点是将短视频文件转化为图层序列帧,通过“时间轴”及图层蒙版等功能来实现。下面我们通过具体案例来演示。
经典案例:舞动的人影
前期拍摄
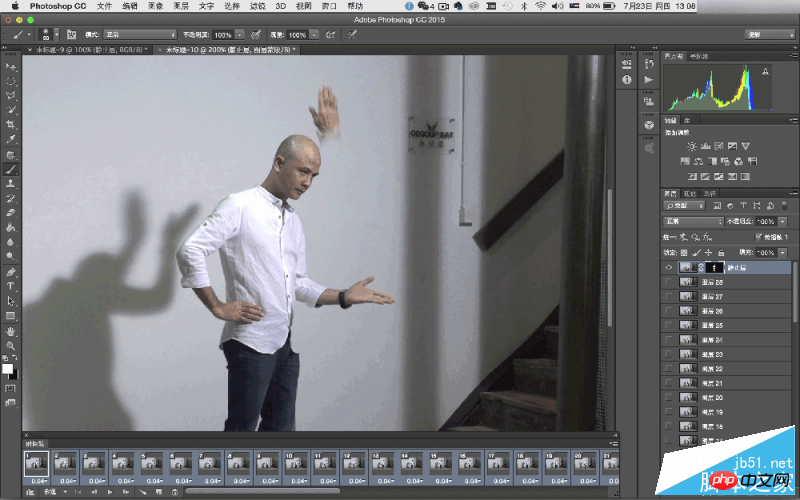
在这个Cinemagraph拍摄制作前,我们预想:希望人物摆一个很酷的动作,并保持绝对静止。而投在墙面和地面上舞动的人影则保持循环往复的状态。因此在拍摄时我们使用了侧位的聚光灯,使人影形状和角度在画面中能够很好的表现。
使用相机的摄像功能拍摄两个短片,第一个短片摄录设计好的人物静止动作(如上图中人物姿势),由于后期只用到该短片的一桢画面,所以让人物保持静止后,拍摄几秒即可,最后挑一桢最好的画面。第二个短片主要拍摄人影舞动的素材,开拍后让人物上半身舞动出各种姿势,需要注意人物舞动的姿势最好做到重复和可循环,另外人影和人物之间应保持距离,尽量减少重叠,这些要领都是为了后期制作时能够便于处理,使画面流畅自然。
摄录完成后我们便可把两个视频短片导入电脑,进行Cinemagraph制作了。

后期制作
第1步
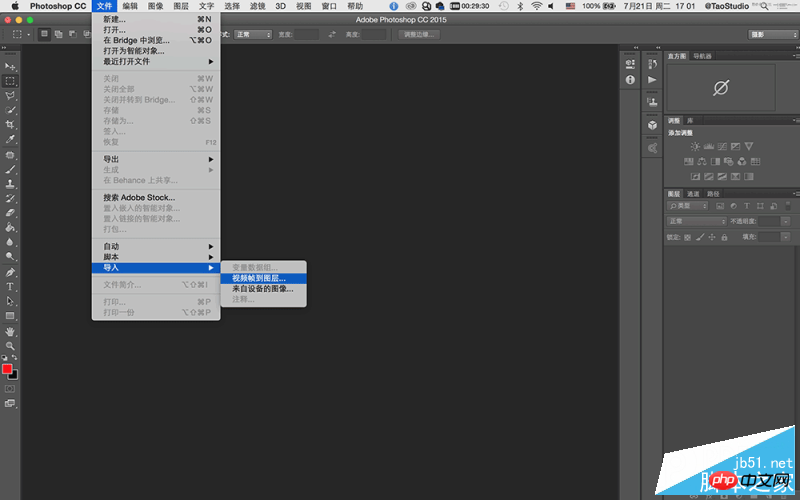
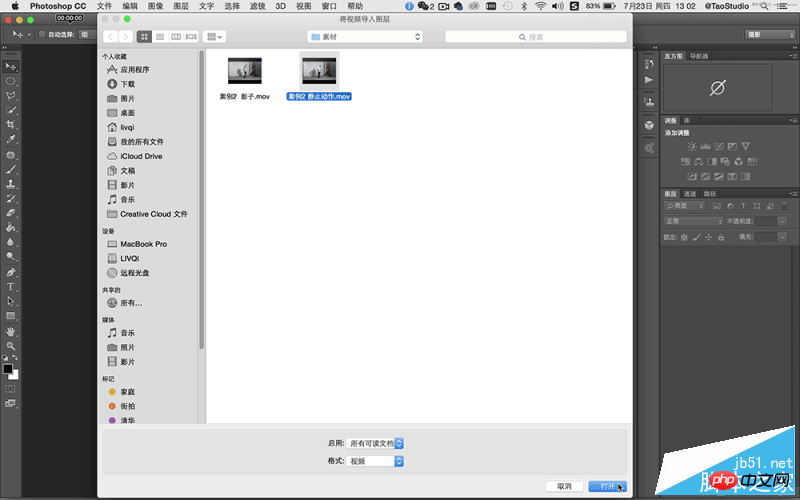
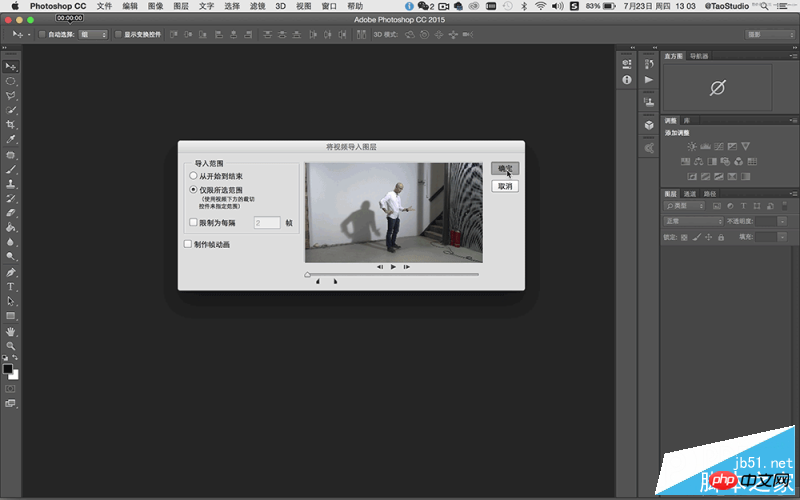
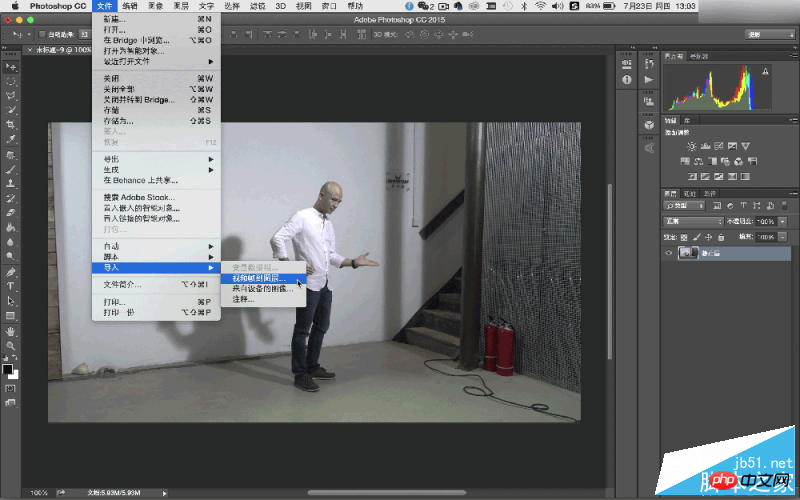
打开 Photoshop CC2015,在菜单栏“文件>导入> 视频帧到图层”,首先打开用于制作人物静止动作的短片素材。在弹出窗口的“导入范围”中选择“仅限所选范围”,由于只用到一个静止帧画面,所以拖拽范围滑块选取一桢画面即可。此时可以不必勾选“制作帧动画”选项。单击“确定”。
第2步
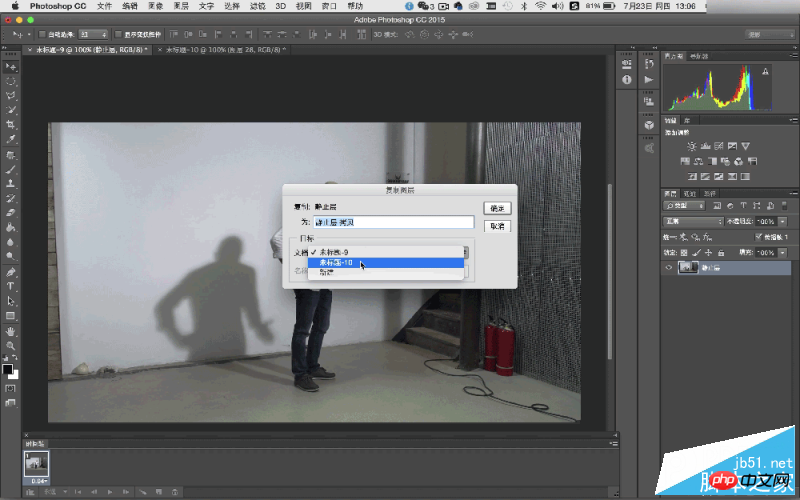
将导入图层的一桢画面命名为“静止层”。然后重复第一步的操作步骤,在菜单栏“文件>导入>视频帧到图层”打开人像影子的素材短片,在弹出窗口的“导入范围”中选择“仅限所选范围”,务必勾选“制作帧动画”复选框。然后分别拖拽前后的黑色范围滑块选取短片段落,Photoshop对于影片中的片段剪辑不是很方便,如果你有专业的影片剪辑软件,先编辑好再进行这步会更为方便。在截取时注意最好是完整的一个动作循环,或能够使首尾动作匹配衔接。最后单击“确定”。
TIPS: 如果你使用相机通过连拍获得连续的图片素材,可通过菜单栏“文件>脚本>将文件载入堆栈”,然后用“时间轴”制作帧动画来进行处理。

第3步
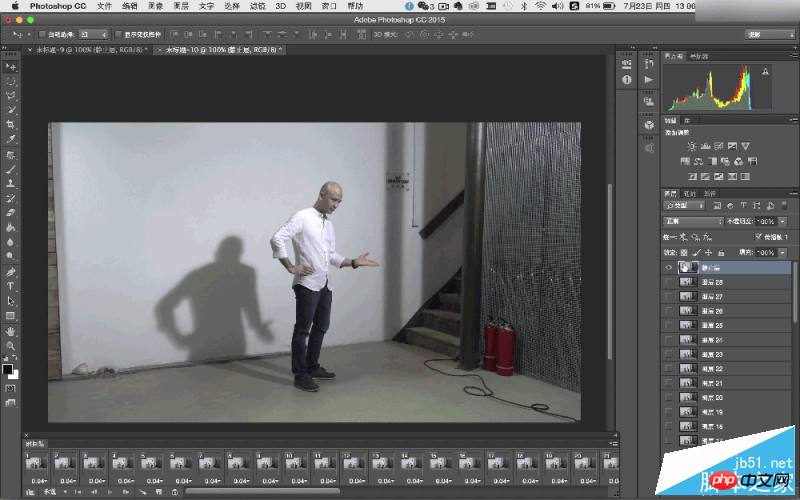
选好的视频段落将以序列帧的形式导入图层面板中。并且通过“时间轴”来显示。如果时间轴没有开启,可以在菜单栏中“窗口>时间轴”打开。

第4步
在时间轴中播放动画观察影子的变化情况。理论上讲如果短片本身能够完美地循环衔接的话,当你按左下角的动画播放钮时,它就会循环播放变成一个原始的动态照片。但如果不行的话,可以通过在时间轴上增加帧来使动作自然衔接。在本例中是将时间轴中所有帧全选后进行复制,然后将复制好的所有帧做“反向帧”。例如短片原来的顺序是 A>B>C,现在经过复制再反向后便是 A>B>C>B>A,这样的循环就会很流畅,当然也需要根据影片的情况来定,如果是单向运动的话,则不需要这样做。

第5步
切换到步骤1中制作静止层的窗口。在图层面板中选取“静止层”图层,单击鼠标右键在弹出窗口中选择“复制图层”,将“静止层”复制到第二个工作窗口中。在图层面板中将复制好的静止层拖拽置顶。

第6步
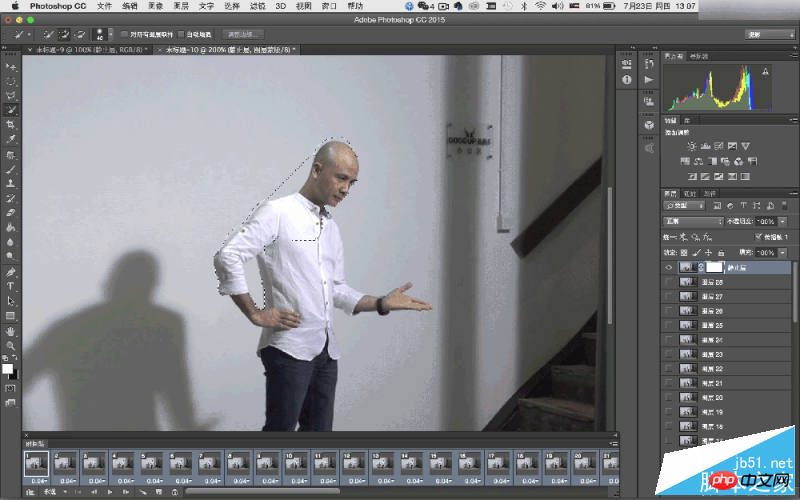
在图层面板中选取“静止层”,然后在时间轴中全选所有帧。单击“静止层”前面的眼睛图标(visible),使其可视,这样才能使“静止层”成为所有帧的“静止层”。接下来,在静止层上添加图层蒙版,在工具栏中使用“快速选择工具”对人像外轮廓进行勾选。
TIPS: 对“静止层”进行蒙版操作,以及对整个短片进行调色等全局操作时,务必全选时间轴中所有的帧。这样才能针对整个短片进行控制,而不是针对其中单独的一帧。
第7步
对勾选好的人像选区进行反选(Command+shift+I),使用黑色油漆桶工具单击图层蒙版中人物之外的选区部分。这时,除静止人像外的背景全都显露出来。在图层蒙版中使用白色画笔工具,擦除人像活动时残留的重影。这个步骤需要通过在时间轴播放动画来确定擦除的范围,但切记要保留好影子部分。当处理完成后播放动画查看,预想的画面效果已基本呈现出来。此外也可设定每一帧的速度,可以控制影子摆动的速度节奏,在本例中所有帧的速度是0.04秒。下面进一步进行美化处理。

第8步
使用裁剪工具,对画面进行方形构图裁切,去除画面两边杂乱部分,让画面主题更集中。

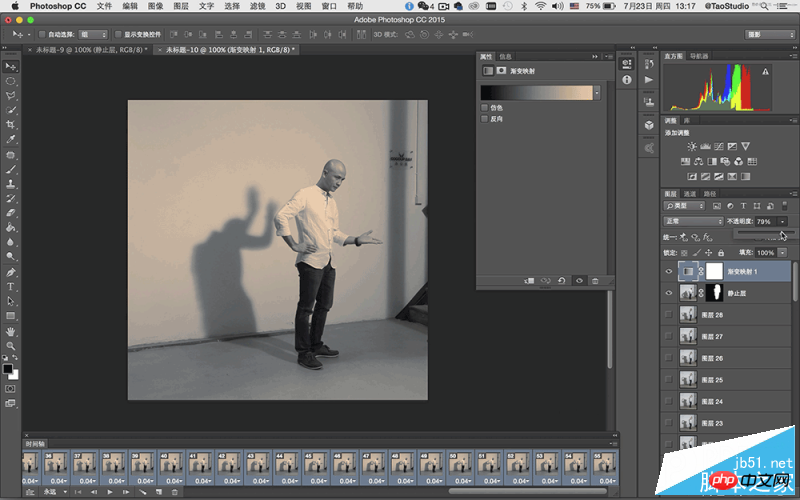
第9步
对画面进行调色,使其具有电影的色调感觉。首先在时间轴中要全选所有帧,然后可以使用渐变映射调色,或之前杂志介绍过的颜色查找调电影色调的方法来进行调色处理也可以尝试。

第10步
调色完成后,可以针对作品的用途调整图像的大小。菜单栏“图像>图像大小”。在本例中用于网络传输,可把图像大小调整为600×600像素。

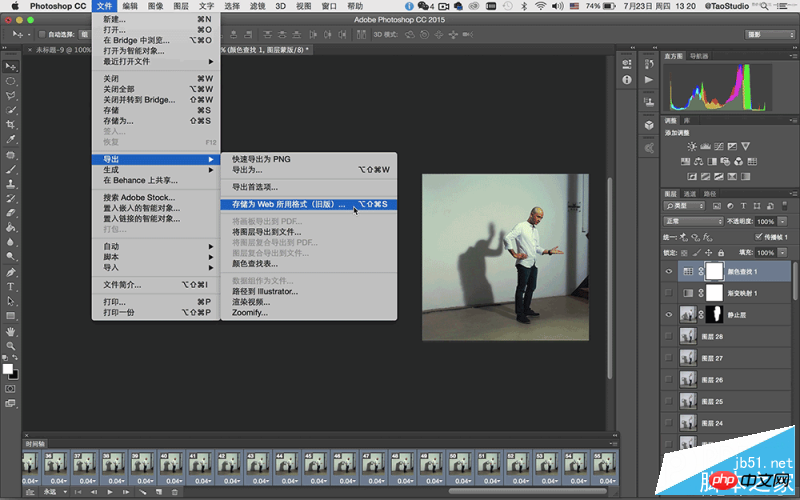
第11步
输出图像。在菜单栏“文件>导出>存储为web所用格式”弹出窗口中进行输出的相关设置,其中需在“循环选项”中选择“永远”,这样画面动作就会一直循环下去。设置好后点击存储,生成一个Gif格式的影像文件。最后就可以进行网络分享了。


教程结束,以上就是Photoshop制作超创意的GIF人像动画效果图Cinemagraph方法,大家觉得怎么样?希望这篇教程能给大家带来帮助!

Hot AI Tools

Undresser.AI Undress
AI-powered app for creating realistic nude photos

AI Clothes Remover
Online AI tool for removing clothes from photos.

Undress AI Tool
Undress images for free

Clothoff.io
AI clothes remover

Video Face Swap
Swap faces in any video effortlessly with our completely free AI face swap tool!

Hot Article
Hot Tools

Notepad++7.3.1
Easy-to-use and free code editor

SublimeText3 Chinese version
Chinese version, very easy to use

Zend Studio 13.0.1
Powerful PHP integrated development environment

Dreamweaver CS6
Visual web development tools

SublimeText3 Mac version
God-level code editing software (SublimeText3)
Hot Topics
 1666
1666
 14
1425
52
1327
25
1273
29
1253
24
14
1425
52
1327
25
1273
29
1253
24

 What are the permanently free photoshopcs5 serial numbers?
Jul 06, 2023 am 10:00 AM
What are the permanently free photoshopcs5 serial numbers?
Jul 06, 2023 am 10:00 AM
The permanently free photoshopcs5 serial numbers are: 1. 1330-1440-1602-3671-9749-7897; 2. 1330-1191-2998-6712-2520-5424; 3. 1330-1367-4285-4928-0630-3107; 4. 1330-1570-9599-9499-8092-8237; 5. 1330-1028-1662-3206-1688-5114, etc.
 How to speed up animation effects in Windows 11: 2 methods explained
Apr 24, 2023 pm 04:55 PM
How to speed up animation effects in Windows 11: 2 methods explained
Apr 24, 2023 pm 04:55 PM
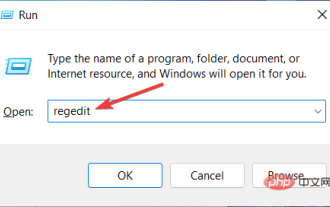
When Microsoft launched Windows 11, it brought a lot of changes. One of the changes is an increase in the number of user interface animations. Some users want to change the way things appear, and they have to find a way to do it. Having animations makes it feel better and more user-friendly. Animation uses visual effects to make the computer look more attractive and responsive. Some of them include sliding menus after a few seconds or minutes. There are many animations on your computer that can affect PC performance, slow it down, and interfere with your work. In this case you have to turn off animation. This article will introduce several ways that users can improve the speed of their animations on PC. You can apply the changes using Registry Editor or a custom file you run. How to improve animations in Windows 11
 Solution: Fix keyboard shortcuts not working in Photoshop
Sep 22, 2023 pm 03:17 PM
Solution: Fix keyboard shortcuts not working in Photoshop
Sep 22, 2023 pm 03:17 PM
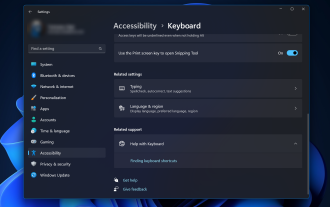
Adobe Photoshop is the industry standard for digital design, loved and used every day by the online community. However, when keyboard shortcuts stutter or fail entirely, it can significantly slow down any project or your overall productivity on Windows 11. Whether you're an experienced designer or just dabbling in photo editing, these glitches are more than just minor annoyances in Photoshop and Photoshop CC. First, let's look at the common reasons why custom or default shortcuts stop working. Why don't my shortcuts work in Photoshop? Customize workspace settings: Sometimes, adjusting or switching between workspace settings can reset keyboard shortcuts. Sticky Keys: This accessibility feature
![Animation not working in PowerPoint [Fixed]](https://img.php.cn/upload/article/000/887/227/170831232982910.jpg?x-oss-process=image/resize,m_fill,h_207,w_330) Animation not working in PowerPoint [Fixed]
Feb 19, 2024 am 11:12 AM
Animation not working in PowerPoint [Fixed]
Feb 19, 2024 am 11:12 AM
Are you trying to create a presentation but can't add animation? If animations are not working in PowerPoint on your Windows PC, then this article will help you. This is a common problem that many people complain about. For example, animations may stop working during presentations in Microsoft Teams or during screen recordings. In this guide, we will explore various troubleshooting techniques to help you fix animations not working in PowerPoint on Windows. Why aren't my PowerPoint animations working? We have noticed that some possible reasons that may cause the animation in PowerPoint not working issue on Windows are as follows: Due to personal
 CSS Animation: How to Achieve the Flash Effect of Elements
Nov 21, 2023 am 10:56 AM
CSS Animation: How to Achieve the Flash Effect of Elements
Nov 21, 2023 am 10:56 AM
CSS animation: How to achieve the flash effect of elements, specific code examples are needed. In web design, animation effects can sometimes bring a good user experience to the page. The glitter effect is a common animation effect that can make elements more eye-catching. The following will introduce how to use CSS to achieve the flash effect of elements. 1. Basic implementation of flash First, we need to use the animation property of CSS to achieve the flash effect. The value of the animation attribute needs to specify the animation name, animation execution time, and animation delay time
 After a two-year delay, the domestic 3D animated film 'Er Lang Shen: The Deep Sea Dragon' is scheduled to be released on July 13
Jan 26, 2024 am 09:42 AM
After a two-year delay, the domestic 3D animated film 'Er Lang Shen: The Deep Sea Dragon' is scheduled to be released on July 13
Jan 26, 2024 am 09:42 AM
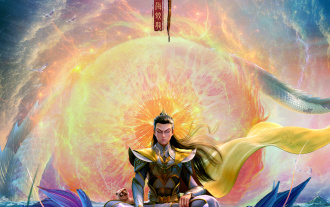
This website reported on January 26 that the domestic 3D animated film "Er Lang Shen: The Deep Sea Dragon" released a set of latest stills and officially announced that it will be released on July 13. It is understood that "Er Lang Shen: The Deep Sea Dragon" is produced by Mihuxing (Beijing) Animation Co., Ltd., Horgos Zhonghe Qiancheng Film Co., Ltd., Zhejiang Hengdian Film Co., Ltd., Zhejiang Gongying Film Co., Ltd., Chengdu The animated film produced by Tianhuo Technology Co., Ltd. and Huawen Image (Beijing) Film Co., Ltd. and directed by Wang Jun was originally scheduled to be released in mainland China on July 22, 2022. Synopsis of the plot of this site: After the Battle of the Conferred Gods, Jiang Ziya took the "Conferred Gods List" to divide the gods, and then the Conferred Gods List was sealed by the Heavenly Court under the deep sea of Kyushu Secret Realm. In fact, in addition to conferring divine positions, there are also many powerful evil spirits sealed in the Conferred Gods List.
 How to use Vue to implement typewriter animation effects
Sep 19, 2023 am 09:33 AM
How to use Vue to implement typewriter animation effects
Sep 19, 2023 am 09:33 AM
How to use Vue to implement typewriter animation special effects Typewriter animation is a common and eye-catching special effect that is often used in website titles, slogans and other text displays. In Vue, we can achieve typewriter animation effects by using Vue custom instructions. This article will introduce in detail how to use Vue to achieve this special effect and provide specific code examples. Step 1: Create a Vue project First, we need to create a Vue project. You can use VueCLI to quickly create a new Vue project, or manually
 The final PV of the main animation 'Arknights: Winter Hidden Return' has been announced and will be launched on October 7
Sep 23, 2023 am 11:37 AM
The final PV of the main animation 'Arknights: Winter Hidden Return' has been announced and will be launched on October 7
Sep 23, 2023 am 11:37 AM
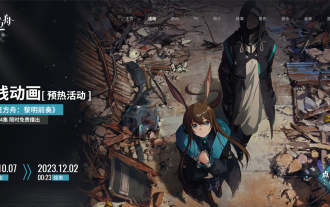
The content that needs to be rewritten on this site is: 9 The content that needs to be rewritten is: Month The content that needs to be rewritten is: 23 The content that needs to be rewritten is: Daily News, the main line drama of the second season of the animated series "Arknights" "Arknights: Winter Hidden Return" has announced its final release. The content that needs to be rewritten is: PV. The content that needs to be rewritten is: 10. The content that needs to be rewritten is: 7. The content that needs to be rewritten is: 7 The content is: The content that needs to be rewritten is: 00:23 The content that needs to be rewritten is: Officially launched, click here to enter the official website of the theme. The content that needs to be re-written is: This site has noticed that "Arknights: Winter Hidden Return" is the sequel to "Arknights: Prelude to Dawn". The plot summary is as follows: In order to prevent the infected, a group of
