Photoshop绘制一个打开逼真的流出的鸡蛋
这篇教程教大家如何使用Photoshop绘制一个打开逼真的流出的鸡蛋教程,效果很逼真,喜欢的朋友可以一起来学习
画任何一个图,都有很多不同的画法,我在这篇教程里介绍的只是我自己熟悉的画法吧。我习惯把所有图层都用形状图层来体现,当然这样优点就是,无论如何调整放大,都是矢量图形;而缺点是很多质感不如贴图方法方便,尤其做水质感之类的。而这样画图就必须做到思路很清晰,要特别了解要画图形的结构。
最终效果
绘图所用的PS工具:
首先,我拆分鸡蛋的结构,以蛋黄部分为例。
1、画出没有质感的形状:
使用前面介绍的形状工具选择椭圆工具,在画布上拉出一个适当大小的正圆(注意按住Shift键拖动)。
2、顶部栏点击填充,给圆形状一个暖黄色。
3、新建一个图层,用形状工具再画一个椭圆。使用选择工具白色箭头点击圆上的一个锚点进行拖拽,大概做如图调整(这个可以根据自己感觉来)。
4、打开菜单栏:窗口 > 属性,选择刚才画的灰色图层,调整羽化值。
5、按住Alt键,在图层面板中点击刚才这两个图层中间位置(鼠标会变成一个箭头加方框的样子),点击后这时图层状态会变成如下剪切蒙版状态。
6、把灰色图层颜色更改成和蛋黄色相近一点的颜色,可以找一些蛋黄照片,会发现边缘呈橙色一点,中间更淡黄一点。
7、接下来,不断重复上一个步骤,画新的调整形状,跟着感觉去微调,颜色中间浅一点,边上的形状深一点的橘黄,再可以修改透明度去不断微调出一个有一些质感的鸡蛋黄。
8、蛋黄反光高光部分:
首先用形状工具画一个圆,调整好位置,然后用形状选择工具的黑箭头点中这个圆,按住Shift的同时画一个圆(或者任何形状都可以),然后调整锚点到如图差不多的样式。
9、对上面的椭圆形状使用路径操作,选择相交。

10、继续添加两个形状,使用减去工具,得到如下。这样高光形状就做好了,假想它是一个窗户的反光样式。
11、更改高光颜色,然后同样对其做剪切蒙版,使用多个图层羽化来做细节调整。
12、蛋黄阴影:
蛋黄阴影部分,我都在蛋黄图层下方建立图层,然后使用50%的不透明度,和形状羽化完成的。
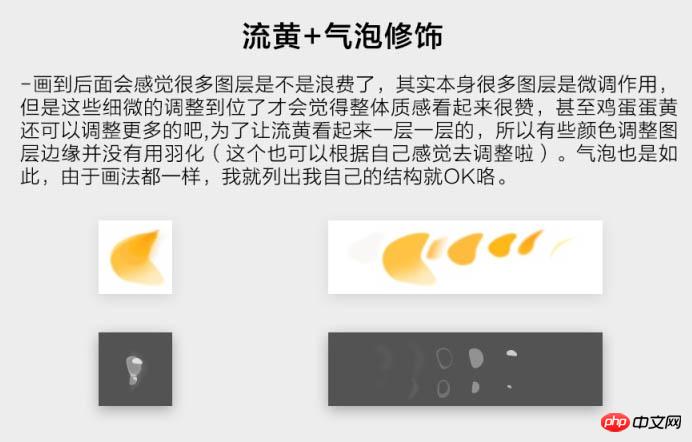
13、流黄 + 气泡修饰:
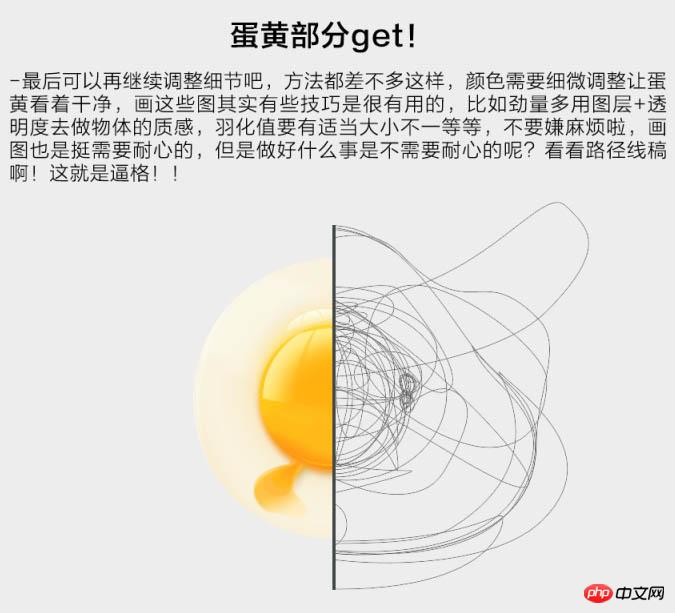
14、最后可以再继续调整细节吧,方法都差不多这样,颜色需要细微调整让蛋黄看着干净。
最终效果:

Hot AI Tools

Undresser.AI Undress
AI-powered app for creating realistic nude photos

AI Clothes Remover
Online AI tool for removing clothes from photos.

Undress AI Tool
Undress images for free

Clothoff.io
AI clothes remover

Video Face Swap
Swap faces in any video effortlessly with our completely free AI face swap tool!

Hot Article

Hot Tools

Notepad++7.3.1
Easy-to-use and free code editor

SublimeText3 Chinese version
Chinese version, very easy to use

Zend Studio 13.0.1
Powerful PHP integrated development environment

Dreamweaver CS6
Visual web development tools

SublimeText3 Mac version
God-level code editing software (SublimeText3)

Hot Topics
 1666
1666
 14
14
 1425
1425
 52
52
 1327
1327
 25
25
 1273
1273
 29
29
 1252
1252
 24
24
 Advanced Photoshop Tutorial: Master Retouching & Compositing
Apr 17, 2025 am 12:10 AM
Photoshop's advanced photo editing and synthesis technologies include: 1. Use layers, masks and adjustment layers for basic operations; 2. Use image pixel values to achieve photo editing effects; 3. Use multiple layers and masks for complex synthesis; 4. Use "liquefaction" tools to adjust facial features; 5. Use "frequency separation" technology to perform delicate photo editing, these technologies can improve image processing level and achieve professional-level effects.
 Photoshop's Key Features: A Deep Dive
Apr 19, 2025 am 12:08 AM
Key features of Photoshop include layers and masks, adjustment tools, filters and effects. 1. Layers and masks allow independent editing of image parts. 2. Adjust tools such as brightness/contrast can modify image tone and brightness. 3. Filters and effects can quickly add visual effects. Mastering these features can help creative professionals achieve their creative vision.
 Using Photoshop: Creative Possibilities and Practical Uses
Apr 22, 2025 am 12:09 AM
Photoshop is very practical and creative in practical applications. 1) It provides basic editing, repairing and synthesis functions, suitable for beginners and professionals. 2) Advanced features such as content recognition fill and layer style can improve image effects. 3) Mastering shortcut keys and optimizing layer structure can improve work efficiency.
 Is Photoshop Free? Understanding Subscription Plans
Apr 12, 2025 am 12:11 AM
Photoshop is not free, but there are several ways to use it at low cost or free: 1. The free trial period is 7 days, and you can experience all functions during this period; 2. Student and teacher discounts can cut costs by half, and school proof is required; 3. The CreativeCloud package is suitable for professional users and includes a variety of Adobe tools; 4. PhotoshopElements and Lightroom are low-cost alternatives, with fewer functions but lower prices.
 Photoshop: Investigating Free Trials and Discount Options
Apr 14, 2025 am 12:06 AM
You can get the access to Photoshop in the most economical way: 1. Experience the software features with a 7-day free trial; 2. Find student or teacher discounts, as well as seasonal promotions; 3. Use coupons on third-party websites; 4. Subscribe to Adobe CreativeCloud's monthly or annual plan.
 Photoshop and Digital Art: Painting, Illustration, and Compositing
Apr 18, 2025 am 12:01 AM
Photoshop's applications in digital art include painting, illustration and image synthesis. 1) Painting: Using brushes, pencils and mixing tools, the artist can create realistic effects. 2) Illustration: With vector and shape tools, artists can accurately draw complex graphics and add effects. 3) Synthesis: Using mask and layer blending mode, artists can seamlessly blend different image elements.
 Photoshop for Designers: Creating Visual Concepts
Apr 13, 2025 am 12:09 AM
Creating visual concepts in Photoshop can be achieved through the following steps: 1. Create a new document, 2. Add a background layer, 3. Use the brush tool to draw basic shapes, 4. Adjust colors and brightness, 5. Add text and graphics, 6. Use masks for local editing, 7. Apply filter effects, these steps help designers build a complete visual work from scratch.
 Using Photoshop for Graphic Design: Branding and More
Apr 16, 2025 am 12:02 AM
The steps to using Photoshop for brand design include: 1. Use the Pen tool to draw basic shapes, 2. Add shadows and highlights through layer styles, 3. Adjust colors and details, 4. Use smart objects and actions to automatically generate different versions of the design. Photoshop helps designers create and optimize brand elements with the flexibility of layers and masks, ensuring consistency and professionalism of designs, from simple logos to complex branding guides.


