
 Software Tutorial
Computer Software
How to enable advanced encoder settings for OBS Studio audio_How to enable advanced encoder settings for OBS Studio audio
Software Tutorial
Computer Software
How to enable advanced encoder settings for OBS Studio audio_How to enable advanced encoder settings for OBS Studio audio
How to enable advanced encoder settings for OBS Studio audio_How to enable advanced encoder settings for OBS Studio audio

In the live broadcast industry, OBS Studio is a very popular advanced encoder and live broadcast software. However, many users encounter difficulties when using OBS Studio for audio settings. In this article, PHP editor Apple will introduce you how to correctly enable OBS Studio audio and perform advanced encoder settings to ensure that your live broadcast experience is smooth and smooth. Whether you are a newbie or an experienced live broadcast host, this article will provide you with useful tips and suggestions to easily master the audio setup method of OBS Studio.
1. First download and install OBS Studio. After the installation is complete, click to enter the software.

2. Enter the software and click the file on the upper left to enter.

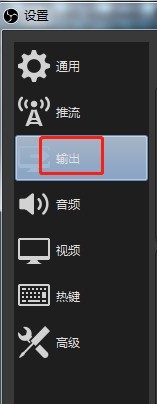
3. Enter the file and find Settings, click Settings to enter.

4. Enter settings, find output, and click input to enter.
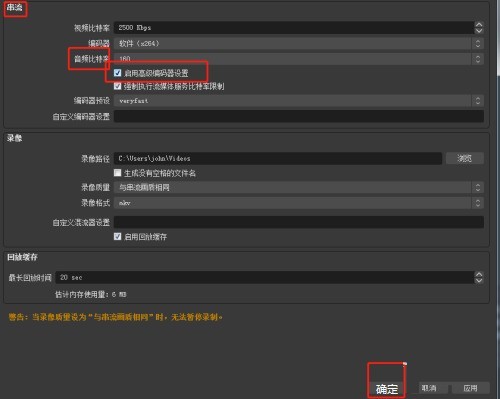
5. Enter the input and find the stream. Find the audio bitrate below and click the box on the left to enable advanced encoder settings. Click OK to complete the settings.
The above is the detailed content of How to enable advanced encoder settings for OBS Studio audio_How to enable advanced encoder settings for OBS Studio audio. For more information, please follow other related articles on the PHP Chinese website!

Hot AI Tools

Undresser.AI Undress
AI-powered app for creating realistic nude photos

AI Clothes Remover
Online AI tool for removing clothes from photos.

Undress AI Tool
Undress images for free

Clothoff.io
AI clothes remover

Video Face Swap
Swap faces in any video effortlessly with our completely free AI face swap tool!

Hot Article
Hot Tools

Notepad++7.3.1
Easy-to-use and free code editor

SublimeText3 Chinese version
Chinese version, very easy to use

Zend Studio 13.0.1
Powerful PHP integrated development environment

Dreamweaver CS6
Visual web development tools

SublimeText3 Mac version
God-level code editing software (SublimeText3)
Hot Topics
 1676
1676
 14
1429
52
1333
25
1278
29
1257
24
14
1429
52
1333
25
1278
29
1257
24

 How to use AI technology to generate a perfect ID photo?
May 15, 2025 pm 07:45 PM
How to use AI technology to generate a perfect ID photo?
May 15, 2025 pm 07:45 PM
With the ID photo generator, you can easily make the ID photo you need without going to the photo studio, saving time and effort. 1. First, activate the function of intelligently repairing old photos. 2. Select the ID photo creation option on the page. 3. Double-click to open the picture file you need to edit. 4. Wait for a moment, and the system will automatically generate a one-inch ID photo. 5. If you need other sizes, please select the appropriate size in the adjustment options. 6. Click the Change Background option. 7. Choose your favorite background color from the color background. 8. Click the Download Save button to save your ID photo.
