

MySQL中的mysqldump命令使用详解_MySQL

mysqldump
MySQL有很多可以导入数据的方法,然而这些只是数据传输中的一半,另外的一般是从MySQL数据库中导出数据。有许多的原因我们需要导出数据。一个重要的原因是用于备份数据库。数据的造价常常是昂贵的,需要谨慎处理它们。经常地备份可以帮助防止宝贵数据地丢失;另外一个原因是,也许您希望导出数据来共享。 在这个信息技术不断成长的世界中,共享数据变得越来越常见。
比方说Macmillan USA维护护着一个将要出版的书籍的大型数据库。这个数据库在许多书店之间共享,这样他们就知道哪些书将会很快出版。医院越来越走向采用无纸病历记录,这样这些病历可以随时跟着你。世界变得越来越小,信息也被共享得越来越多。有很多中导出数据得方法,它们都跟导入数据很相似。因为,毕竟,这些都只是一种透视得方式。从数据库导出的数据就是从另一端导入的数据。这里我们并不讨论其他的数据库各种各样的导出数据的方法,您将学会如何用MySQL来实现数据导出。
使用mysqldump:
(mysqldump命令位于mysql/bin/目录中)
mysqldump工具很多方面类似相反作用的工具mysqlimport。它们有一些同样的选项。但mysqldump能够做更多的事情。它可以把整个数据库装载到一个单独的文本文件中。这个文件包含有所有重建您的数据库所需要的SQL命令。这个命令取得所有的模式(Schema,后面有解释)并且将其转换成DDL语法(CREATE语句,即数据库定义语句),取得所有的数据,并且从这些数据中创建INSERT语句。这个工具将您的数据库中所有的设计倒转。因为所有的东西都被包含到了一个文本文件中。这个文本文件可以用一个简单的批处理和一个合适SQL语句导回到MySQL中。这个工具令人难以置信地简单而快速。决不会有半点让人头疼地地方。
因此,如果您像装载整个数据库Meet_A_Geek的内容到一个文件中,可以使用下面的命令:
bin/mysqldump –p Meet_A_Geek > MeetAGeek_Dump_File.txt
这个语句也允许您指定一个表进行dump(备份/导出/装载?)。如果您只是希望把数据库Meet_A_Geek中的表Orders中的整个内容导出到一个文件,可以使用下面的命令:
bin/mysqldump –p Meet_A_Geek Orders >MeetAGeek_Orders.txt
这个非常的灵活,您甚至可以使用WHERE从句来选择您需要的记录导出到文件中。要达到这样的目的,可以使用类似于下面的命令:
bin/mysqldump –p –where="Order_ID > 2000" Meet_A_Geek Orders > Special_Dump.txt
mysqldump工具有大量的选项,部分选项如下表:
选项/Option 作用/Action Performed
--add-drop-table
这个选项将会在每一个表的前面加上DROP TABLE IF EXISTS语句,这样可以保证导回MySQL数据库的时候不会出错,因为每次导回的时候,都会首先检查表是否存在,存在就删除
--add-locks
这个选项会在INSERT语句中捆上一个LOCK TABLE和UNLOCK TABLE语句。这就防止在这些记录被再次导入数据库时其他用户对表进行的操作
-c or - complete_insert
这个选项使得mysqldump命令给每一个产生INSERT语句加上列(field)的名字。当把数据导出导另外一个数据库时这个选项很有用。
--delayed-insert 在INSERT命令中加入DELAY选项
-F or -flush-logs 使用这个选项,在执行导出之前将会刷新MySQL服务器的log.
-f or -force 使用这个选项,即使有错误发生,仍然继续导出
--full 这个选项把附加信息也加到CREATE TABLE的语句中
-l or -lock-tables 使用这个选项,导出表的时候服务器将会给表加锁。
-t or -no-create- info
这个选项使的mysqldump命令不创建CREATE TABLE语句,这个选项在您只需要数据而不需要DDL(数据库定义语句)时很方便。
-d or -no-data 这个选项使的mysqldump命令不创建INSERT语句。
在您只需要DDL语句时,可以使用这个选项。
--opt 此选项将打开所有会提高文件导出速度和创造一个可以更快导入的文件的选项。
-q or -quick 这个选项使得MySQL不会把整个导出的内容读入内存再执行导出,而是在读到的时候就写入导文件中。
-T path or -tab = path 这个选项将会创建两个文件,一个文件包含DDL语句或者表创建语句,另一个文件包含数据。DDL文件被命名为table_name.sql,数据文件被命名为table_name.txt.路径名是存放这两个文件的目录。目录必须已经存在,并且命令的使用者有对文件的特权。
-w "WHERE Clause" or -where = "Where clause "
如前面所讲的,您可以使用这一选项来过筛选将要放到 导出文件的数据。
假定您需要为一个表单中要用到的帐号建立一个文件,经理要看今年(2004年)所有的订单(Orders),它们并不对DDL感兴趣,并且需要文件有逗号分隔,因为这样就很容易导入到Excel中。 为了完成这个人物,您可以使用下面的句子:
bin/mysqldump –p –where "Order_Date >='2000-01-01'"
–tab = /home/mark –no-create-info –fields-terminated-by=, Meet_A_Geek Orders
这将会得到您想要的结果。
schema:模式
The set of statements, expressed in data definition language, that completely describe the structure of a data base.
一组以数据定义语言来表达的语句集,该语句集完整地描述了数据库的结构。
SELECT INTO OUTFILE :
如果您觉得mysqldump工具不够酷,就使用SELECT INTO OUTFILE吧, MySQL同样提供一个跟LOAD DATA INFILE命令有相反作用的命令,这就是SELECT INTO OUTFILE 命令,这两个命令有很多的相似之处。首先,它们有所有的选项几乎相同。现在您需要完成前面用mysqldump完成的功能,可以依照下面的步骤进行操作:
1. 确保mysqld进程(服务)已经在运行
2. cd /usr/local/mysql
3. bin/mysqladmin ping ;// 如果这个句子通不过,可以用这个:mysqladmin -u root -p ping
mysqladmin ping用于检测mysqld的状态,is alive说明正在运行,出错则可能需要用户名和密码。
4. 启动MySQL 监听程序.
5. bin/mysql –p Meet_A_Geek;// 进入mysql命令行,并且打开数据库Meet_A_Geek,需要输入密码
6. 在命令行中,输入一下命令:
SELECT * INTO OUTFILE '/home/mark/Orders.txt'
FIELDS
TERMINATED BY = ','
FROM Orders
WHERE Order_Date >= '2000-01-01'
在你按了Return(回车)之后,文件就创建了。这个句子就像一个规则的SELECT语句,只是把想屏幕的输出重定向到了文件中。这意味这您可以使用JOIN来实现多表的高级查询。这个特点也可以被用作一个报表产生器。
比方说,您可以组合这一章中讨论的方法来产生一个非常有趣的查询,试试这个:
在mysql目录建立一个名为Report_G.rpt 的文本文件,加入下面的行:
USE Meet_A_Geek;
INSERT INTO Customers (Customer_ID, Last_Name, First_Name)
VALUES (NULL, "Kinnard", "Vicky");
INSERT INTO Customers (Customer_ID, Last_Name, First_Name)
VALUES (NULL, "Kinnard", "Steven");
INSERT INTO Customers (Customer_ID, Last_Name, First_Name)
VALUES (NULL, "Brown", "Sam");
SELECT Last_Name INTO OUTFILE '/home/mark/Report.rpt'
FROM Customers WHERE Customer_ID > 1;
然后确认 mysql进程在运行,并且您在mysql目录中, 输入下面的命令:
bin/mysql

Hot AI Tools

Undresser.AI Undress
AI-powered app for creating realistic nude photos

AI Clothes Remover
Online AI tool for removing clothes from photos.

Undress AI Tool
Undress images for free

Clothoff.io
AI clothes remover

Video Face Swap
Swap faces in any video effortlessly with our completely free AI face swap tool!

Hot Article
Hot Tools

Notepad++7.3.1
Easy-to-use and free code editor

SublimeText3 Chinese version
Chinese version, very easy to use

Zend Studio 13.0.1
Powerful PHP integrated development environment

Dreamweaver CS6
Visual web development tools

SublimeText3 Mac version
God-level code editing software (SublimeText3)
Hot Topics
 1665
1665
 14
1423
52
1321
25
1269
29
1249
24
14
1423
52
1321
25
1269
29
1249
24

 What software is crystaldiskmark? -How to use crystaldiskmark?
Mar 18, 2024 pm 02:58 PM
What software is crystaldiskmark? -How to use crystaldiskmark?
Mar 18, 2024 pm 02:58 PM
CrystalDiskMark is a small HDD benchmark tool for hard drives that quickly measures sequential and random read/write speeds. Next, let the editor introduce CrystalDiskMark to you and how to use crystaldiskmark~ 1. Introduction to CrystalDiskMark CrystalDiskMark is a widely used disk performance testing tool used to evaluate the read and write speed and performance of mechanical hard drives and solid-state drives (SSD). Random I/O performance. It is a free Windows application and provides a user-friendly interface and various test modes to evaluate different aspects of hard drive performance and is widely used in hardware reviews
 How to download foobar2000? -How to use foobar2000
Mar 18, 2024 am 10:58 AM
How to download foobar2000? -How to use foobar2000
Mar 18, 2024 am 10:58 AM
foobar2000 is a software that can listen to music resources at any time. It brings you all kinds of music with lossless sound quality. The enhanced version of the music player allows you to get a more comprehensive and comfortable music experience. Its design concept is to play the advanced audio on the computer The device is transplanted to mobile phones to provide a more convenient and efficient music playback experience. The interface design is simple, clear and easy to use. It adopts a minimalist design style without too many decorations and cumbersome operations to get started quickly. It also supports a variety of skins and Theme, personalize settings according to your own preferences, and create an exclusive music player that supports the playback of multiple audio formats. It also supports the audio gain function to adjust the volume according to your own hearing conditions to avoid hearing damage caused by excessive volume. Next, let me help you
 What to do if the 0x80004005 error code appears. The editor will teach you how to solve the 0x80004005 error code.
Mar 21, 2024 pm 09:17 PM
What to do if the 0x80004005 error code appears. The editor will teach you how to solve the 0x80004005 error code.
Mar 21, 2024 pm 09:17 PM
When deleting or decompressing a folder on your computer, sometimes a prompt dialog box "Error 0x80004005: Unspecified Error" will pop up. How should you solve this situation? There are actually many reasons why the error code 0x80004005 is prompted, but most of them are caused by viruses. We can re-register the dll to solve the problem. Below, the editor will explain to you the experience of handling the 0x80004005 error code. Some users are prompted with error code 0X80004005 when using their computers. The 0x80004005 error is mainly caused by the computer not correctly registering certain dynamic link library files, or by a firewall that does not allow HTTPS connections between the computer and the Internet. So how about
 BTCC tutorial: How to bind and use MetaMask wallet on BTCC exchange?
Apr 26, 2024 am 09:40 AM
BTCC tutorial: How to bind and use MetaMask wallet on BTCC exchange?
Apr 26, 2024 am 09:40 AM
MetaMask (also called Little Fox Wallet in Chinese) is a free and well-received encryption wallet software. Currently, BTCC supports binding to the MetaMask wallet. After binding, you can use the MetaMask wallet to quickly log in, store value, buy coins, etc., and you can also get 20 USDT trial bonus for the first time binding. In the BTCCMetaMask wallet tutorial, we will introduce in detail how to register and use MetaMask, and how to bind and use the Little Fox wallet in BTCC. What is MetaMask wallet? With over 30 million users, MetaMask Little Fox Wallet is one of the most popular cryptocurrency wallets today. It is free to use and can be installed on the network as an extension
 How to use NetEase Mailbox Master
Mar 27, 2024 pm 05:32 PM
How to use NetEase Mailbox Master
Mar 27, 2024 pm 05:32 PM
NetEase Mailbox, as an email address widely used by Chinese netizens, has always won the trust of users with its stable and efficient services. NetEase Mailbox Master is an email software specially created for mobile phone users. It greatly simplifies the process of sending and receiving emails and makes our email processing more convenient. So how to use NetEase Mailbox Master, and what specific functions it has. Below, the editor of this site will give you a detailed introduction, hoping to help you! First, you can search and download the NetEase Mailbox Master app in the mobile app store. Search for "NetEase Mailbox Master" in App Store or Baidu Mobile Assistant, and then follow the prompts to install it. After the download and installation is completed, we open the NetEase email account and log in. The login interface is as shown below
 How to use Baidu Netdisk app
Mar 27, 2024 pm 06:46 PM
How to use Baidu Netdisk app
Mar 27, 2024 pm 06:46 PM
Cloud storage has become an indispensable part of our daily life and work nowadays. As one of the leading cloud storage services in China, Baidu Netdisk has won the favor of a large number of users with its powerful storage functions, efficient transmission speed and convenient operation experience. And whether you want to back up important files, share information, watch videos online, or listen to music, Baidu Cloud Disk can meet your needs. However, many users may not understand the specific use method of Baidu Netdisk app, so this tutorial will introduce in detail how to use Baidu Netdisk app. Users who are still confused can follow this article to learn more. ! How to use Baidu Cloud Network Disk: 1. Installation First, when downloading and installing Baidu Cloud software, please select the custom installation option.
 How to transfer files from Quark Cloud Disk to Baidu Cloud Disk?
Mar 14, 2024 pm 02:07 PM
How to transfer files from Quark Cloud Disk to Baidu Cloud Disk?
Mar 14, 2024 pm 02:07 PM
Quark Netdisk and Baidu Netdisk are currently the most commonly used Netdisk software for storing files. If you want to save the files in Quark Netdisk to Baidu Netdisk, how do you do it? In this issue, the editor has compiled the tutorial steps for transferring files from Quark Network Disk computer to Baidu Network Disk. Let’s take a look at how to operate it. How to save Quark network disk files to Baidu network disk? To transfer files from Quark Network Disk to Baidu Network Disk, you first need to download the required files from Quark Network Disk, then select the target folder in the Baidu Network Disk client and open it. Then, drag and drop the files downloaded from Quark Cloud Disk into the folder opened by the Baidu Cloud Disk client, or use the upload function to add the files to Baidu Cloud Disk. Make sure to check whether the file was successfully transferred in Baidu Cloud Disk after the upload is completed. That's it
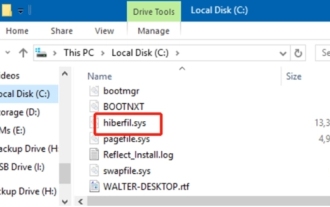 What is hiberfil.sys file? Can hiberfil.sys be deleted?
Mar 15, 2024 am 09:49 AM
What is hiberfil.sys file? Can hiberfil.sys be deleted?
Mar 15, 2024 am 09:49 AM
Recently, many netizens have asked the editor, what is the file hiberfil.sys? Can hiberfil.sys take up a lot of C drive space and be deleted? The editor can tell you that the hiberfil.sys file can be deleted. Let’s take a look at the details below. hiberfil.sys is a hidden file in the Windows system and also a system hibernation file. It is usually stored in the root directory of the C drive, and its size is equivalent to the size of the system's installed memory. This file is used when the computer is hibernated and contains the memory data of the current system so that it can be quickly restored to the previous state during recovery. Since its size is equal to the memory capacity, it may take up a larger amount of hard drive space. hiber
