

12 common IP commands in the iproute installation package

Year after year, we have been using the ifconfig command to perform network-related tasks, such as checking and configuring network card information. But ifconfig is no longer maintained and has been deprecated in recent versions of Linux! The ifconfig command has been replaced by the ip command.
Theip command is somewhat similar to the ifconfig command, but it is much more powerful and has many new functions. The ip command completes many tasks that the ifconfig command cannot.

This tutorial will discuss the 12 most common uses of the ip command, let’s get started.
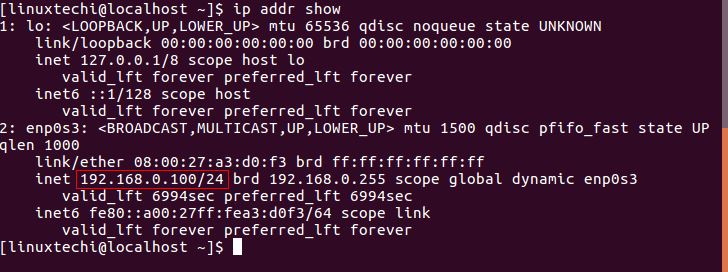
Check the network information such as IP address, subnet and other network card, use ip addr show command:
[linuxtechi@localhost]$ ip addr show

或

[linuxtechi@localhost]$ ip a s
This will display the relevant network information of all available network cards in the system, but if you want to view the information of a certain network card, the command is:
[linuxtechi@localhost]$ ip addr show enp0s3
Here enp0s3 is the name of the network card.
IP-addr-show-commant-output
Use the ip command to enable a disabled network card:
[linuxtechi@localhost]$ sudo ip link set enp0s3 up
To disable the network card, use the down trigger:
[linuxtechi@localhost]$ sudo ip link set enp0s3 down
To assign an IP address to the network card, we use the following command:
[linuxtechi@localhost]$ sudo ip addr add 192.168.0.50/255.255.255.0 dev enp0s3
You can also use the ip command to set the broadcast address. By default, the broadcast address is not set. The command to set the broadcast address is:
[linuxtechi@localhost]$ sudo ip addr add broadcast 192.168.0.255 dev enp0s3
We can also use the following command to set the standard broadcast address based on the IP address:
[linuxtechi@localhost]$ sudo ip addr add 192.168.0.10/24 brd + dev enp0s3
As shown in the above example, we can use brd instead of broadcast to set the broadcast address.
If you want to delete an IP from the network card, use the following ip command:
[linuxtechi@localhost]$ sudo ip addr del 192.168.0.10/24 dev enp0s3
添加别名,即为网卡添加不止一个 IP,执行下面命令:
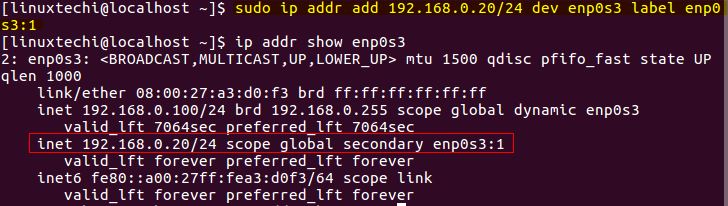
[linuxtechi@localhost]$ sudo ip addr add 192.168.0.20/24 dev enp0s3 label enp0s3:1
ip-command-add-alias-linux
查看路由信息会给我们显示数据包到达目的地的路由路径。要查看网络路由信息,执行下面命令:
[linuxtechi@localhost]$ ip route show

ip-route-command-output
在上面输出结果中,我们能够看到所有网卡上数据包的路由信息。我们也可以获取特定 IP 的路由信息,方法是:
[linuxtechi@localhost]$ sudo ip route get 192.168.0.1
我们也可以使用 IP 来修改数据包的默认路由。方法是使用 ip route 命令:
[linuxtechi@localhost]$ sudo ip route add default via 192.168.0.150/24
这样所有的网络数据包通过 192.168.0.150 来转发,而不是以前的默认路由了。若要修改某个网卡的默认路由,执行:
[linuxtechi@localhost]$ sudo ip route add 172.16.32.32 via 192.168.0.150/24 dev enp0s3
要删除之前设置的默认路由,打开终端然后运行:
[linuxtechi@localhost]$ sudo ip route del 192.168.0.150/24
注意: 用上面方法修改的默认路由只是临时有效的,在系统重启后所有的改动都会丢失。要永久修改路由,需要修改或创建 route-enp0s3 文件。将下面这行加入其中:
[linuxtechi@localhost]$  sudo vi /etc/sysconfig/network-scripts/route-enp0s3

172.16.32.32 via 192.168.0.150/24 dev enp0s3
保存并退出该文件。
若你使用的是基于 Ubuntu 或 debian 的操作系统,则该要修改的文件为 /etc/network/interfaces,然后添加 ip route add 172.16.32.32 via 192.168.0.150/24 dev enp0s3 这行到文件末尾。
ARP,是地址解析协议的缩写,用于将 IP 地址转换为物理地址(也就是 MAC 地址)。所有的 IP 和其对应的 MAC 明细都存储在一张表中,这张表叫做 ARP 缓存。
要查看 ARP 缓存中的记录,即连接到局域网中设备的 MAC 地址,则使用如下 ip 命令:
[linuxtechi@localhost]$ ip neigh

ip-neigh-command-linux
删除 ARP 记录的命令为:
[linuxtechi@localhost]$ sudo ip neigh del 192.168.0.106 dev enp0s3
若想往 ARP 缓存中添加新记录,则命令为:
[linuxtechi@localhost]$ sudo ip neigh add 192.168.0.150 lladdr 33:1g:75:37:r3:84 dev enp0s3 nud perm
这里 nud 的意思是 “neghbour state”(网络邻居状态),它的值可以是:
- perm - 永久有效并且只能被管理员删除
- noarp - 记录有效,但在生命周期过期后就允许被删除了
- stale - 记录有效,但可能已经过期
- reachable - 记录有效,但超时后就失效了
通过 ip 命令还能查看网络的统计信息,比如所有网卡上传输的字节数和报文数,错误或丢弃的报文数等。使用 ip -s link 命令来查看:
[linuxtechi@localhost]$ ip -s link
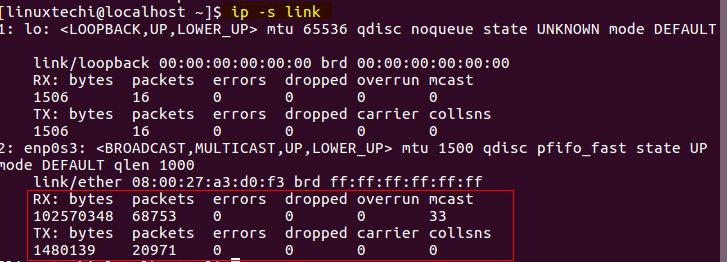
ip-s-command-linux
若你想查看某个上面例子中没有的选项,那么你可以查看帮助。事实上对任何命令你都可以寻求帮助。要列出 ip 命令的所有可选项,执行:
[linuxtechi@localhost]$ ip help
The above is the detailed content of 12 common IP commands in the iproute installation package. For more information, please follow other related articles on the PHP Chinese website!

Hot AI Tools

Undresser.AI Undress
AI-powered app for creating realistic nude photos

AI Clothes Remover
Online AI tool for removing clothes from photos.

Undress AI Tool
Undress images for free

Clothoff.io
AI clothes remover

Video Face Swap
Swap faces in any video effortlessly with our completely free AI face swap tool!

Hot Article
Hot Tools

Notepad++7.3.1
Easy-to-use and free code editor

SublimeText3 Chinese version
Chinese version, very easy to use

Zend Studio 13.0.1
Powerful PHP integrated development environment

Dreamweaver CS6
Visual web development tools

SublimeText3 Mac version
God-level code editing software (SublimeText3)
Hot Topics


 What computer configuration is required for vscode
Apr 15, 2025 pm 09:48 PM
What computer configuration is required for vscode
Apr 15, 2025 pm 09:48 PM
VS Code system requirements: Operating system: Windows 10 and above, macOS 10.12 and above, Linux distribution processor: minimum 1.6 GHz, recommended 2.0 GHz and above memory: minimum 512 MB, recommended 4 GB and above storage space: minimum 250 MB, recommended 1 GB and above other requirements: stable network connection, Xorg/Wayland (Linux)
 Linux Architecture: Unveiling the 5 Basic Components
Apr 20, 2025 am 12:04 AM
Linux Architecture: Unveiling the 5 Basic Components
Apr 20, 2025 am 12:04 AM
The five basic components of the Linux system are: 1. Kernel, 2. System library, 3. System utilities, 4. Graphical user interface, 5. Applications. The kernel manages hardware resources, the system library provides precompiled functions, system utilities are used for system management, the GUI provides visual interaction, and applications use these components to implement functions.
 vscode terminal usage tutorial
Apr 15, 2025 pm 10:09 PM
vscode terminal usage tutorial
Apr 15, 2025 pm 10:09 PM
vscode built-in terminal is a development tool that allows running commands and scripts within the editor to simplify the development process. How to use vscode terminal: Open the terminal with the shortcut key (Ctrl/Cmd). Enter a command or run the script. Use hotkeys (such as Ctrl L to clear the terminal). Change the working directory (such as the cd command). Advanced features include debug mode, automatic code snippet completion, and interactive command history.
 How to check the warehouse address of git
Apr 17, 2025 pm 01:54 PM
How to check the warehouse address of git
Apr 17, 2025 pm 01:54 PM
To view the Git repository address, perform the following steps: 1. Open the command line and navigate to the repository directory; 2. Run the "git remote -v" command; 3. View the repository name in the output and its corresponding address.
 How to run java code in notepad
Apr 16, 2025 pm 07:39 PM
How to run java code in notepad
Apr 16, 2025 pm 07:39 PM
Although Notepad cannot run Java code directly, it can be achieved by using other tools: using the command line compiler (javac) to generate a bytecode file (filename.class). Use the Java interpreter (java) to interpret bytecode, execute the code, and output the result.
 Where to write code in vscode
Apr 15, 2025 pm 09:54 PM
Where to write code in vscode
Apr 15, 2025 pm 09:54 PM
Writing code in Visual Studio Code (VSCode) is simple and easy to use. Just install VSCode, create a project, select a language, create a file, write code, save and run it. The advantages of VSCode include cross-platform, free and open source, powerful features, rich extensions, and lightweight and fast.
 What is the main purpose of Linux?
Apr 16, 2025 am 12:19 AM
What is the main purpose of Linux?
Apr 16, 2025 am 12:19 AM
The main uses of Linux include: 1. Server operating system, 2. Embedded system, 3. Desktop operating system, 4. Development and testing environment. Linux excels in these areas, providing stability, security and efficient development tools.
 vscode terminal command cannot be used
Apr 15, 2025 pm 10:03 PM
vscode terminal command cannot be used
Apr 15, 2025 pm 10:03 PM
Causes and solutions for the VS Code terminal commands not available: The necessary tools are not installed (Windows: WSL; macOS: Xcode command line tools) Path configuration is wrong (add executable files to PATH environment variables) Permission issues (run VS Code as administrator) Firewall or proxy restrictions (check settings, unrestrictions) Terminal settings are incorrect (enable use of external terminals) VS Code installation is corrupt (reinstall or update) Terminal configuration is incompatible (try different terminal types or commands) Specific environment variables are missing (set necessary environment variables)
