

zetcd solves how to remove the dependence of applications on ZooKeeper

Distributed systems usually rely on an arbitration system to work together. Generally, such systems use arbitration to ensure the accurate transmission of information to avoid split-brain. Such systems sacrifice versatility in exchange for ample design leeway, a practice that has clearly been exemplified by the proliferation of implementations. There are many such systems, such as: chubby, ZooKeeper, etcd and consul, etc. Although the concepts and protocols of these systems are different, they all provide similar key-value based distributed arbitration. As part of the plan to make etcd the most high-profile basic component of distributed systems, the etcd team has developed a new agent, zetcd, which allows the etcd cluster to consume ZooKeeper service requests without any changes.
ZooKeeper was the first open source implementation of arbitration software, which prompted it to become the preferred backend for many distributed systems. In theory, these systems should be compatible with etcd, but due to historical reasons, this is not the case; etcd clusters cannot replace ZooKeeper, and their data models and client protocols are incompatible with ZooKeeper applications; and vice versa. If the system is already in production, there is little incentive to plug it into a new backend and introduce new complexity.
Fortunately, the etcd v3 API is preparing to implement simulation support for the ZooKeeper data model through a standard proxy zetcd. zetcd is a new open source project developed by the etcd team. Today the first beta version of zetcd, v0, was released. 0.1, the goal is to manage and deploy the zetcd system in production systems.
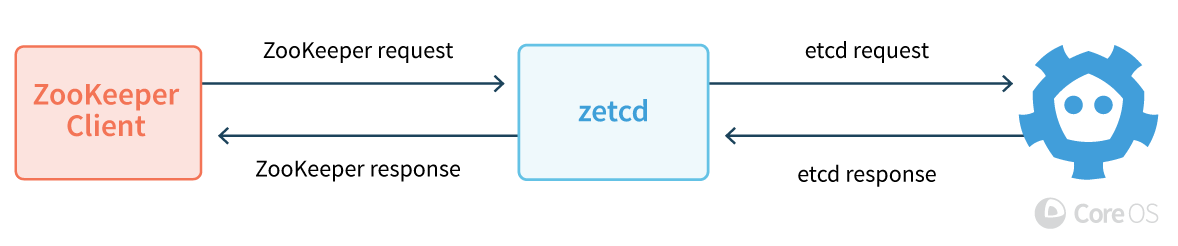
zetcd The agent is deployed in front of the etcd cluster and serves a simulated ZooKeeper client port, allowing the ZooKeeper application to call etcd natively in the upper layer. Generally speaking, zetcd accepts ZooKeeper client requests, converts them into etcd's data model and API, forwards the requests to etcd, and then forwards the return information back in a way that the client can understand. The performance of zetcd is comparable to ZooKeeper, and it simplifies the management and operation complexity between ZooKeeper cluster and etcd. This article will reveal how to use zetcd, how zetcd works, and performance benchmarks.
What zetcd needs to run is a go compiler, source code obtained from the Internet, and a system that can run etcd. The following example shows how to obtain the zetcd source code and run the ZooKeeper command on zetcd. Since both etcd and zetcd are built based on the development branch, it is not recommended to do this in a production environment. This is just a simple example to explain how to use it.
First, obtain etcd and zetcd source code and compile it into binary code:
go get github.com/coreos/etcd/cmd/etcd
go get github.com/coreos/zetcd/cmd/zetcd
Secondly, run etcd and connect zetcd to etcd client server:
#etcd uses localhost:2379 by default
etcd &
zetcd -zkaddr localhost:2181 -endpoints localhost:2379 &
Try zetd by adding a subscription and creating a key:
go install github.com/coreos/zetcd/cmd/zkctl
zkctl watch / &
zkctl create /abc "foo"
Conceptually, the above example completes adding a layer of zetcd to a single etcd instance.
In depth, zetcd will translate ZooKeeper's data model into an adapted etcd API. For key lookups, zetcd converts the ZooKeeper hierarchical directory into etcd's flat binary keyspace. To manage metadata, when writing to the etcd backend, zetcd utilizes memory-level transactions to securely and atomically update the information to ZooKeeper znode information.
ZooKeeper lists keys in directory mode (getChildren), while etcd uses interval (Range) mode. The following figure explains how zetcd encodes keys under etcd to effectively support listing in directory form. All zetcd keys in etcd have a prefix that includes the full directory name (for example: "/" and "/abc" represent depths of 0 and 1 respectively). To list a directory, zetcd issues a prefixed range request (for example, ["/zk/key/002/abc/", "/zk/key/002/abc0") to list the directories that satisfy the directory depth and path. All keys under /abc/. The depth limit only applies to the directory itself; if zetcd only uses the path but not the depth, etcd will return all keys in this directory, and zetcd will discard the result, otherwise only the keys in this directory will be returned.
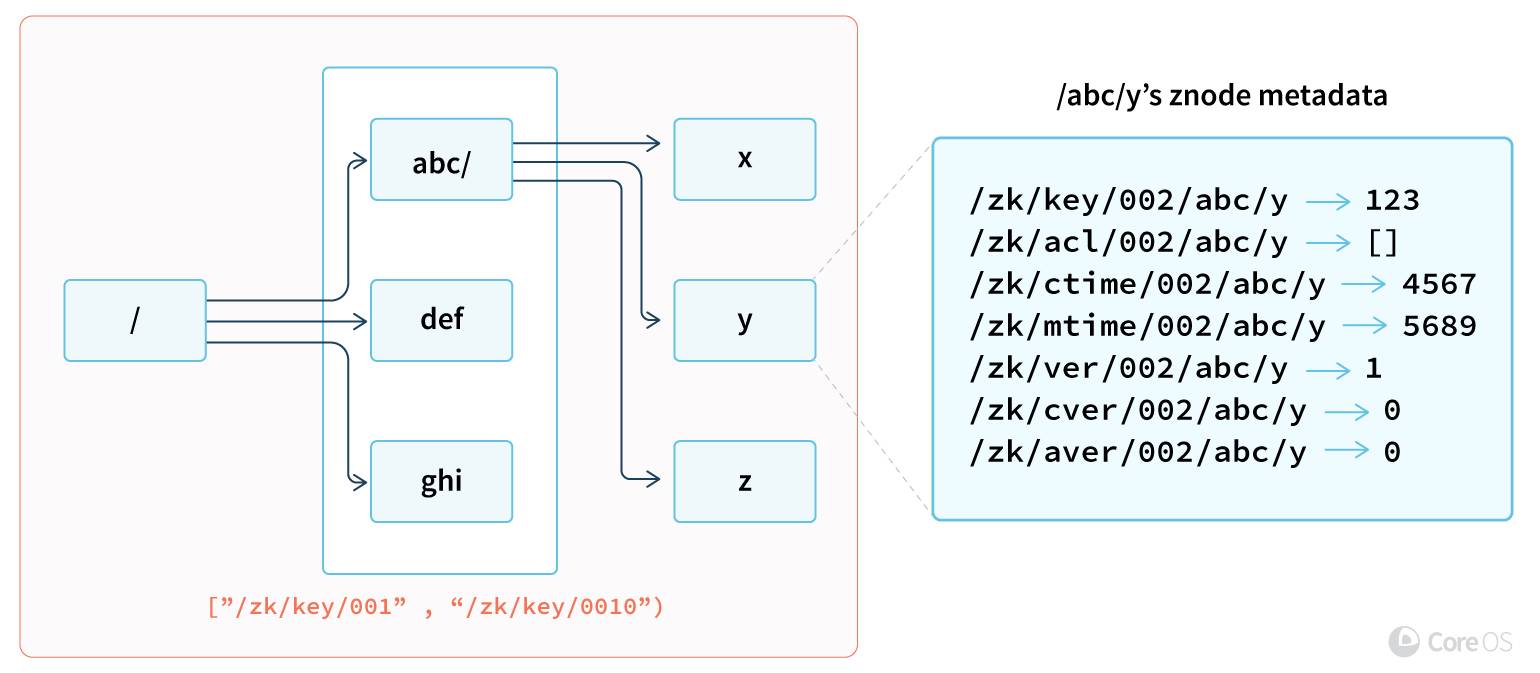
Each ZooKeeper key has some metadata in the ZNode, that is, key adjustment, version and permissions, etc. Although etcd also has metadata for each key, it is much simpler than ZNode. For example, because there is no directory, there is no subversion, because etcd uses a role-based authentication mechanism, there is no ACL, and because the actual clock is out of scope, There is no timestamp. These additional metadata will be mapped to corresponding keys to describe a complete ZNode. When modifying metadata, zetcd uses memory-level soft transactions to automatically update a subset of keys, ensuring that ZNodes can remain consistent without expensive locking mechanisms.
In addition, zetcd can perform dynamic verification with an authorized ZooKeeper server. For comparison, zetcd can connect to both etcd and an external ZooKeeper server. When the client initiates a request to zetcd in this mode, the request will be forwarded to both zetcd and the ZooKeeper server. If the data responded by the two servers is inconsistent, zetcd will flag a warning for this response.
由于数据的转换以及额外的网络开销,也许很容易觉得这样的模拟不切实际。尽管对于ZooKeeper或者etcd集群来说,zetcd有额外的花销,但是它仍然有一个优势,即某些etcd应用安装完毕后仍然需要ZooKeeper来协调的场景。例如,早期用户报告称在zetcd里通过etcd的TLS加密流量比一个类似的经典ZooKeeper配置更简单。在这些场景中,支持同一种ZooKeeper协议所带来的简单可靠性比性能更重要一些。 跟etcd性能工具的接口及报告形式类似,zetcd命令行工具zkboom可以用来判断一个zetcd的性能基准是否满足要求。其它ZooKeeper性能工具应该也可以用在zetcd;zkboom为用户提供了便利,我们不妨试试用它来做下创建key的测试:
go get github.com/coreos/zetcd/cmd/zkboom
zkboom --conns=50 --total=10000 --endpoints=localhost:2181 create
zetcd应当可以为小负载提供充分的性能保障。一个简单两节点配置的延迟基准表明zetcd是可以承受大量请求的。具体配置为两台Linux服务器通过一个千兆交换机互联,其中一台设备在RAID磁盘配置上运行代理和和服务端,另外一台设备用于产生客户请求。zkbook通过创建一个空的key存储,然后从中读取128Kbytes的键值对来进行测量。用户请求被限制在每秒2500个请求,然后逐渐增加并发客户端数量。ZooKeeper 3.4.10和etcd结果对比见下图。
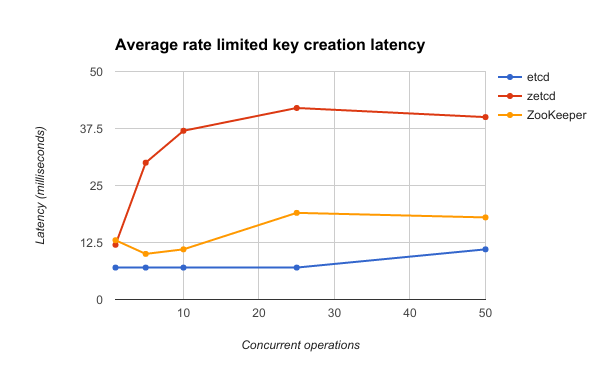
下图揭示了zetcd客户端并发数与创建key的平均延迟之间的关系。由于etcd在延迟上比ZooKeeper要有5-35ms的优势,zetcd有足够余地处理由于额外负载和网络跳转造成的延迟。比起ZooKeeper,zetcd代理始终还是存在20ms左右的差距,但是从处理2500请求的吞吐量数据来看,并没有出现队列堵塞。一种对zetcd写比较慢的解释是,与读不一样,由于数据模型上存在差异,所以在每个ZooKeeper key写时需要写多个key。
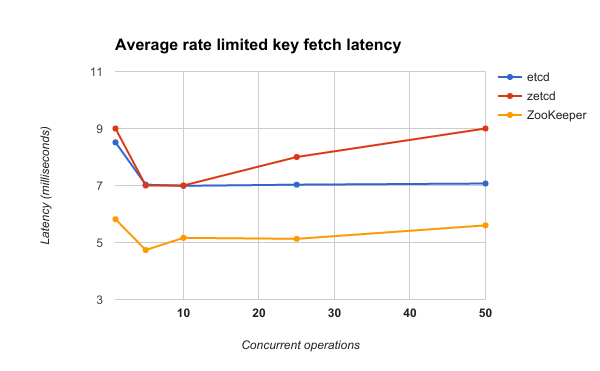
下图揭示了zetcd客户端并发数与key取值的平均延迟之间的关系。由于ZooKeeper的取值延迟比etcd要快那么2ms左右,想要zetcd提供数据的速度快过ZooKeeper的话恐怕还得依赖于etcd本身性能的进一步提升。然而,尽管zetcd需要从etcd请求额外的key来模拟Zookeeper znode的元数据,zetcd的命中延迟在等待etcd key提取数据方面只增加了大概1.5ms。zetcd在key的数据提取操作方面仅需一次往返,因为读请求会被打包到一个etcd事务中。
zetcd承诺上述性能基准测试的结果是合理的,在可接受的延迟情况下,可以轻松支撑每秒上千个操作。以上模拟对于Mesos,Kafka和Drill替代ZooKeeper提供了一个替代选择。但是对于zetcd本身来说性能方面仍有不少的提升空间。与此同时测试更多的ZooKeeper应用也会进一步推动zetcd成为ZooKeeper服务器的替代品。
zetcd从去年十月开始在开源社区发行,最近刚发布第一个版本:zetcd v0.0.1。尽管是第一个beta发行版,但是已经为未来生产系统提供稳定管理和部署。如果跟etcd配合起来使用,运行zetcd的系统将会一套自驱动的“ZooKeeper”集群,它可以自动后台升级,备份和TLS管理。
etcd为分布式系统提供可靠、高效的配置管理服务,在Docker、Kubernetes、Mesos等平台中扮演了越来越重要的角色。作为2013年开始的项目,它还很年轻,官方文档中缺乏实现上全面、系统的介绍,本课程深入浅出地介绍了etcd的实现,并为运维和二次开发提供了系统的指导和建议。
The above is the detailed content of zetcd solves how to remove the dependence of applications on ZooKeeper. For more information, please follow other related articles on the PHP Chinese website!

Hot AI Tools

Undresser.AI Undress
AI-powered app for creating realistic nude photos

AI Clothes Remover
Online AI tool for removing clothes from photos.

Undress AI Tool
Undress images for free

Clothoff.io
AI clothes remover

Video Face Swap
Swap faces in any video effortlessly with our completely free AI face swap tool!

Hot Article
Hot Tools

Notepad++7.3.1
Easy-to-use and free code editor

SublimeText3 Chinese version
Chinese version, very easy to use

Zend Studio 13.0.1
Powerful PHP integrated development environment

Dreamweaver CS6
Visual web development tools

SublimeText3 Mac version
God-level code editing software (SublimeText3)
Hot Topics
 1655
1655
 14
1414
52
1307
25
1253
29
1227
24
14
1414
52
1307
25
1253
29
1227
24

 Linux Architecture: Unveiling the 5 Basic Components
Apr 20, 2025 am 12:04 AM
Linux Architecture: Unveiling the 5 Basic Components
Apr 20, 2025 am 12:04 AM
The five basic components of the Linux system are: 1. Kernel, 2. System library, 3. System utilities, 4. Graphical user interface, 5. Applications. The kernel manages hardware resources, the system library provides precompiled functions, system utilities are used for system management, the GUI provides visual interaction, and applications use these components to implement functions.
 vscode terminal usage tutorial
Apr 15, 2025 pm 10:09 PM
vscode terminal usage tutorial
Apr 15, 2025 pm 10:09 PM
vscode built-in terminal is a development tool that allows running commands and scripts within the editor to simplify the development process. How to use vscode terminal: Open the terminal with the shortcut key (Ctrl/Cmd). Enter a command or run the script. Use hotkeys (such as Ctrl L to clear the terminal). Change the working directory (such as the cd command). Advanced features include debug mode, automatic code snippet completion, and interactive command history.
 How to check the warehouse address of git
Apr 17, 2025 pm 01:54 PM
How to check the warehouse address of git
Apr 17, 2025 pm 01:54 PM
To view the Git repository address, perform the following steps: 1. Open the command line and navigate to the repository directory; 2. Run the "git remote -v" command; 3. View the repository name in the output and its corresponding address.
 How to run java code in notepad
Apr 16, 2025 pm 07:39 PM
How to run java code in notepad
Apr 16, 2025 pm 07:39 PM
Although Notepad cannot run Java code directly, it can be achieved by using other tools: using the command line compiler (javac) to generate a bytecode file (filename.class). Use the Java interpreter (java) to interpret bytecode, execute the code, and output the result.
 What is the main purpose of Linux?
Apr 16, 2025 am 12:19 AM
What is the main purpose of Linux?
Apr 16, 2025 am 12:19 AM
The main uses of Linux include: 1. Server operating system, 2. Embedded system, 3. Desktop operating system, 4. Development and testing environment. Linux excels in these areas, providing stability, security and efficient development tools.
 vscode Previous Next Shortcut Key
Apr 15, 2025 pm 10:51 PM
vscode Previous Next Shortcut Key
Apr 15, 2025 pm 10:51 PM
VS Code One-step/Next step shortcut key usage: One-step (backward): Windows/Linux: Ctrl ←; macOS: Cmd ←Next step (forward): Windows/Linux: Ctrl →; macOS: Cmd →
 How to run sublime after writing the code
Apr 16, 2025 am 08:51 AM
How to run sublime after writing the code
Apr 16, 2025 am 08:51 AM
There are six ways to run code in Sublime: through hotkeys, menus, build systems, command lines, set default build systems, and custom build commands, and run individual files/projects by right-clicking on projects/files. The build system availability depends on the installation of Sublime Text.
 laravel installation code
Apr 18, 2025 pm 12:30 PM
laravel installation code
Apr 18, 2025 pm 12:30 PM
To install Laravel, follow these steps in sequence: Install Composer (for macOS/Linux and Windows) Install Laravel Installer Create a new project Start Service Access Application (URL: http://127.0.0.1:8000) Set up the database connection (if required)
