

How to create timeline animation in PPT

php editor Xigua will introduce you in detail how to create timeline animation in PPT. Timeline animation is a commonly used display method in PPT production, which can vividly show the development process of events. With simple operations, you can easily create vivid and interesting timeline animations to make your PPT more vivid and attractive. Next, let’s follow the editor’s steps and learn how to create timeline animation!
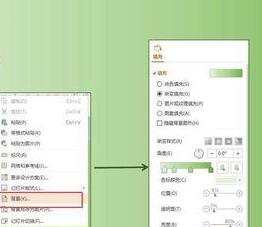
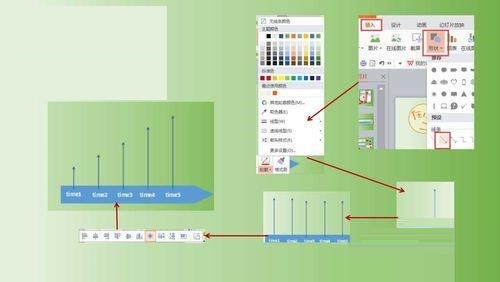
1. After creating the presentation, stay on the single page where you want to create the timeline, right-click and select [Background]. On the right side there will be a window with all settings for the background. Set the background color and other settings you need.
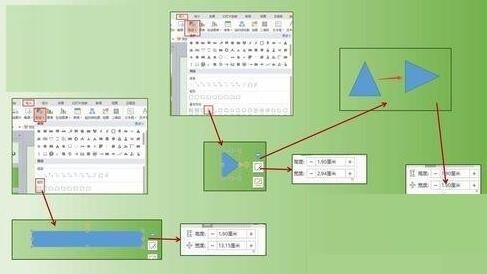
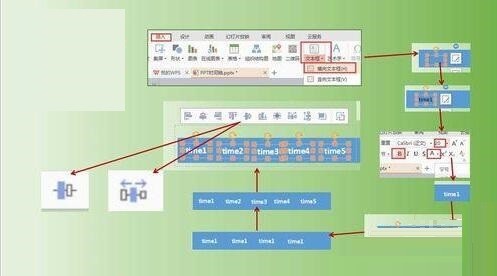
2. After setting the background, you can create the [axis] of the timeline. Specific operations:
(1) Insert [rectangle],
(2) Look at the height of this rectangle (the size of this shape can be set at will).
(3) Insert another shape - triangle.
(4) Rotate the triangle so that one side is vertical.
(5) Select the triangle and set its height to the same value as the high position of the rectangle.
(6) Connect the triangle with the rectangle.
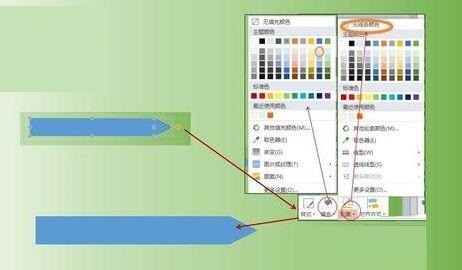
3. Change the color of the timeline. Specific operations:
(1) Hold down ctrl and click with the mouse to select the rectangle and triangle.
(2) Set the outline to [None] and the color fill to your favorite color.
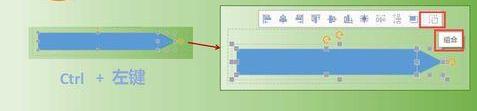
4. After adjusting the axis, color and outline of the timeline, merge them into one graphic. Specific operations:
(1) Hold down ctrl and click the mouse Click to select the rectangle and triangle.
(2) You can see the [Combination] logo above the picture, click on it, or you can find [Combination] in [Drawing Tools].
5. The axis has been completed. Now we need to complete some data information. Specific operations:
(1) Insert a [horizontal text box] on the timeline.
(2) Information is entered in the text box.
(3) Adjust the [Font], [Color], [Size] and other information of the font.
(4) Hold down ctrl and drag the mouse to copy the text box.
(5) Modify the content of the text box,
(6) Hold down ctrl, click with the mouse to select all text boxes, and set [Vertical Centering] and [Horizontal Distribution].
6. Full timeline, specific operations:
(1) Insert shape--arrow.
(2) Change the color of the arrow, the thickness of the line, etc. ‘
(3) Copy the arrow and arrange it on the timeline.
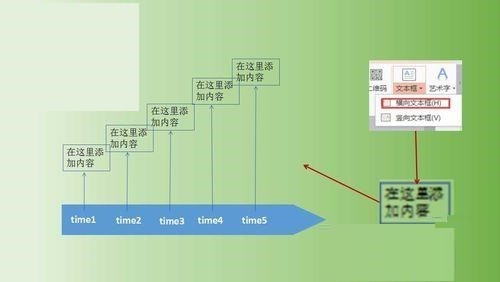
7. Add content to the timeline, specific operations:
(1) Insert text box.
(2)Input content.
(3) Adjust the color, size and other information of the font and arrange it above the arrow.
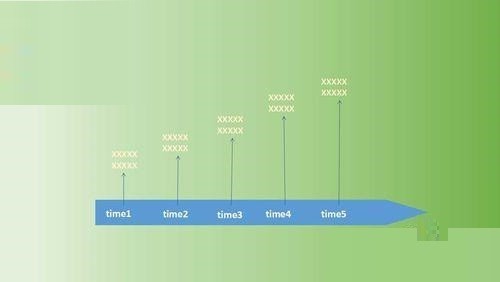
8. After the above steps, a static plane timeline is ready. If you add a little animation to this static timeline, the effect will be better.
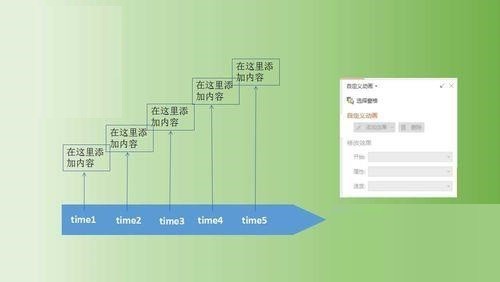
9. The specific animation can be set at will. See how the editor sets it up. Specific operations:
(1) Select the axis of the timeline, and the axis At the time point above, set it to enter the animation [box shape].
(2) Click on the first arrow from the left to set the animation [Fly In].
(3) Click on the text box above the first arrow and set the animation [Fly In].
(4) By analogy, continue setting to the right.
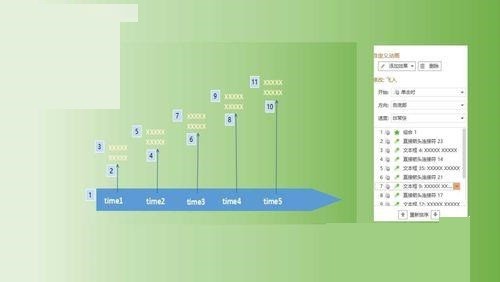
10. The final effect is as shown below.
The above is the detailed content of How to create timeline animation in PPT. For more information, please follow other related articles on the PHP Chinese website!

Hot AI Tools

Undresser.AI Undress
AI-powered app for creating realistic nude photos

AI Clothes Remover
Online AI tool for removing clothes from photos.

Undress AI Tool
Undress images for free

Clothoff.io
AI clothes remover

Video Face Swap
Swap faces in any video effortlessly with our completely free AI face swap tool!

Hot Article
Hot Tools

Notepad++7.3.1
Easy-to-use and free code editor

SublimeText3 Chinese version
Chinese version, very easy to use

Zend Studio 13.0.1
Powerful PHP integrated development environment

Dreamweaver CS6
Visual web development tools

SublimeText3 Mac version
God-level code editing software (SublimeText3)
Hot Topics
 1653
1653
 14
1413
52
1304
25
1251
29
1224
24
14
1413
52
1304
25
1251
29
1224
24

 How to do vertical centering of bootstrap
Apr 07, 2025 pm 03:21 PM
How to do vertical centering of bootstrap
Apr 07, 2025 pm 03:21 PM
Use Bootstrap to implement vertical centering: flexbox method: Use the d-flex, justify-content-center, and align-items-center classes to place elements in the flexbox container. align-items-center class method: For browsers that do not support flexbox, use the align-items-center class, provided that the parent element has a defined height.
 Do I need to use flexbox in the center of the Bootstrap picture?
Apr 07, 2025 am 09:06 AM
Do I need to use flexbox in the center of the Bootstrap picture?
Apr 07, 2025 am 09:06 AM
There are many ways to center Bootstrap pictures, and you don’t have to use Flexbox. If you only need to center horizontally, the text-center class is enough; if you need to center vertically or multiple elements, Flexbox or Grid is more suitable. Flexbox is less compatible and may increase complexity, while Grid is more powerful and has a higher learning cost. When choosing a method, you should weigh the pros and cons and choose the most suitable method according to your needs and preferences.
 How to elegantly solve the problem of too small spacing of Span tags after a line break?
Apr 05, 2025 pm 06:00 PM
How to elegantly solve the problem of too small spacing of Span tags after a line break?
Apr 05, 2025 pm 06:00 PM
How to elegantly handle the spacing of Span tags after a new line In web page layout, you often encounter the need to arrange multiple spans horizontally...
 Master SQL SELECT statements: A comprehensive guide
Apr 08, 2025 pm 06:39 PM
Master SQL SELECT statements: A comprehensive guide
Apr 08, 2025 pm 06:39 PM
SQLSELECT statement Detailed explanation SELECT statement is the most basic and commonly used command in SQL, used to extract data from database tables. The extracted data is presented as a result set. SELECT statement syntax SELECTcolumn1,column2,...FROMtable_nameWHEREconditionORDERBYcolumn_name[ASC|DESC]; SELECT statement component selection clause (SELECT): Specify the column to be retrieved. Use * to select all columns. For example: SELECTfirst_name,last_nameFROMemployees; Source clause (FR
 How to center images in containers for Bootstrap
Apr 07, 2025 am 09:12 AM
How to center images in containers for Bootstrap
Apr 07, 2025 am 09:12 AM
Overview: There are many ways to center images using Bootstrap. Basic method: Use the mx-auto class to center horizontally. Use the img-fluid class to adapt to the parent container. Use the d-block class to set the image to a block-level element (vertical centering). Advanced method: Flexbox layout: Use the justify-content-center and align-items-center properties. Grid layout: Use the place-items: center property. Best practice: Avoid unnecessary nesting and styles. Choose the best method for the project. Pay attention to the maintainability of the code and avoid sacrificing code quality to pursue the excitement
 How to adjust the wordpress article list
Apr 20, 2025 am 10:48 AM
How to adjust the wordpress article list
Apr 20, 2025 am 10:48 AM
There are four ways to adjust the WordPress article list: use theme options, use plugins (such as Post Types Order, WP Post List, Boxy Stuff), use code (add settings in the functions.php file), or modify the WordPress database directly.
 How to make images center horizontally in div
Apr 07, 2025 am 07:39 AM
How to make images center horizontally in div
Apr 07, 2025 am 07:39 AM
How to center the image in the Bootstrap div: Best choice: Use Flexbox (add the d-flex and justify-content-center classes) for old projects: Use text-align (set img tag to inline-block; and add text-align: center;)
 What changes have been made with the list style of Bootstrap 5?
Apr 07, 2025 am 11:09 AM
What changes have been made with the list style of Bootstrap 5?
Apr 07, 2025 am 11:09 AM
Bootstrap 5 list style changes are mainly due to detail optimization and semantic improvement, including: the default margins of unordered lists are simplified, and the visual effects are cleaner and neat; the list style emphasizes semantics, enhancing accessibility and maintainability.
