

What are the techniques for explaining ppt?

php editor Apple will share with you some tips on explaining PPT today. As a commonly used presentation tool, PPT plays an important role in speeches and work. By rationally using PPT, you can improve the effectiveness of your speech, attract the audience's attention, and deliver information more clearly and vividly. Let's learn about some techniques for explaining PPT, hoping to help everyone improve their speech and presentation skills.
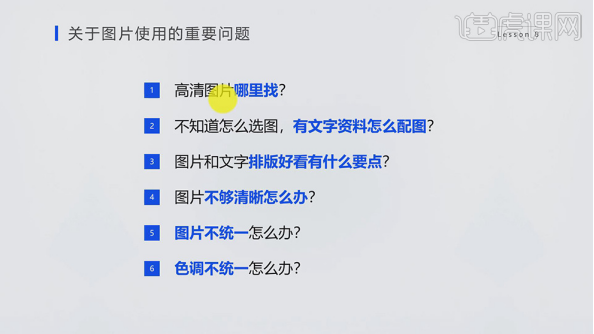
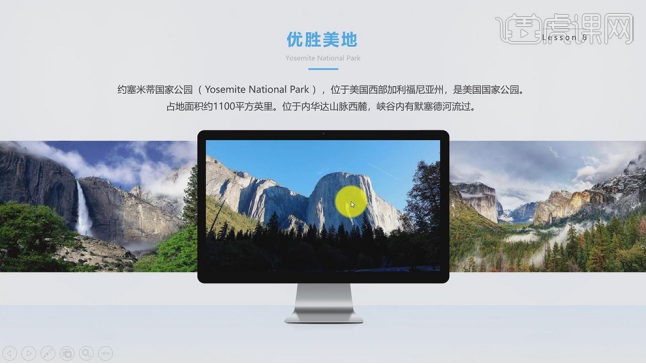
1. Important issues regarding the use of pictures mainly include the six parts in the picture.
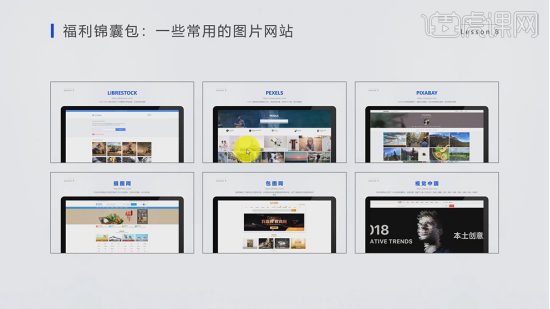
#2. Finding a good picture includes a good picture search thinking and a good picture search website.

3. Some commonly used websites for searching pictures are: LIBRESTOCK, PEXELS, PLXABAY, as well as Photo Network, Baotu Network, and Visual China.
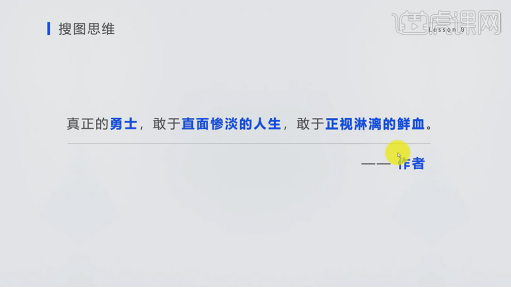
#4. For a paragraph to find keywords for picture-searching thinking, only by refining the keywords accurately can you find better-looking pictures.
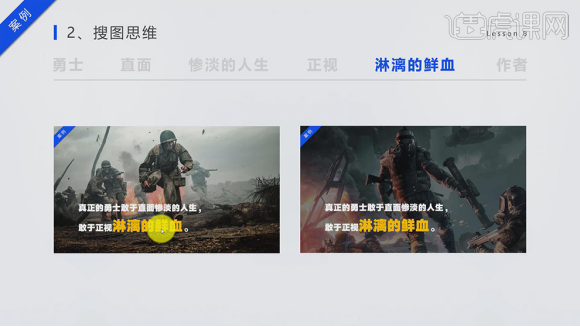
#5. Search for images for each keyword, format sentences for the found images, and enlarge the corresponding keywords in the images for each keyword.
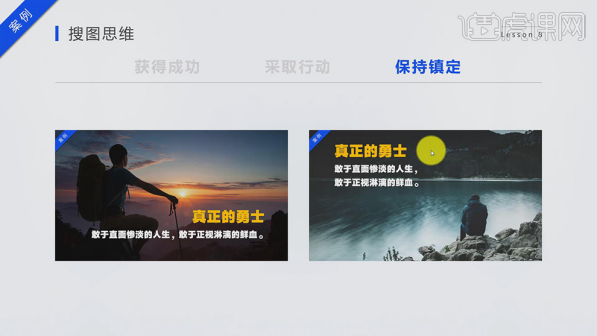
# 6. You can also use pictures to convey some emotional issues. You can also find pictures of emotions through keywords.

7. There is also a result expressed through pictures selected by keywords, and these results can be success, taking action or staying calm.
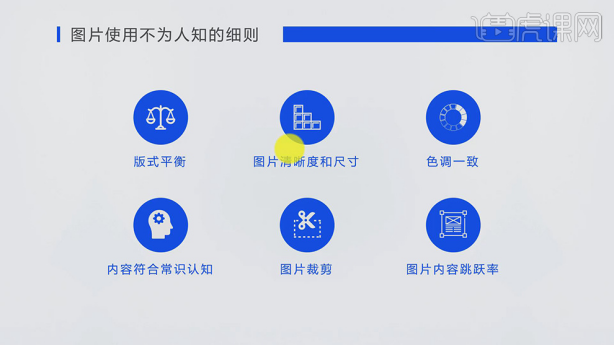
8. The unknown details of the use of pictures include six parts: board balance, picture clarity and size, consistent tone, content consistent with common sense, and picture cropping and picture content jump.
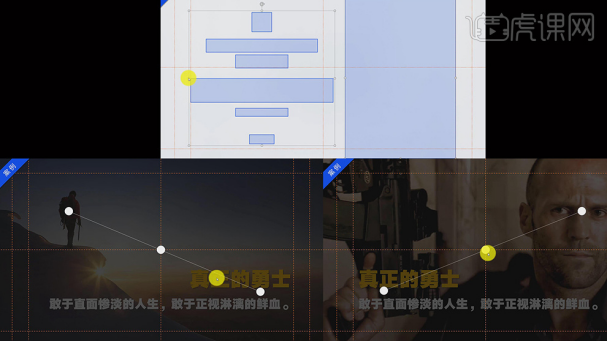
#9. The balance of the board style includes some distribution of text and main body in the composition.
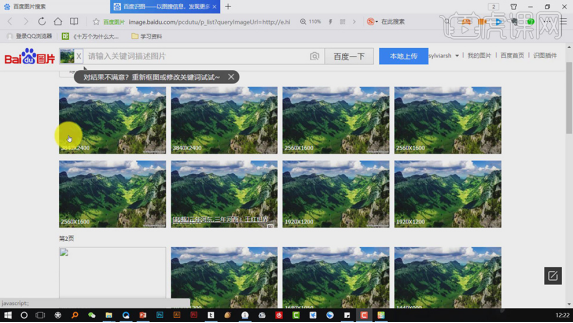
#10. For clarity, you can choose a large-sized picture through image search to get a better understanding of the clarity.
#11. Tonal consistency is to make the overall feeling of the picture consistent by adjusting the color.
#12. The content conforms to common sense and is the unity of the upper and lower spacing of the composition of the picture and the size and tone of the subject.
#13. Image cropping means that the same position of the image in the screen after cropping is relatively uniform, and the distance between the top and bottom is consistent with the size of the image.

14. To jump in the picture content, you need to choose the shooting angle and color of the picture that are more outstanding and enlarge it.

#15. Cut out the image to create a digging effect, making the character more three-dimensional.

#16. Through the symmetry of the picture, the picture is extended.
#17. When cropping the picture, keep the subject object larger and type the text to form a contrast in size. This layout will look more beautiful.

#18. Make the picture more three-dimensional by changing the direction of the picture.
#19. The method of extending the picture is to put similar pictures next to it to make the picture have an extension effect, making the picture richer.
The above is a comprehensive introduction to the related skills of PPT, but if you want to make a good enough PPT, you still need to practice more, open the PPT and practice!
The above is the detailed content of What are the techniques for explaining ppt?. For more information, please follow other related articles on the PHP Chinese website!

Hot AI Tools

Undresser.AI Undress
AI-powered app for creating realistic nude photos

AI Clothes Remover
Online AI tool for removing clothes from photos.

Undress AI Tool
Undress images for free

Clothoff.io
AI clothes remover

Video Face Swap
Swap faces in any video effortlessly with our completely free AI face swap tool!

Hot Article
Hot Tools

Notepad++7.3.1
Easy-to-use and free code editor

SublimeText3 Chinese version
Chinese version, very easy to use

Zend Studio 13.0.1
Powerful PHP integrated development environment

Dreamweaver CS6
Visual web development tools

SublimeText3 Mac version
God-level code editing software (SublimeText3)
Hot Topics


 How to remove the date that appears automatically when printing from PPT handouts
Mar 26, 2024 pm 08:16 PM
How to remove the date that appears automatically when printing from PPT handouts
Mar 26, 2024 pm 08:16 PM
1. Let me first talk about the method I used at the beginning, maybe everyone is using it too. First, open [View]——]Remarks Template[. 2. A place where you can actually see the date after opening it. 3. Select it first and delete it. 4. After deleting, click [Close Master View]. 5. Open the print preview again and find that the date is still there. 6. In fact, this date was not deleted here. It should be in the [Handout Master]. Look at the picture below. 7. Delete the date after you find it. 8. Now when you open the preview and take a look, the date is no longer there. Note: In fact, this method is also very easy to remember, because the printed handouts are handouts, so you should look for the [Handout Master].
 Introduction to the method of inserting heptagons into PPT slides
Mar 26, 2024 pm 07:46 PM
Introduction to the method of inserting heptagons into PPT slides
Mar 26, 2024 pm 07:46 PM
1. Open the PPT slide document, and in the [Outline, Slide] column on the left side of the PPT, click to select the slide where you want to insert the basic [shape]. 2. After selecting, select the [Insert] menu in the function menu bar above the PPT and click. 3. After clicking the [Insert] menu, the [Insert] submenu bar pops up below the function menu bar. Select the [Shape] menu in the [Insert] submenu bar. 4. Click the [Shape] menu to pop up the preset shape type selection page. 5. In the shape type selection page, select the [Heptagon] shape and click. 6. After clicking, move the mouse to the slide editing interface, press the mouse to draw, and release the mouse after the drawing is completed. Complete the insertion of the [heptagon] shape.
 How to insert excel icons into PPT slides
Mar 26, 2024 pm 05:40 PM
How to insert excel icons into PPT slides
Mar 26, 2024 pm 05:40 PM
1. Open the PPT and turn the page to the page where you need to insert the excel icon. Click the Insert tab. 2. Click [Object]. 3. The following dialog box will pop up. 4. Click [Create from file] and click [Browse]. 5. Select the excel table to be inserted. 6. Click OK and the following page will pop up. 7. Check [Show as icon]. 8. Click OK.
 How to deal with blanks when playing PPT slides
Mar 26, 2024 pm 07:51 PM
How to deal with blanks when playing PPT slides
Mar 26, 2024 pm 07:51 PM
1. Open the PPT file you created and select the second slide. 2. On the second slide, select one of the pictures, and then select [Animation] to add any animation effect. 3. In the start column of the animation bar, change [While Standalone] to [After Previous Animation], and you will see that the picture animation label [1] will change to [0]. Do the same for subsequent slides, and you can see the effect by playing the slide at the end.
 Win11 Tips Sharing: Skip Microsoft Account Login with One Trick
Mar 27, 2024 pm 02:57 PM
Win11 Tips Sharing: Skip Microsoft Account Login with One Trick
Mar 27, 2024 pm 02:57 PM
Win11 Tips Sharing: One trick to skip Microsoft account login Windows 11 is the latest operating system launched by Microsoft, with a new design style and many practical functions. However, for some users, having to log in to their Microsoft account every time they boot up the system can be a bit annoying. If you are one of them, you might as well try the following tips, which will allow you to skip logging in with a Microsoft account and enter the desktop interface directly. First, we need to create a local account in the system to log in instead of a Microsoft account. The advantage of doing this is
 Restricted processing operation method is prompted when embedding fonts in PPT
Mar 26, 2024 pm 08:41 PM
Restricted processing operation method is prompted when embedding fonts in PPT
Mar 26, 2024 pm 08:41 PM
1. Open PowerPoint and edit the PPT document. 2. Find the font that cannot be embedded, select the text box, right-click - Cut/Copy. 3. Right-click the blank space of the slide and select [Paste] - Paste as picture. 4. It is simple and convenient to save the font as a picture, but the font cannot be modified. Method 2: Software FontCreatorProgram 1. Download the FontCreatorProgram software from the Internet, unzip the file, and select the [FCP.EXE] file to install. 2. Open the installed software, click [File] - Open - Installed Fonts in the window menu bar, and select PPT. For fonts that cannot be embedded, click [OK]. 3. Select [
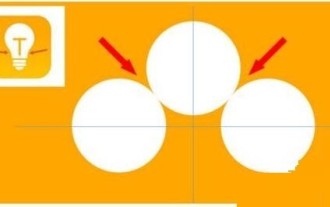 Detailed steps for designing a light bulb icon in PPT
Mar 26, 2024 pm 08:36 PM
Detailed steps for designing a light bulb icon in PPT
Mar 26, 2024 pm 08:36 PM
1. Hold down the shift key to draw a perfect circle in PPT, then copy the perfect circle twice, and stick it together as shown below. Notice in the picture below that the blue guide line exactly crosses the diameters of the three circles. (Pay attention to the arrow in the picture below). 2. The next step is very important. Insert an inverted trapezoid in the middle of the three circles. The long side of the trapezoid is at the diameter of the middle circle. (arrow in the picture below). 3. If you view the perspective version, please pay attention to the position pointed by the arrow in the picture below. Exactly tangent to both circles. 4. Next, adjust the remaining details. For example, the rounded corners at the bottom of the light bulb are actually completed with a rounded rectangle. The effect is as follows. Especially the small semicircle at the bottom is solved by arc graphics. 2 points in the picture below. 5. After using the direction arrows to fine-tune the distance between the graphics, add a T shape in the middle.
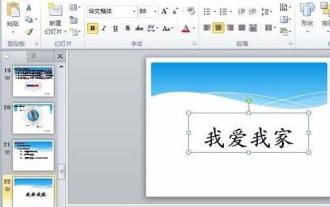 How to create underline animation when mouse clicks text in PPT
Mar 26, 2024 pm 06:40 PM
How to create underline animation when mouse clicks text in PPT
Mar 26, 2024 pm 06:40 PM
1. Enter text. 2. Select the shape under Insert and select Line within it. 3. Draw a straight line below the word love. 4. Select the straight line, then select the animation menu, and choose an animation effect from it. 5. Play the animation. At this time, there are no horizontal lines under the text. 6. Click the mouse, and a horizontal line will appear under the text.
