

How to download nvidia control panel

Steps to download the nvidia control panel: 1. Visit the NVIDIA official website; 2. Navigate to the driver download page; 3. Select the graphics card model and operating system; 4. Search and download the driver; 5. Install the driver program; 6. Restart the computer; 7. Verify the installation of the NVIDIA control panel.

The NVIDIA control panel is an important tool for NVIDIA graphics card users. It provides a wealth of graphics card setting options to help users optimize graphics card performance and improve computer experience. The following will introduce the download steps of NVIDIA Control Panel in detail to ensure that users can obtain and install this tool correctly and safely.
Step one: Visit NVIDIA official website
First, open your browser and enter "NVIDIA official website" to search. Find NVIDIA's official website in the search results and open it. Please note, make sure you visit the official website to avoid downloading malware or viruses.
Step 2: Navigate to the driver download page
On the homepage of the NVIDIA official website, you can see various product information and news. In order to download the NVIDIA Control Panel, you need to find the page related to driver downloads. Usually, you can find "Drivers" or a similar option in the navigation menu on the home page, click on it to enter the driver download page.
Step 3: Select the graphics card model and operating system
On the driver download page, you will see a series of options to choose from. First, you need to select your graphics card model. If you're not sure about your graphics card model, you can check it in your computer's Device Manager. In Device Manager, expand the "Display Adapters" option and your NVIDIA graphics card model will be displayed.
Next, select your operating system version. Make sure to choose the version that exactly matches your computer's operating system, including the operating system's bitness (32-bit or 64-bit). Selecting the wrong driver version may cause installation failure or system instability.
Step 4: Search and download the driver
After selecting the graphics card model and operating system, click "Search" or a similar button, and the system will automatically filter Find the driver that suits you. In the search results, find the corresponding driver and click the "Download" button to start downloading.
Please note that your network connection must be stable during the download process to avoid download failure or slow download speed. At the same time, pay attention to the source and size of the downloaded file to ensure that the correct driver file is downloaded.
Step 5: Install the driver
After the download is complete, find the downloaded driver file and double-click it to start the installation. During the installation process, you may need to read and agree to NVIDIA's license agreement, select the installation location and components, etc. Please follow the installation wizard prompts until the installation is complete.
During the installation process, if your computer prompts that administrator rights are required, please make sure to run the installer as an administrator. In addition, if you have installed other versions of NVIDIA drivers before, the installer may prompt you to uninstall the old version before installing it again. Please follow the prompts to ensure proper installation of the new driver.
Step 6: Restart the computer
After the installation is complete, you need to restart the computer for the new driver to take effect. During the restart process, be sure to close all running programs and save your work progress to avoid losing data.
Step 7: Verify the installation of NVIDIA Control Panel
After restarting the computer, you can open it by right-clicking on a blank space on the desktop and selecting "NVIDIA Control Panel" . If the control panel can open normally and display various setting options, then you have successfully installed the NVIDIA control panel.
In addition, you can also check the status of the graphics card driver in your computer's Device Manager. In Device Manager, expand the "Display Adapters" option and your NVIDIA graphics card should show up as "NVIDIA GeForce" or something similar, with no yellow exclamation mark or question mark, indicating that the driver has been installed correctly and is working fine.
Summary:
With the above seven steps, you should be able to successfully download and install the NVIDIA Control Panel. Please note, be vigilant during the download and installation process and make sure to download the driver from the official website and follow the correct installation steps. In addition, regularly updating NVIDIA drivers is also an important measure to maintain stable and improved graphics card performance.
Finally, if you encounter any problems or difficulties during the installation process, you can consult NVIDIA's official documentation, online tutorials or seek community support. NVIDIA's official website usually provides detailed driver installation tutorials and FAQs to help you solve problems you encounter. At the same time, you can also seek help in relevant technical forums or communities, where there are many experienced users and technical experts willing to share their knowledge and experience.
By correctly downloading and installing the NVIDIA Control Panel, you will be able to take full advantage of the performance of your NVIDIA graphics card and enjoy a better computer experience. Whether you're gaming, video editing, or other graphics-intensive tasks, the NVIDIA Control Panel will be your essential tool for optimizing graphics card performance.
The above is the detailed content of How to download nvidia control panel. For more information, please follow other related articles on the PHP Chinese website!

Hot AI Tools

Undresser.AI Undress
AI-powered app for creating realistic nude photos

AI Clothes Remover
Online AI tool for removing clothes from photos.

Undress AI Tool
Undress images for free

Clothoff.io
AI clothes remover

Video Face Swap
Swap faces in any video effortlessly with our completely free AI face swap tool!

Hot Article
Hot Tools

Notepad++7.3.1
Easy-to-use and free code editor

SublimeText3 Chinese version
Chinese version, very easy to use

Zend Studio 13.0.1
Powerful PHP integrated development environment

Dreamweaver CS6
Visual web development tools

SublimeText3 Mac version
God-level code editing software (SublimeText3)
Hot Topics


 How to switch language in Adobe After Effects cs6 (Ae cs6) Detailed steps for switching between Chinese and English in Ae cs6 - ZOL download
May 09, 2024 pm 02:00 PM
How to switch language in Adobe After Effects cs6 (Ae cs6) Detailed steps for switching between Chinese and English in Ae cs6 - ZOL download
May 09, 2024 pm 02:00 PM
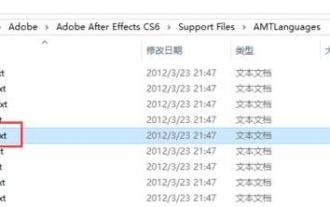
1. First find the AMTLanguages folder. We found some documentation in the AMTLanguages folder. If you install Simplified Chinese, there will be a zh_CN.txt text document (the text content is: zh_CN). If you installed it in English, there will be a text document en_US.txt (the text content is: en_US). 3. Therefore, if we want to switch to Chinese, we need to create a new text document of zh_CN.txt (the text content is: zh_CN) under the AdobeAfterEffectsCCSupportFilesAMTLanguages path. 4. On the contrary, if we want to switch to English,
 How to shoot videos on Douyin? How to turn on the microphone for video shooting?
May 09, 2024 pm 02:40 PM
How to shoot videos on Douyin? How to turn on the microphone for video shooting?
May 09, 2024 pm 02:40 PM
As one of the most popular short video platforms today, the quality and effect of Douyin’s videos directly affect the user’s viewing experience. So, how to shoot high-quality videos on Douyin? 1. How to shoot videos on Douyin? 1. Open the Douyin APP and click the "+" button in the middle at the bottom to enter the video shooting page. 2. Douyin provides a variety of shooting modes, including normal shooting, slow motion, short video, etc. Choose the appropriate shooting mode according to your needs. 3. On the shooting page, click the "Filter" button at the bottom of the screen to choose different filter effects to make the video more personalized. 4. If you need to adjust parameters such as exposure and contrast, you can click the "Parameters" button in the lower left corner of the screen to set it. 5. During shooting, you can click on the left side of the screen
 How to adjust video opacity in Vegas Pro How to adjust video opacity
May 09, 2024 pm 01:13 PM
How to adjust video opacity in Vegas Pro How to adjust video opacity
May 09, 2024 pm 01:13 PM
1. First, after opening the VegasPro software interface, click the import button under the file menu in the upper left corner and find the media option. 2. Then, after completing the material import, click and drag it into the timeline panel. 3. Then, after selecting the video track, Click the slider button on the left 4. Finally, drag to adjust according to the transparency ratio you want.
 How to export audio files separately from EDIUS Tutorial on exporting audio files separately from EDIUS
May 09, 2024 pm 01:10 PM
How to export audio files separately from EDIUS Tutorial on exporting audio files separately from EDIUS
May 09, 2024 pm 01:10 PM
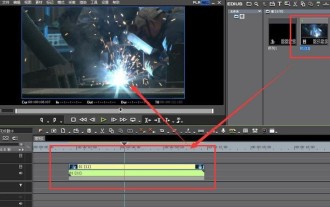
First, after importing the video material, drag and drop it onto the audio and video track. Then, open the sound waveform display of the track, click the unlock button in the connection group column, and then edit the anchor point for the detached audio track and set the starting point of playback. and the end position. Then, right-click the Output to File button. Finally, find the audio option in the format settings window that opens, click to select PCMWAVE format output and save it.
 How to cut video with FastStone Capture. Introduction to how to cut video.
May 09, 2024 pm 01:01 PM
How to cut video with FastStone Capture. Introduction to how to cut video.
May 09, 2024 pm 01:01 PM
First, open FastStoneCapture, click the icon as shown below, then click Edit, select the video file to be edited, then click Cut on the upper left to pop up a dialog box, after setting the duration, click OK to appear above [This part will was deleted when saving the file], click the big save as last in the upper left corner, a dialog box will pop up, after saving, click OK, play the video and you will find that the video time has been cut. The editor has shared here the method of cutting videos with FastStoneCapture. Don’t miss this article.
 Detailed steps for creating camera lens zoom-in effect in AE
May 09, 2024 pm 01:00 PM
Detailed steps for creating camera lens zoom-in effect in AE
May 09, 2024 pm 01:00 PM
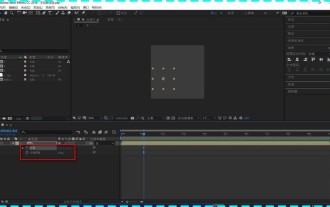
1. Open AE, [New Synthesis]. 2. Select the text tool, create a text layer, and enter a few words. 3. Convert the text layer to a 3D layer and click the 3D icon. 4. Right-click in the blank area of the layer panel and select [New]-[Camera]. 5. Set the parameters of the camera to whatever you want. After setting, click [OK]. 6. Select [Camera Tool] on the toolbar, and use the camera tool to adjust the lens effect of the material. 7. Zoom in effect: Just right-click the video preview window and move the mouse upward. 8. Of course, the right click only previews the zoom-in effect. If you want to achieve the zoom-in effect of the material, you need to add keyframes. Press the shortcut key [P] to bring up the [Position] option. The last parameter is to adjust the distance of the lens.
 How to view layer properties in Ae How to view layer properties in Ae
May 09, 2024 pm 03:13 PM
How to view layer properties in Ae How to view layer properties in Ae
May 09, 2024 pm 03:13 PM
1. First, after opening the interface, click the mouse to select the layer and find the location of the attribute bar. 2. Then, hold down the shift key on the keyboard, and then press the T key on the keyboard to open the opacity attribute. 3. Finally, press P respectively. , S, A, and R keys to display all layer properties such as position, anchor point, scale, rotation, and opacity.
 What systems does oracle database support?
May 10, 2024 am 02:06 AM
What systems does oracle database support?
May 10, 2024 am 02:06 AM
Operating systems supported by Oracle Database include Unix systems (such as Linux, Solaris), Windows systems (such as Windows Server, Windows 11), z/OS, and macOS, with specific requirements varying by database version and operating system. Supported platforms include x86, x86-64, ARM, SPARC, and POWER, depending on database version and compatibility. Factors such as hardware compatibility, performance, security, usability, and budget constraints should be considered when selecting an operating system.
