
 Backend Development
PHP Tutorial
Detailed explanation of Discuz waterproof wall settings: protecting the website from malicious attacks
Backend Development
PHP Tutorial
Detailed explanation of Discuz waterproof wall settings: protecting the website from malicious attacks
Detailed explanation of Discuz waterproof wall settings: protecting the website from malicious attacks

Note: The following is the content of the detailed article on Discuz waterproof wall settings. The article has a total word count of more than 1,500 words and includes detailed steps and code examples for setting up a waterproof wall.
In today’s Internet era, it has become normal for websites to suffer from various malicious attacks. In order to protect website security, waterproof wall technology is a common and effective measure. This article will explain in detail how to set up a waterproof wall in the Discuz forum system to protect the website from malicious attacks.
1. What is a waterproof wall?
Waterproof wall (CAPTCHA, full name: Completely Automated Public Turing test to tell Computers and Humans Apart) is an automated testing tool that distinguishes between machines and humans and is designed to protect websites from malicious robot attacks. Classic waterproof wall forms include image verification codes, text verification codes, mathematical verification codes, etc., which require users to complete a simple verification operation before submitting information.
2. Discuz waterproof wall setting steps
Step 1: Log in to the Discuz forum backend
First, use the administrator account to log in to the Discuz forum backend management page.
Step 2: Enter the "Global" settings
Find the "Global" option in the left menu of the background management page, and click to enter the "Global" settings page.
Step 3: Enter "Waterproof Wall Settings"
In the "Global" settings page, find the "Waterproof Wall Settings" option and click to enter the waterproof wall settings page.
Step 4: Enable the waterproof wall function
In the waterproof wall settings page, find the "Enable waterproof wall function" option and check the check box to enable the waterproof wall function.
Step 5: Select the waterproof wall type
In the waterproof wall settings page, select the appropriate waterproof wall type, which can be a graphical verification code, a text verification code or a mathematical verification code, etc. Choose the most suitable type according to the actual situation of the website.
Step 6: Save settings
After completing the selection of waterproof wall type, remember to click the "Submit" or "Save Settings" button at the bottom of the page to save the settings and take effect.
3. Waterproof wall setting code example
Graphic verification code setting example:
<!-- 在注册页面添加图形验证码 -->
<div>
    <label for="captcha">验证码:</label>
    <img src="captcha.php" alt="captcha">
    <input type="text" id="captcha" name="captcha">
</div>Text verification code setting example:
<!-- 在登录页面添加文字验证码 -->
<div>
    <label for="captcha">验证码:</label>
    <input type="text" id="captcha" name="captcha" placeholder="请输入验证码">
    <span>ABCD</span> <!-- 显示验证码文字提示 -->
</div>Mathematical verification code setting example :
<!-- 在留言板页面添加数学验证码 -->
<div>
    <label for="captcha">验证码:</label>
    <input type="text" id="captcha" name="captcha">
    <span>3 + 5 = ?</span> <!-- 显示数学计算题 -->
</div>The above are code examples set in the Discuz forum system for different types of waterproof walls. Developers can adjust the style and position according to needs.
Conclusion
Through the detailed explanation of Discuz waterproof wall settings, I hope readers can better protect their websites from malicious attacks. Remember to update the verification code content regularly to ensure the security and effectiveness of the waterproof wall. May your website be safe and stable, and your user experience be better!
The above is the article content for Discuz waterproof wall settings. Hope this helps. If you need more technical support or other content, please feel free to contact me.
The above is the detailed content of Detailed explanation of Discuz waterproof wall settings: protecting the website from malicious attacks. For more information, please follow other related articles on the PHP Chinese website!

Hot AI Tools

Undresser.AI Undress
AI-powered app for creating realistic nude photos

AI Clothes Remover
Online AI tool for removing clothes from photos.

Undress AI Tool
Undress images for free

Clothoff.io
AI clothes remover

Video Face Swap
Swap faces in any video effortlessly with our completely free AI face swap tool!

Hot Article
Hot Tools

Notepad++7.3.1
Easy-to-use and free code editor

SublimeText3 Chinese version
Chinese version, very easy to use

Zend Studio 13.0.1
Powerful PHP integrated development environment

Dreamweaver CS6
Visual web development tools

SublimeText3 Mac version
God-level code editing software (SublimeText3)
Hot Topics


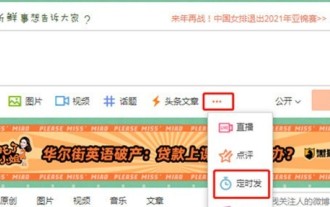
 How to set the scheduled time for publishing works on Douyin? How does it set the video duration?
Mar 27, 2024 pm 06:11 PM
How to set the scheduled time for publishing works on Douyin? How does it set the video duration?
Mar 27, 2024 pm 06:11 PM
Publishing works on Douyin can attract more attention and likes, but sometimes it may be difficult for us to publish works in real time. In this case, we can use Douyin's scheduled release function. Douyin’s scheduled release function allows users to automatically publish works at a scheduled time, which can better plan the release plan and increase the exposure and influence of the work. 1. How to set the scheduled time for publishing works on Douyin? To set a scheduled release time, first go to Douyin's personal homepage, find the "+" button in the upper right corner, and click to enter the release page. There is a clock icon in the lower right corner of the publishing page. Click to enter the scheduled publishing interface. In the interface, you can choose the type of work you want to publish, including short videos, long videos, and live broadcasts. Next, you need to set a time for your work to be published. TikTok provides
 Setting up Chinese with VSCode: The Complete Guide
Mar 25, 2024 am 11:18 AM
Setting up Chinese with VSCode: The Complete Guide
Mar 25, 2024 am 11:18 AM
VSCode Setup in Chinese: A Complete Guide In software development, Visual Studio Code (VSCode for short) is a commonly used integrated development environment. For developers who use Chinese, setting VSCode to the Chinese interface can improve work efficiency. This article will provide you with a complete guide, detailing how to set VSCode to a Chinese interface and providing specific code examples. Step 1: Download and install the language pack. After opening VSCode, click on the left
 How to set up scheduled publishing on Weibo_Tutorial on how to set up scheduled publishing on Weibo
Mar 29, 2024 pm 03:51 PM
How to set up scheduled publishing on Weibo_Tutorial on how to set up scheduled publishing on Weibo
Mar 29, 2024 pm 03:51 PM
1. Open the Weibo client, click the three little dots on the editing page, and then click Scheduled Post. 2. After clicking on scheduled posting, there will be a time option on the right side of the publishing time. Set the time, edit the article, and click on the yellow words in the lower right corner to schedule posting. 3. The mobile version of Weibo does not currently support scheduled publishing. This function can only be used on the PC client!
 How to set the Enter key to send messages in QQ
Mar 25, 2024 pm 07:10 PM
How to set the Enter key to send messages in QQ
Mar 25, 2024 pm 07:10 PM
1. First, click on the mobile phone desktop to enter QQ, and click on the avatar in the upper left corner. 2. Click [Settings] in the lower left corner. 3. Click to open [Accessibility]. 4. Then we only need to click to turn on the [Enter key to send message] switch.
 Where is the Douyin tag set? How can it be tagged so that it can be pushed accurately?
Mar 27, 2024 am 11:01 AM
Where is the Douyin tag set? How can it be tagged so that it can be pushed accurately?
Mar 27, 2024 am 11:01 AM
As one of the most popular short video platforms in the world, Douyin allows everyone to become a creator and share every moment of life. For Douyin users, tags are a very important function. It can help users better classify and retrieve content, and also allows the platform to push appropriate content to users more accurately. So, where are the Douyin tags set? This article will explain in detail how to set up and use tags on Douyin. 1. Where is the Douyin tag set? Using tags on Douyin can help users better classify and label their works, making it easier for other users to find and follow them. The method to set the label is as follows: 1. Open the Douyin APP and log in to your account. 2. Click the "+" sign at the bottom of the screen and select the "Publish" button. 3.
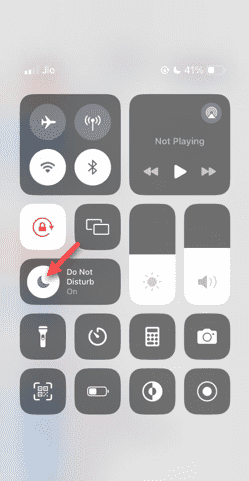 Do Not Disturb Mode Not Working in iPhone: Fix
Apr 24, 2024 pm 04:50 PM
Do Not Disturb Mode Not Working in iPhone: Fix
Apr 24, 2024 pm 04:50 PM
Even answering calls in Do Not Disturb mode can be a very annoying experience. As the name suggests, Do Not Disturb mode turns off all incoming call notifications and alerts from emails, messages, etc. You can follow these solution sets to fix it. Fix 1 – Enable Focus Mode Enable focus mode on your phone. Step 1 – Swipe down from the top to access Control Center. Step 2 – Next, enable “Focus Mode” on your phone. Focus Mode enables Do Not Disturb mode on your phone. It won't cause any incoming call alerts to appear on your phone. Fix 2 – Change Focus Mode Settings If there are some issues in the focus mode settings, you should fix them. Step 1 – Open your iPhone settings window. Step 2 – Next, turn on the Focus mode settings
 How to set wallpaper on wallpaperengine
Mar 23, 2024 pm 09:06 PM
How to set wallpaper on wallpaperengine
Mar 23, 2024 pm 09:06 PM
Wallpaperengine is a very popular wallpaper software, so how to set wallpaper? Users need to start this software first, and then click on a wallpaper. After double-clicking the wallpaper, the settings will be automatically performed. This introduction to how to set the wallpaper will tell you the specific method. The following is a detailed introduction. Come and take a look. . How to set wallpaper on wallpaperengine? Answer: Double-click the wallpaper to automatically set it. Specific methods: 1. First, click on the software in steam to start it. 2. Choose to start wallpaperengine. 3. After entering the interface, select a wallpaper you like and click Confirm to use it. 4. There will be some setting buttons on the right side, which can be used as needed
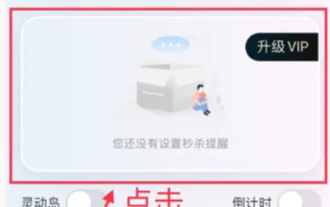 How to set the countdown to grab tickets in Damai
Apr 01, 2024 pm 07:01 PM
How to set the countdown to grab tickets in Damai
Apr 01, 2024 pm 07:01 PM
When buying tickets on Damai.com, in order to ensure that the ticket purchase time can be accurately grasped, users can set a floating clock to grab tickets. The detailed setting method is below, let us learn together. How to bind the floating clock to Damai 1. Click to open the floating clock app on your phone to enter the interface, and click on the location where the flash sale check is set, as shown in the figure below: 2. After coming to the page of adding new records, click on Damai.com Copy the ticket purchase link page copied in. 3. Next, set the flash sale time and notification time below, turn on the switch button behind [Save to Calendar], and click [Save] below. 4. Click to turn on [Countdown], as shown in the figure below: 5. When the reminder time comes, click the [Start Picture-in-Picture] button below. 6. When the ticket purchase time comes
