

How to detect the camera driver

The camera plays a very important role when we use computers or mobile devices. Whether you are making video calls, taking photos or recording videos, you cannot do without the support of the camera. The correct driver is also very critical for the camera to work properly. This article will explain how to simply check the camera driver to ensure that our camera is working properly.
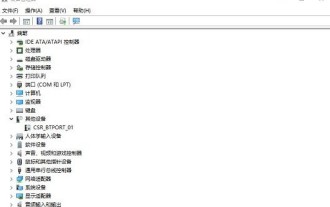
First, we can try to find the device manager in the operating system. In Windows systems, you can enter the device manager interface through the "Start" menu, then find "Control Panel" and then select "Device Manager". In the MacOS system, you can enter the Device Manager through "System Preferences", then select "General", and then click "About This Mac".
In the device manager interface, we can find the camera device. In Windows systems, you can find the "Image Device" or "Camera" option; in MacOS systems, you can find the "Camera" option. Generally, the camera device will have a corresponding icon to facilitate our quick identification.
If we cannot find the camera device or there is an exclamation mark or question mark in the device manager, it means there may be a problem with the camera driver. We can right-click the camera device and select "Properties" to view the device details. In the properties window, we can see the status of the device and driver information. If the status of the device shows "unable to start" or "the driver is not installed correctly", then we need to reinstall the camera driver.
The steps to reinstall the camera driver are as follows:
- In the Device Manager, first try to right-click the camera device and select "Update Driver". The system will try to automatically search for and install the latest drivers.
- If automatic updates cannot solve the problem, we can try to download and install the driver manually. First, we need to determine the brand and model of the camera. You can get this information by looking at the logo on the device or by viewing the details in Device Manager. We can then search and download the latest driver for our device model on the official website of the camera brand. Note, be sure to download and install the driver suitable for our device model and operating system version.
- After the download is completed, we can double-click the installer to perform driver installation. During the installation process, you may need to complete some additional operations according to the instructions of the installation wizard, such as accepting the license agreement, selecting the installation location, etc.
- After the installation is completed, we can restart the computer or mobile device to make the driver take effect.
After completing the above steps, we can enter the device manager again to view the status of the camera device. If the status displays "Normal" or there is no exclamation mark or question mark, then the camera driver has been successfully installed.
In addition to driver issues, camera drivers may also have compatibility issues. If the device manager shows that the camera driver is normal, but we still encounter problems when using the camera, then we can try the following operations:
- Check whether the connection between the camera and the computer or mobile device is stable. You can try replugging or unplugging the cable or replacing the cable.
- Check for operating system and application updates. Occasionally, operating system or application updates may affect camera compatibility. We can try to update the operating system and related applications, and then test whether the camera can work normally again.
- If the above methods still cannot solve the problem, then we can contact the camera’s after-sales service or professional maintenance personnel for consultation and repair.
To sum up, checking the camera driver is an important step to ensure that the camera is working properly. By checking the device status and driver information through Device Manager, reinstalling the driver, and checking compatibility issues, we can solve most camera driver-related problems and restore the camera to normal operation.
The above is the detailed content of How to detect the camera driver. For more information, please follow other related articles on the PHP Chinese website!

Hot AI Tools

Undresser.AI Undress
AI-powered app for creating realistic nude photos

AI Clothes Remover
Online AI tool for removing clothes from photos.

Undress AI Tool
Undress images for free

Clothoff.io
AI clothes remover

Video Face Swap
Swap faces in any video effortlessly with our completely free AI face swap tool!

Hot Article
Hot Tools

Notepad++7.3.1
Easy-to-use and free code editor

SublimeText3 Chinese version
Chinese version, very easy to use

Zend Studio 13.0.1
Powerful PHP integrated development environment

Dreamweaver CS6
Visual web development tools

SublimeText3 Mac version
God-level code editing software (SublimeText3)
Hot Topics
 1659
1659
 14
1416
52
1310
25
1258
29
1232
24
14
1416
52
1310
25
1258
29
1232
24

 What to do if win11 bluetooth cannot be used_win11 bluetooth cannot be connected how to deal with it
May 08, 2024 am 10:37 AM
What to do if win11 bluetooth cannot be used_win11 bluetooth cannot be connected how to deal with it
May 08, 2024 am 10:37 AM
1. First, we click the search button in the taskbar below, search and enter [Device Manager]. 2. Then find our Bluetooth device in the device manager, right-click to select it, and click [Update Driver]. 3. If the Bluetooth device cannot be found in the device manager, then we can download Master Lu and update the driver in it. Method 2: 1. First, we enter [Settings] through the start menu. 2. Find the [devices] device in the setting interface. 3. Then click the [Bluetooth] option, and then set the switch below to [On].
 How to connect Redmi Note13RPro to the computer?
May 09, 2024 pm 06:52 PM
How to connect Redmi Note13RPro to the computer?
May 09, 2024 pm 06:52 PM
The phone Redmi Note13RPro has been very popular recently. Many consumers have purchased this phone. However, many users are using this phone for the first time, so they don’t know how to connect the Redmi Note13RPro to the computer. In this regard, the editor is here to explain to you Detailed tutorial introduction is provided. How to connect Redmi Note13RPro to the computer? 1. Use a USB data cable to connect the Redmi phone to the USB interface of the computer. 2. Open the phone settings, click Options, and turn on USB debugging. 3. Open the device manager on your computer and find the mobile device option. 4. Right-click the mobile device, select Update Driver, and then select Automatically search for updated drivers. 5. If the computer does not automatically search for the driver,
 How to assemble an acer desktop computer?
May 08, 2024 pm 08:25 PM
How to assemble an acer desktop computer?
May 08, 2024 pm 08:25 PM
How to assemble an acer desktop computer? The assembly method of Acer desktop computer is as follows: open the case, install the power supply into the case, and tighten the screws. Install the CPU onto the motherboard, making sure the pins on the CPU are aligned with the slots on the motherboard, and tighten the screws on the CPU heat sink. Install the memory module onto the motherboard, making sure that the bumps on the memory module are aligned with the slots on the motherboard. Press down hard until you hear a "pop" sound to complete the installation. Install graphics cards, sound cards, network cards and other boards onto the motherboard, making sure the screws on the boards are tightened. Install storage devices such as hard drives and optical drives into the chassis, making sure the screws are tightened. Connect the motherboard to the chassis, including power cables, hard drive cables, optical drive cables, etc. Finally, close the chassis cover and tighten the screws to complete the assembly. exist
 Does the newly assembled computer keyboard light not light up?
May 07, 2024 pm 04:40 PM
Does the newly assembled computer keyboard light not light up?
May 07, 2024 pm 04:40 PM
Does the newly assembled computer keyboard light not light up? The motherboard model should be UEFIbios. First find a keyboard with PS2 port, enter bios, turn off UEFI boot, and change to Legacy mode. If there is fast boot, turn off options like FastBoot, UEFI boot, turn on fast boot, and enter the system. USB interface detection may be turned off before, and USB devices can be used to assemble the computer after entering the system. The mouse and keyboard lights do not light up when the computer is turned on? If the keyboard light does not come on, there is a high possibility of memory failure, or it may be caused by static electricity on the motherboard or the motherboard is faulty. Use an eraser to wipe the gold finger of the memory graphics card, and remove and insert the memory several times. The problem remains. There are dual memory sticks and a single memory stick is used for testing. The problem persists. Re-plug the various cables inside and outside the chassis, and then unplug the connector on the motherboard.
 Laptop power on but black screen
May 09, 2024 am 09:04 AM
Laptop power on but black screen
May 09, 2024 am 09:04 AM
What should I do if the laptop power-on indicator light comes on and the screen goes black? It may be caused by poor contact. It is recommended to restart the laptop. If the problem still cannot be solved, the monitor is broken and it is recommended to go to a repair shop for repair. When the notebook is turned on, the screen is black, but there is sound entering the system, and the external monitor is still abnormal. It may be a problem with the graphics card or motherboard. Just remove and replace it. Start switch problem. Black screen when booting, no self-test. Use the meter pin to short-circuit the startup terminal on the motherboard, and it will start normally. Memory stick problem. There will be a long beep when the screen is black when the phone is turned on. Just take out the memory stick, clean it and then plug it back in. cpu problem. It is recommended to use an external monitor of the computer, which is a general desktop monitor, and connect it to the external display interface of the notebook. If a
 What should I do if the Win11 taskbar does not display the time? Introduction to the most effective solutions
May 09, 2024 pm 01:13 PM
What should I do if the Win11 taskbar does not display the time? Introduction to the most effective solutions
May 09, 2024 pm 01:13 PM
The win11 taskbar is very unique. Many users will also adjust the transparency of the taskbar to beautify the taskbar. However, they don’t know what to do when the win11 taskbar does not display the time? Let’s take a look below! 1. Restart Windows 11: Sometimes, restarting the system can solve the taskbar display problem. 2. Check the taskbar settings: right-click an empty space on the taskbar and select "Taskbar Settings". Make sure the "Show time" option is enabled. If it's not enabled, toggle the switch to enable it. 3. Check your date and time settings: Open the Settings app, select Time & Language, then select Date & Time. Make sure the date, time and time zone are set correctly. 4. Update operating system: Make sure your Wind
 What to do if Win11 black screen teaches you how to solve Windows_11 black screen problem
May 08, 2024 pm 03:10 PM
What to do if Win11 black screen teaches you how to solve Windows_11 black screen problem
May 08, 2024 pm 03:10 PM
Windows 11 is the latest operating system launched by Microsoft, which brings a new interface design and more practical functions. However, some users encountered a black screen problem during the upgrade or use process, resulting in the inability to work properly. This article will introduce in detail several methods to effectively solve the black screen problem in Win11 and help you quickly restore the normal operation of the computer. Tool materials: System version: Windows11 (21H2) Brand model: Lenovo Xiaoxin Pro162022, Dell XPS13Plus, Asus ZenBookS13OLED Software version: NVIDIA GeForceExperience3.26.0.160, Intel Driver & SupportAssist
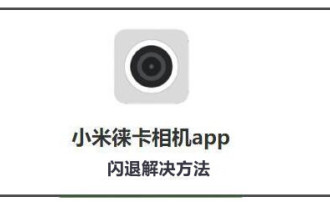 Introduction to solutions to Xiaomi Leica camera crashes
May 08, 2024 pm 03:20 PM
Introduction to solutions to Xiaomi Leica camera crashes
May 08, 2024 pm 03:20 PM
Xiaomi’s new photography software Leica Camera is very popular, but this software will crash when taking pictures. Many users don’t know what’s going on and how to solve it. Let’s take a look at the Xiaomi Leica Camera crash solution. Method. What to do if the Xiaomi Leica camera crashes? Solution 1: 1. First turn off the phone, and then restart the phone after 30 seconds. 2. Then download a camera software of the same type and try to see if it can operate normally. 3. Open the phone settings-camera program-clear cache data. 4. If the problem is still not solved, try backing up the phone data and restoring factory settings. 5. If none of the above points are true, it may be a hardware problem with the camera component, and the phone needs to be returned to the factory for repair and testing. Solution two: 1. Back up important data and open the security center
