

How to install and use i3 window manager on Linux

i3wm (i3 Window Manager) is written in C language and is a lightweight, easy to configure and popular tiling window manager. Unlike traditional desktop environments, Tiling Manager provides just enough functionality to arrange windows on the screen in an easy and attractive way that suits your workflow.
i3 is a minimalist tiling manager that intelligently arranges windows on the screen in a seamless, non-overlapping manner. Other tiling managers include xmonad and wmii.
In this guide, we will explain how to install and use i3 window manager on a Linux desktop system.
Benefits of i3 Window Manager
Unlike X Windows managers such as Fluxbox, KWin and enlightenment, i3 comes with a package of goodies, which are listed below, to provide a smooth desktop experience.
1. Resource friendly
Unlike full-featured desktop environments like GNOME, the i3 window manager is very minimalist and designed to simplify and increase efficiency. Because resource utilization is low, it compensates for the window manager's fast tiling issues and leaves plenty of memory and CPU for other applications.
2. Flexibility
In addition to being able to automatically arrange windows in a neat and organized manner, i3 is also fully configurable and you can adjust a few settings to match your preferred screen layout. Using external tools, you can enhance the appearance by selecting a background image, adjusting transparency and window fade effects, and enabling desktop notifications.
3. Easy to navigate between workspaces
Since you can easily configure various keyboard shortcuts, i3 Collage Manager provides an easy and fast way to switch between workspaces. You can be more productive by seamlessly grouping windows to fit your workflow.
Install i3 Window Manager on Linux
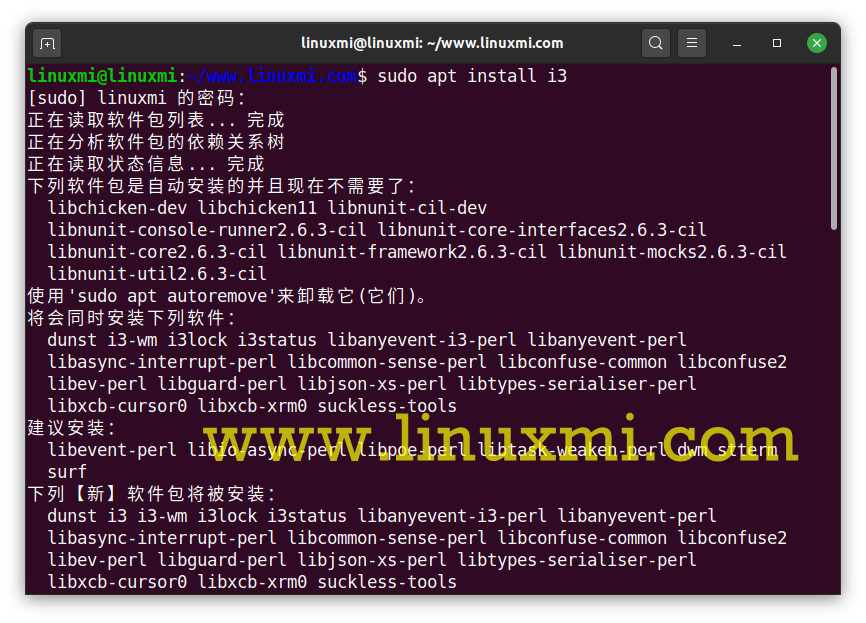
The i3 tiling manager is available in the Debian, Ubuntu, and Linux Mint repositories and can be installed using the apt package manager as shown below.
linuxmi@linuxmi:~/www.linuxmi.com
sudo apt install i3
On Fedora distributions, i3 can be installed using the dnf package manager as shown below.
linuxmi@linuxmi:~/www.linuxmi.com
sudo dnf install i3
After the installation is completed, you need to restart the system, click the small gear in the login window, and select the 'i3' option, as shown in the picture.

Select i3 window manager
After logging in, you will be prompted to generate a configuration file that will be saved in your home directory ~/.config/i3/config, or use the default of saving the file in the /etc/i3 directory.
In this guide we will be using the first option, so we will press ENTER to place the configuration file in our home directory.
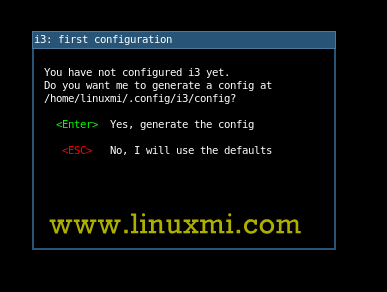
Create i3 configuration file
Next, you will need to define the i3 wm modifier key, also known as the $mod key, which can be the Windows logo key or the Alt key (Ubuntu Chinese Alt key). Use the up or down arrow keys to select your preferred modifier key.
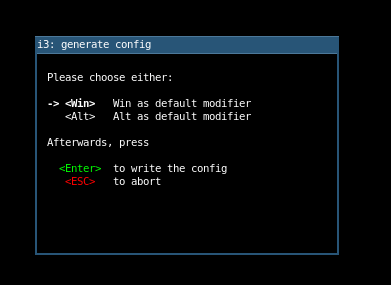
Set i3 modification key
After completing the initial setup. The default i3 window doesn't matter much, it saves as a blank screen and displays the status bar at the bottom of the screen.

i3 window status bar
How to use i3 window manager in Linux
Once you have the i3 Tile Manager installed, here are some keyboard combinations you can use to easily start using the Tile Manager.
Start terminal:$mod ENTER.
Launch an application using the menu: $mod d This will open a menu at the top of your screen, allowing you to search for a specific application by entering keywords in the text box provided.
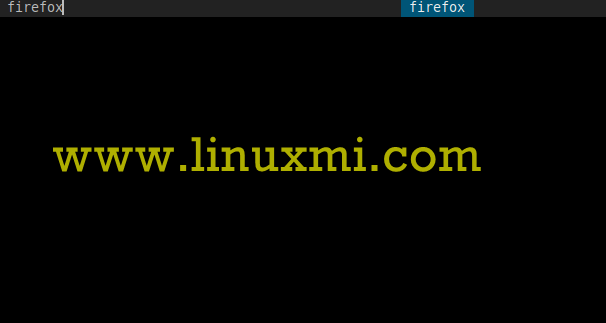
Launch application in i3 window
- Enter full screen mode - on and off: $mod f.
- Exit the application window; $mod Shift q.
- Restart i3: $mod Shift r.
- Exit i3 window manager: $mod Shift e.
Operation window
When you launch an application, they are usually tiles, as shown below. Obviously, the workspace looks crowded without multiple tiled windows, leaving you feeling overwhelmed.

Operation i3 window manager window
For a better experience, you can detach a window and put it in the foreground, so you have a "floating" experience. This can be achieved by pressing the $mod Shift Space combination.
In the example below, the terminal window is in the foreground rather than tiled.

Separate window in the foreground
In addition, you can also make the window full screen and return to tiled mode by clicking the $mod f combination and repeating the same operation.
i3 Status Bar
This is one of the most important but still overlooked parts of the i3 tiling manager. It displays information such as available disk space, IP address and bandwidth rate, battery level, date and time.

i3 window status bar
i3 basic configuration
If you did not generate the configuration file in your home directory, you can find it in the /etc/i3/config path. To copy it to your home directory
linuxmi@linuxmi:~/www.linuxmi.com$ sudo cp /etc/i3/config ~/.config/i3
Then change ownership to your user
linuxmi@linuxmi:~/www.linuxmi.com$ sudo chown user:group ~/.config/i3
The configuration file comes with many settings that you can adjust to your liking to change the appearance of the tile manager. You can change the color of the workspace, change the layout of the windows, and resize the windows. We won’t spend too much time on that or now. The purpose of this guide is to introduce you to i3 Tiling Manager and the basic features to get started.
The above is the detailed content of How to install and use i3 window manager on Linux. For more information, please follow other related articles on the PHP Chinese website!

Hot AI Tools

Undresser.AI Undress
AI-powered app for creating realistic nude photos

AI Clothes Remover
Online AI tool for removing clothes from photos.

Undress AI Tool
Undress images for free

Clothoff.io
AI clothes remover

Video Face Swap
Swap faces in any video effortlessly with our completely free AI face swap tool!

Hot Article
Hot Tools

Notepad++7.3.1
Easy-to-use and free code editor

SublimeText3 Chinese version
Chinese version, very easy to use

Zend Studio 13.0.1
Powerful PHP integrated development environment

Dreamweaver CS6
Visual web development tools

SublimeText3 Mac version
God-level code editing software (SublimeText3)
Hot Topics


 What computer configuration is required for vscode
Apr 15, 2025 pm 09:48 PM
What computer configuration is required for vscode
Apr 15, 2025 pm 09:48 PM
VS Code system requirements: Operating system: Windows 10 and above, macOS 10.12 and above, Linux distribution processor: minimum 1.6 GHz, recommended 2.0 GHz and above memory: minimum 512 MB, recommended 4 GB and above storage space: minimum 250 MB, recommended 1 GB and above other requirements: stable network connection, Xorg/Wayland (Linux)
 Linux Architecture: Unveiling the 5 Basic Components
Apr 20, 2025 am 12:04 AM
Linux Architecture: Unveiling the 5 Basic Components
Apr 20, 2025 am 12:04 AM
The five basic components of the Linux system are: 1. Kernel, 2. System library, 3. System utilities, 4. Graphical user interface, 5. Applications. The kernel manages hardware resources, the system library provides precompiled functions, system utilities are used for system management, the GUI provides visual interaction, and applications use these components to implement functions.
 vscode terminal usage tutorial
Apr 15, 2025 pm 10:09 PM
vscode terminal usage tutorial
Apr 15, 2025 pm 10:09 PM
vscode built-in terminal is a development tool that allows running commands and scripts within the editor to simplify the development process. How to use vscode terminal: Open the terminal with the shortcut key (Ctrl/Cmd). Enter a command or run the script. Use hotkeys (such as Ctrl L to clear the terminal). Change the working directory (such as the cd command). Advanced features include debug mode, automatic code snippet completion, and interactive command history.
 How to check the warehouse address of git
Apr 17, 2025 pm 01:54 PM
How to check the warehouse address of git
Apr 17, 2025 pm 01:54 PM
To view the Git repository address, perform the following steps: 1. Open the command line and navigate to the repository directory; 2. Run the "git remote -v" command; 3. View the repository name in the output and its corresponding address.
 How to run java code in notepad
Apr 16, 2025 pm 07:39 PM
How to run java code in notepad
Apr 16, 2025 pm 07:39 PM
Although Notepad cannot run Java code directly, it can be achieved by using other tools: using the command line compiler (javac) to generate a bytecode file (filename.class). Use the Java interpreter (java) to interpret bytecode, execute the code, and output the result.
 Where to write code in vscode
Apr 15, 2025 pm 09:54 PM
Where to write code in vscode
Apr 15, 2025 pm 09:54 PM
Writing code in Visual Studio Code (VSCode) is simple and easy to use. Just install VSCode, create a project, select a language, create a file, write code, save and run it. The advantages of VSCode include cross-platform, free and open source, powerful features, rich extensions, and lightweight and fast.
 What is the main purpose of Linux?
Apr 16, 2025 am 12:19 AM
What is the main purpose of Linux?
Apr 16, 2025 am 12:19 AM
The main uses of Linux include: 1. Server operating system, 2. Embedded system, 3. Desktop operating system, 4. Development and testing environment. Linux excels in these areas, providing stability, security and efficient development tools.
 vscode terminal command cannot be used
Apr 15, 2025 pm 10:03 PM
vscode terminal command cannot be used
Apr 15, 2025 pm 10:03 PM
Causes and solutions for the VS Code terminal commands not available: The necessary tools are not installed (Windows: WSL; macOS: Xcode command line tools) Path configuration is wrong (add executable files to PATH environment variables) Permission issues (run VS Code as administrator) Firewall or proxy restrictions (check settings, unrestrictions) Terminal settings are incorrect (enable use of external terminals) VS Code installation is corrupt (reinstall or update) Terminal configuration is incompatible (try different terminal types or commands) Specific environment variables are missing (set necessary environment variables)
