win7 hardware wizard
php editor Xiaoxin introduces to you a practical tool software-Win7 Hardware Wizard. This is a hardware driver installation tool specially designed for Windows 7 systems, which can help users install and update computer hardware drivers quickly and accurately. Whether it is a newly purchased hardware device or an old device that needs to be updated, the Win7 Hardware Wizard can provide the latest driver download and installation guidance, allowing users to easily solve hardware compatibility issues and improve computer performance and stability. Use the Win7 Hardware Wizard to make driver installation no longer a hassle and make your computer more efficient and smooth!
Windows 7 to Windows 10 Upgrade Process
You can upgrade Windows 7 to Windows 10 using the in-place upgrade option without losing files or having to wipe the device.
The upgrade task can be performed using the Media Creation Tool, which is not only available for Windows 7 but also for devices running Windows 8.1.
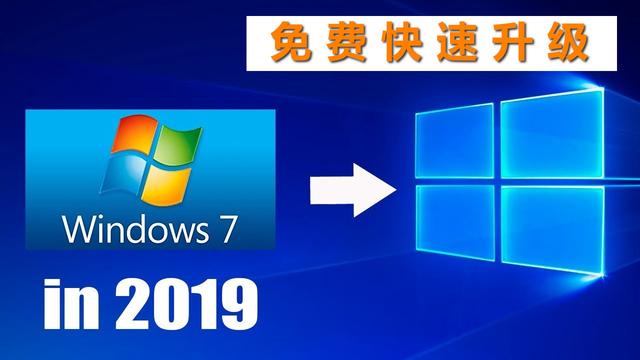
Here are the steps to upgrade from Windows 7 to Windows 10. If you wish to upgrade and perform a clean installation, please follow the step-by-step instructions below.
〓〓〓 Contents〓〓〓
Minimum hardware requirements for Windows 10 How to create a full backup of Windows 7 How to upgrade Windows 7 to Windows 10 1. Minimum hardware requirements for Windows 10The following is to install Windows 10 Minimum hardware requirements for versions 1903 and 1909:
Processor: 1GHz or faster CPU or system-on-chip (SoC)
Memory: 1GB (32-bit) or 2GB (64-bit )
Hard disk space:
Existing installation: 32-bit 16GB or 64-bit 20GB
New installation or new PC: 32GB or larger
Graphics card : DirectX 9 or later with WDDM 1.0 driver
Display resolution: 800×600
Networking: Wi-Fi or Ethernet adapter
To succeed To upgrade to Windows 10, you'll also need to be running the latest version of your current operating system, in this case "Windows 7 Service Pack 1". If you haven't installed this update yet, you can download it here:
https://www.microsoft.com/en-us/download/details.aspx?id=5842
Tip: You can check which version of Windows you are running by opening the Run command (Windows R keyboard shortcut), typing winver, and clicking the OK button.
To upgrade Windows 7 to Windows 10, a valid Windows 10 product key is required as you will no longer be able to use the Windows 7 product key. If you try, you will receive the message "This product key is invalid. Please check and try again, or try using a different key."
Update September 19, 2019: You can still upgrade to Windows 10 using a Windows 7 product key, but please note that Microsoft no longer offers free upgrades, so Microsoft can stop activating devices using this method at any time.
2. How to create a full backup of Windows 7Although Microsoft has been improving the upgrade process of Windows 10, there are always upgrade failures. In order to avoid any problems, you should make sure to perform a complete backup of the system. in case for need. Fortunately, both Windows 7 and Windows 8.1 come with system image backup tools that can create backups of your entire computer.
3. How to upgrade Windows 7 to Windows 10Before starting the upgrade process, it is recommended that you uninstall all software that may prevent you from successfully upgrading to Windows 10, such as antivirus software, security software, and old third-party applications program.
You should also disconnect all hardware connected to your computer, including printers, phones, cameras, external hard drives, and other USB peripherals. Sometimes, connected devices can be the cause of system failure during an upgrade.
Use the following steps to upgrade from Windows 7 to Windows 10:
1. Download the Media Creation Tool from Microsoft.
Tip: If you are using an older version of Internet Explorer, you may not be able to access the Microsoft download website. If this is the case, you will need to use another web browser, such as Google Chrome.
2. Click the "Download Tool Now" button and save the installer on your computer.
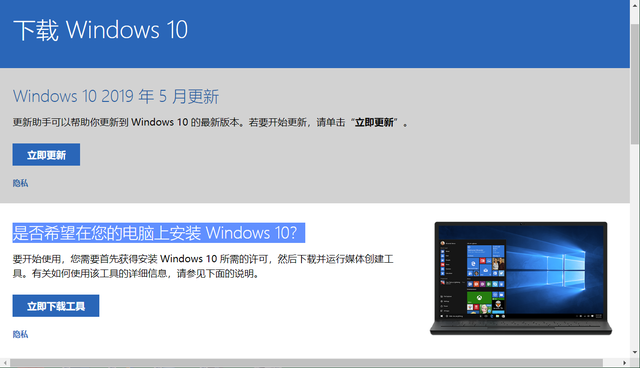
3. Double-click MediaCreationTool1903.exe (it may also be other numbers, Microsoft releases different versions at different times) to start the Windows 10 installation wizard.
4. Click to accept the license agreement.
5. Select the "Upgrade this PC now" option to download the file and start the upgrade.
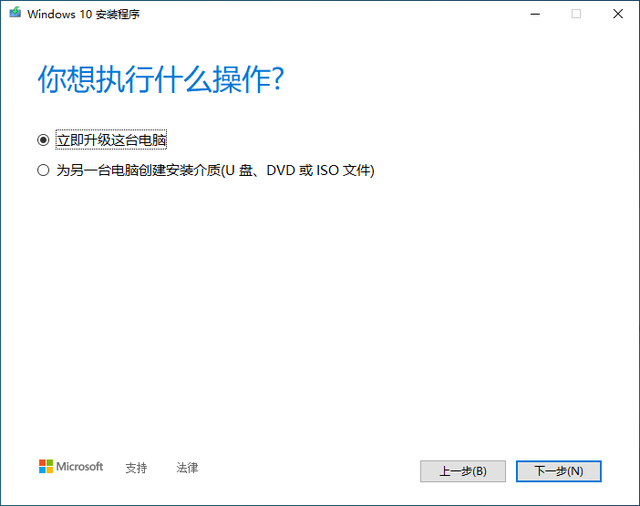
6. Click the Next button.
7. Start downloading the Windows 10 upgrade file.
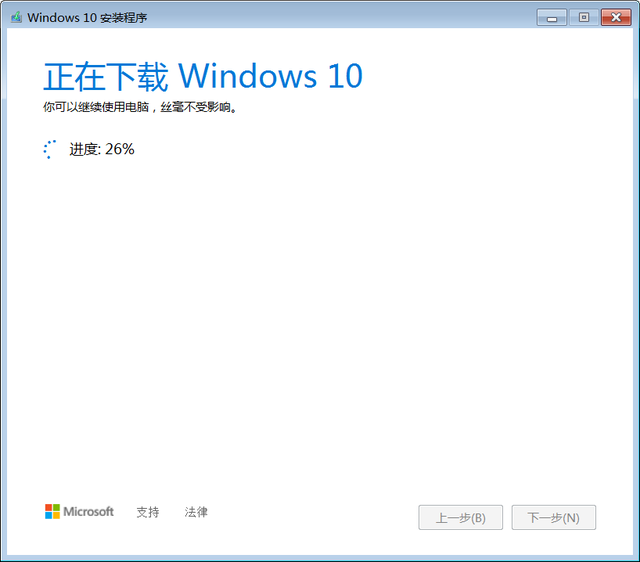
8. After the download is complete, follow the wizard prompts and click the Next button.
9. Click the "Accept" button to agree to the license agreement again.
10. Select the Keep personal files and applications option.
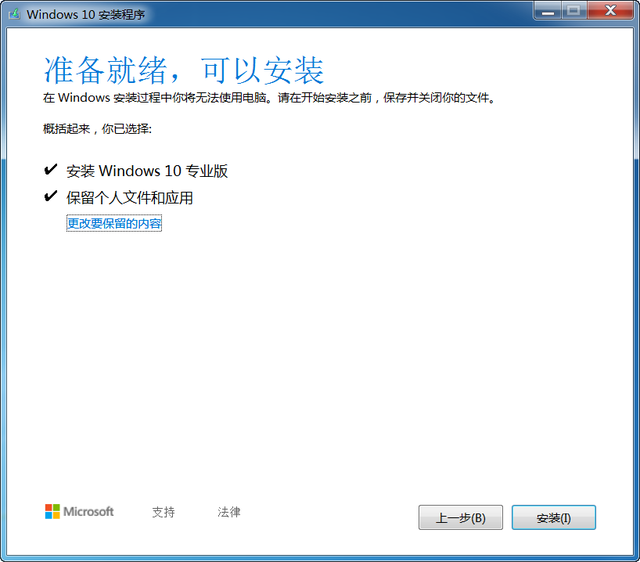
11. Click the Install button.
After the installation is complete, you need to complete the simple out-of-box experience (OOBE) to complete the setup of Windows 10, and then you will see the familiar desktop again along with every new feature that comes with Windows 10.
Additionally, be sure to use Device Manager to check that hardware drivers are properly installed on your system, reinstall antivirus software, and any other software you uninstalled before upgrading.
Extended reading:■>>Still using Windows 7? After reading these 7 points, I guarantee that you want to upgrade to Windows 10 immediately
■>>Microsoft will stop supporting Windows 7 in January next year. Are you still insisting on using it, are you not afraid of problems?
■>>Does the computer operating system need to be upgraded from Win7/8 to Win10? Listen to what the experts say

1. The headline account [Micro Class Media] focuses on software sharing. If you like to play software, please follow, comment, collect, and forward.
2. If you have any questions while studying, please feel free to communicate with me. Search [Micro Course Media] on Toutiao today. I’ll be waiting for you here!
The above is the detailed content of win7 hardware wizard. For more information, please follow other related articles on the PHP Chinese website!

Hot AI Tools

Undresser.AI Undress
AI-powered app for creating realistic nude photos

AI Clothes Remover
Online AI tool for removing clothes from photos.

Undress AI Tool
Undress images for free

Clothoff.io
AI clothes remover

Video Face Swap
Swap faces in any video effortlessly with our completely free AI face swap tool!

Hot Article

Hot Tools

Notepad++7.3.1
Easy-to-use and free code editor

SublimeText3 Chinese version
Chinese version, very easy to use

Zend Studio 13.0.1
Powerful PHP integrated development environment

Dreamweaver CS6
Visual web development tools

SublimeText3 Mac version
God-level code editing software (SublimeText3)

Hot Topics
 1663
1663
 14
14
 1420
1420
 52
52
 1315
1315
 25
25
 1266
1266
 29
29
 1239
1239
 24
24
 System Restore prompts that you must enable system protection on this drive
Jun 19, 2024 pm 12:23 PM
The computer has a restore point, and when the system is restored, it prompts "You must enable system protection on this drive." This usually means that the system protection function is not turned on. System protection is a feature provided by the Windows operating system that can create system restore points to back up system files and settings. That way, if something goes wrong, you can revert to a previous state. When the system fails and you cannot enter the desktop to start it, you can only try the following method: Troubleshooting-Advanced Options-Command Prompt Command 1 netstartvssrstrui.exe/offline:C:\windows=active Command 2 cd%windir%\system32 \configrenSYSTEMsy
 What should I do if win10 does not switch users? Win10 login interface does not have the option to switch users. Solution
Jun 25, 2024 pm 05:21 PM
A problem that Windows 10 users may encounter is that they cannot find the switch user option on the login interface. So what should I do if there is no switch user option on the win10 login interface? Let this site give users a detailed explanation of the problem of not switching user options in the win10 login interface. Detailed solution to the problem of switching user options on the Win10 login interface: Check user account settings: First, make sure you have multiple user accounts on your computer and that these accounts are enabled. You can check and enable the account by following these steps: a. Press Win+I keys to open Settings and select "Accounts". b. Select "Family & Others" or &ld in the left navigation bar
 How to permanently turn off real-time protection in win10? How to disable real-time protection function in win10 computer 0
Jun 05, 2024 pm 09:46 PM
Although the comprehensive anti-virus software that comes with Windows 10 system can continuously protect the security of your personal computer, sometimes it may also affect certain downloaded files. For some users, it may be more appropriate to temporarily turn off the real-time protection function. But many users don’t know how to permanently turn off the real-time protection feature on win10 system. 1. First, press the "Win+R" keys to open the run window, enter the "gpedit.msc" command to open the local Group Policy Editor interface; 2. Then, in the opened interface, click "Computer Configuration/Administrative Templates/ Windows Components/MicrosoftDef
 How to restore the default wallpaper in win10? One trick to quickly restore the default wallpaper in Windows 10 system
Jun 02, 2024 pm 02:07 PM
In Windows 10 system, if you want to return to the system default wallpaper, you can follow the following steps: 1. Right-click a blank space on the desktop and select Personalize in the pop-up menu. 2. This will open the Personalization window in Settings. In the left menu, click Background. 3. Under the "Background" settings, find and click the drop-down menu next to "Choosepicture", and then select Windows Default (Windows Default) or directly select a picture that looks like the default wallpaper in the picture preview below ( if there are multiple options). 4. If your system has multiple versions
 What should I do if the Win7 taskbar does not display the icon? How to solve the problem of the computer taskbar icon disappearing
Jun 09, 2024 pm 01:49 PM
Recently, many users using Win7 system have found that the icons in the taskbar suddenly disappeared, which makes the operation very inconvenient and they do not know how to solve the problem. This article will introduce to you how to solve the problem of disappearing taskbar icons in Win7 system. Bar! Cause Analysis When encountering such a situation, there are generally two situations: one is that the taskbar on the computer does not really disappear, but is just hidden, and the other is that the taskbar does disappear. Method 1: 1. There is a situation that you need to confirm first, that is, when the mouse is placed at the bottom of the screen, the taskbar will be displayed. You can directly click the mouse on the taskbar and select "Properties". 2. In the dialog box that opens, click & on the "Hide taskbar" option.
 Windows cannot start the Windows Audio service Error 0x80070005
Jun 19, 2024 pm 01:08 PM
The guy's computer appears: Windows cannot start the WindowsAudio service (located on the local computer). Error 0x8007005: Access denied. This situation is usually caused by user permissions. You can try the following methods to fix it. Method 1: Modify the registry to add permissions through batch processing, create a new text document on the desktop, save it as .bat, and right-click the administrator to go far. Echo==========================EchoProcessingRegistryPermission.Pleasewait...Echo================== ========subinacl/subkey
 How to clear all desktop background images in Win7? Tips for deleting personalized background images in Win7
Jun 02, 2024 am 09:01 AM
In Win7 system, many users want to delete personalized desktop background images, but do not know how to delete them. This article will show you how to delete personalized background images in Win7 system. 1. First, open the control panel interface of the Win7 system and click to enter the "Appearance and Personalization" settings; 2. Then, in the opened interface, click the "Change Desktop Background" setting; 3. Then, click below "Desktop background" option; 4. Then, select Select all, and then click Clear all. Of course, you can also use it under "Customize", right-click the theme you want to delete, and then click &q on the shortcut menu
 What should I do if Win10 takes a screenshot and crashes? How to solve the problem of Win10 flashing and then disappearing after taking a screenshot?
Jun 02, 2024 pm 12:48 PM
There are many reasons why the screenshot disappears after taking a screenshot in Win10. Users can first check the screenshot save location or adjust the screenshot settings, or check the animation effect to check it. If it really doesn't work, you can also choose to update the driver and operating system to perform the operation. Let this website carefully introduce to users the analysis of the problem of Win10 disappearing after taking a screenshot. Analysis of the problem after win10 takes a picture and it flashes and disappears 1. Check where the screenshot is saved: When you use the Win+PrtSc (PrintScreen) key combination to take a screenshot, the screenshot is usually saved in the C:\Users\YourUsername\Pictures\Screenshots folder. please


