

Backup is that simple: teach you how to use Linux rsync command easily

In the daily use of modern computers, data backup is particularly important. For Linux users, the rsync command is a common method for backing up and synchronizing files. It enables fast and efficient data synchronization between different systems or local folders.
Program background: Data synchronization is required between server A and server B (either 1-to-1 or many-to-many, here is a simple 1-to-1 example). This solution is often used for remote disaster recovery.
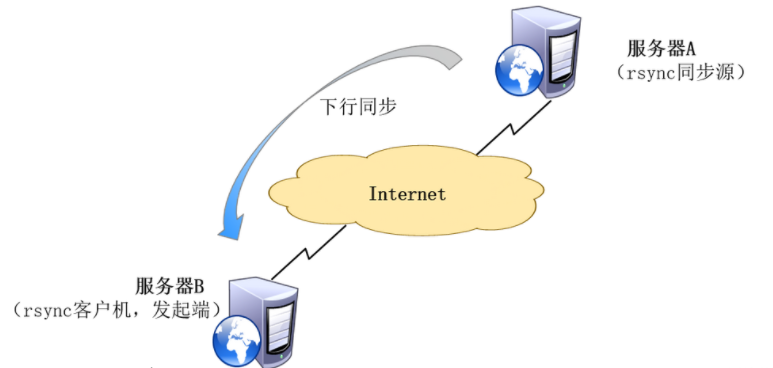
There are roughly two types of synchronization solutions based on application scenarios, scheduled synchronization and real-time synchronization. Scheduled synchronization has the characteristics of fixed synchronization time, poor real-time performance, and low resource consumption; real-time synchronization has the characteristics of strong real-time performance, intensive synchronization, and high resource consumption.
1. Timing synchronization
1. Install software:
yum install rsync -y
2. Password-free login (you can also use plain text to simulate interactive login, but from a security perspective, it is recommended to use password-free login):
ssh-keygen -t rsa
After generation, you can enter the directory cd ~/.ssh/ and copy the generated key ~/.ssh/id_rsa.pub content to /root/.ssh/authorized_keys on the remote host
Many students here are curious about why there is no need to enter a password for the above operations. Students who know password-free login can skip this introduction. Here is an introduction to the principle of password-free login:
rsa is also called asymmetric key algorithm, corresponding to symmetric key algorithm.
The so-called symmetric key algorithm is communication between A and B. In order for both parties to confirm each other's identity, A and B agree on a key k known by both parties to determine the identity as follows:
A => (mk) B A sends m plaintext and K key to B, and B confirms that the K key is the same as A's previous agreement, so that A's identity can be confirmed to be true. Vice versa, the same is true for communication from B to A.
Asymmetric encryption requires two keys: public key and private key. The public key and the private key are a pair. If the public key is used to encrypt data, it can only be decrypted with the corresponding private key. If the data is encrypted with a private key, it can only be decrypted with the corresponding public key. Because different keys are used for encryption and decryption, it is called asymmetric encryption.
So the above operation shares the public key of server A with server B (remote host), so server A no longer needs the traditional interactive password input to log in to server B. Server B can use the public key of server A. And confirm the authenticity of server A (private key).
[root@localhost ~]# cd ~/.ssh/
[root@localhost .ssh]# ls
id_rsa  id_rsa.pub  known_hosts
3. Write shell script
[root@localhost ~]# vim back.sh
#!/bin/sh
rsync -avz -e 'ssh -p 22' root@x.x.x.x:/XXX/pub /data/
Note: The data synchronization of rsync is divided into two different actions: pull and push. Before writing the script, be sure to test whether the command can be executed normally.
4. Crontab scheduled execution configuration (execute script at 3 o'clock every day)
At this point, scheduled synchronization is configured.
2. Real-time synchronization
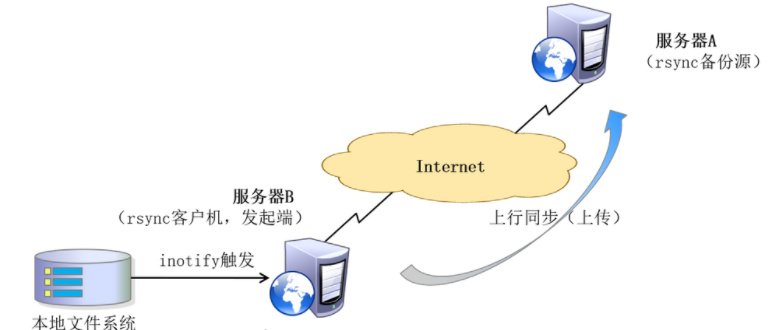
Introduction to Inotify
Inotify is a Linux feature, available since version 2.6.13, that monitors file system operations such as reads, writes, and creates. Inotify is very responsive, very simple to use, and much more efficient than busy polling of cron tasks.
Start configuring Inotify
Note: rsync needs to be installed on both servers A and B before starting.
1. Adjust inotify kernel parameters on server B, vim /etc/sysctl.conf
fs.inotify.max_queued_events = 16384
fs.inotify.max_user_instances = 1024
fs.inotify.max_user_watches = 1048576
2. Make the adjustment of inotify kernel parameters take effect immediately
sysctl -p
3. Install Inotify-Tool
# 先安装扩展包源,否则inotify-tools找不到
yum install epel-release
yum install inotify-tools
4. Open two terminals. One terminal performs operations such as creation and deletion, and the other executes the Inotify-Tool tool. When testing the Inotify-Tool tool, it works normally
inotifywait -mrq -e modify,create,move,delete /var/www/

inotifywait:用于持续监控,实时输出结果
inotifywatch:用于短期监控,任务完成后再出结果
5. Writing scripts
vim /root/tongbu.sh
#!/bin/bash
INOTIFY_CMD="inotifywait -mrq -e modify,create,attrib,move,delete /root/cs"

RSYNC_CMD="rsync -avz -e 'ssh -

p 22'  /root/cs/  root@x.x.x.x:/root/cs/ "
$INOTIFY_CMD | while read DIRECTORY EVENT FILE
do
    if [ $(pgrep rsync | wc -l) -le 0 ] ; then
        $RSYNC_CMD
    fi
done
Note: Pay special attention here, do not confuse the logical relationship, it is server B pushing and server A.
6. Add automatic background operation at boot, edit the /etc/profile file, and add the following statement to the last line
/bin/bash /root/tongbu.sh &
This completes the explanation of scheduled synchronization and real-time synchronization. Applying different solutions according to different scenarios requires flexible response, and special attention should be paid to this. For real-time synchronization solutions, the monitoring directory must not be set as a log directory, otherwise the server CPU may soar and it may crash.
In short, the rsync command is a very powerful, flexible and efficient file synchronization and backup tool. Whether in daily use or in a production environment, it can exert its unique advantages. Through the introduction and practice of this article, I believe that everyone has mastered the basic usage and skills of this command. I hope you can make better use of the rsync command to manage and protect your data in your future use of Linux!
The above is the detailed content of Backup is that simple: teach you how to use Linux rsync command easily. For more information, please follow other related articles on the PHP Chinese website!

Hot AI Tools

Undresser.AI Undress
AI-powered app for creating realistic nude photos

AI Clothes Remover
Online AI tool for removing clothes from photos.

Undress AI Tool
Undress images for free

Clothoff.io
AI clothes remover

Video Face Swap
Swap faces in any video effortlessly with our completely free AI face swap tool!

Hot Article
Hot Tools

Notepad++7.3.1
Easy-to-use and free code editor

SublimeText3 Chinese version
Chinese version, very easy to use

Zend Studio 13.0.1
Powerful PHP integrated development environment

Dreamweaver CS6
Visual web development tools

SublimeText3 Mac version
God-level code editing software (SublimeText3)
Hot Topics


 What computer configuration is required for vscode
Apr 15, 2025 pm 09:48 PM
What computer configuration is required for vscode
Apr 15, 2025 pm 09:48 PM
VS Code system requirements: Operating system: Windows 10 and above, macOS 10.12 and above, Linux distribution processor: minimum 1.6 GHz, recommended 2.0 GHz and above memory: minimum 512 MB, recommended 4 GB and above storage space: minimum 250 MB, recommended 1 GB and above other requirements: stable network connection, Xorg/Wayland (Linux)
 Linux Architecture: Unveiling the 5 Basic Components
Apr 20, 2025 am 12:04 AM
Linux Architecture: Unveiling the 5 Basic Components
Apr 20, 2025 am 12:04 AM
The five basic components of the Linux system are: 1. Kernel, 2. System library, 3. System utilities, 4. Graphical user interface, 5. Applications. The kernel manages hardware resources, the system library provides precompiled functions, system utilities are used for system management, the GUI provides visual interaction, and applications use these components to implement functions.
 How to run java code in notepad
Apr 16, 2025 pm 07:39 PM
How to run java code in notepad
Apr 16, 2025 pm 07:39 PM
Although Notepad cannot run Java code directly, it can be achieved by using other tools: using the command line compiler (javac) to generate a bytecode file (filename.class). Use the Java interpreter (java) to interpret bytecode, execute the code, and output the result.
 vscode terminal usage tutorial
Apr 15, 2025 pm 10:09 PM
vscode terminal usage tutorial
Apr 15, 2025 pm 10:09 PM
vscode built-in terminal is a development tool that allows running commands and scripts within the editor to simplify the development process. How to use vscode terminal: Open the terminal with the shortcut key (Ctrl/Cmd). Enter a command or run the script. Use hotkeys (such as Ctrl L to clear the terminal). Change the working directory (such as the cd command). Advanced features include debug mode, automatic code snippet completion, and interactive command history.
 How to check the warehouse address of git
Apr 17, 2025 pm 01:54 PM
How to check the warehouse address of git
Apr 17, 2025 pm 01:54 PM
To view the Git repository address, perform the following steps: 1. Open the command line and navigate to the repository directory; 2. Run the "git remote -v" command; 3. View the repository name in the output and its corresponding address.
 vscode cannot install extension
Apr 15, 2025 pm 07:18 PM
vscode cannot install extension
Apr 15, 2025 pm 07:18 PM
The reasons for the installation of VS Code extensions may be: network instability, insufficient permissions, system compatibility issues, VS Code version is too old, antivirus software or firewall interference. By checking network connections, permissions, log files, updating VS Code, disabling security software, and restarting VS Code or computers, you can gradually troubleshoot and resolve issues.
 Where to write code in vscode
Apr 15, 2025 pm 09:54 PM
Where to write code in vscode
Apr 15, 2025 pm 09:54 PM
Writing code in Visual Studio Code (VSCode) is simple and easy to use. Just install VSCode, create a project, select a language, create a file, write code, save and run it. The advantages of VSCode include cross-platform, free and open source, powerful features, rich extensions, and lightweight and fast.
 Can vscode be used for mac
Apr 15, 2025 pm 07:36 PM
Can vscode be used for mac
Apr 15, 2025 pm 07:36 PM
VS Code is available on Mac. It has powerful extensions, Git integration, terminal and debugger, and also offers a wealth of setup options. However, for particularly large projects or highly professional development, VS Code may have performance or functional limitations.
