

Configure DHCP server on RHEL 9 / Rocky Linux 9

DHCP, or Dynamic Host Configuration Protocol, is a network protocol that automatically assigns IP addresses to client systems in a computer network. It assigns clients to the DHCP pool or IP address range specified in its configuration. While you can manually assign static IPs to client systems, a DHCP server simplifies the process and dynamically assigns IP addresses to client systems on your network.
In this article, we will demonstrate how to install and configure a DHCP server on RHEL 9/Rocky Linux 9.
prerequisites
- Pre-installed RHEL 9 or Rocky Linux 9
- Regular user with sudo administrator rights
- YUM/DNF repository or Red Hat subscription service configured locally for RHEL 9
- Can access the Internet
Without further delay, let’s get to the DHCP server installation steps.
1) Configure static IP address on RHEL 9/Rocky Linux 9
Before you begin, it is necessary to set up a static IP address on your RHEL or Rocky Linux system. There are several ways to accomplish this, but the simplest and most intuitive is to use the nmtui or nmcli utilities.
Reading can also set a static IP address on RHEL 9
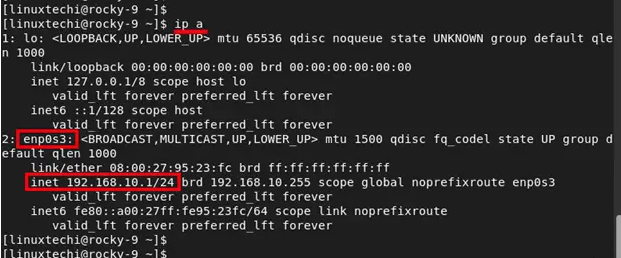
To confirm the IP address of the linux system, run the ip command below.
$ ip a
2) Install and configure DHCP server
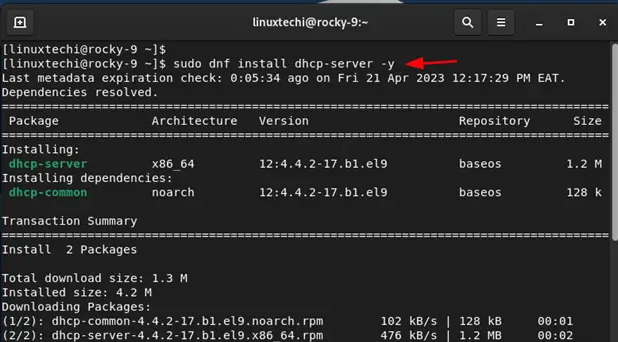
Once you have configured a static IP, the next step to take is to install a DHCP server. The RHEL 9 or Rocky Linux 9 repository (BaseOS) provides the dhcp-server package by default. You can install it as follows.
$ sudo dnf install dhcp-server -y
After installing the DHCP server, we need to further configure the settings. Therefore, open the DHCP configuration file.
$ sudo vi /etc/dhcp/dhcpd.conf
Paste the following lines of code into the configuration file. Be sure to configure the subnet to your desired value.
default-lease-time 3600;
max-lease-time 86400;
authoritative;
subnet 192.168.10.0 netmask 255.255.255.0 {
range 192.168.10.100 192.168.10.200;
option routers 192.168.10.1;
option subnet-mask 255.255.255.0;
option domain-name-servers 192.168.10.1;
}
Save and close the file.
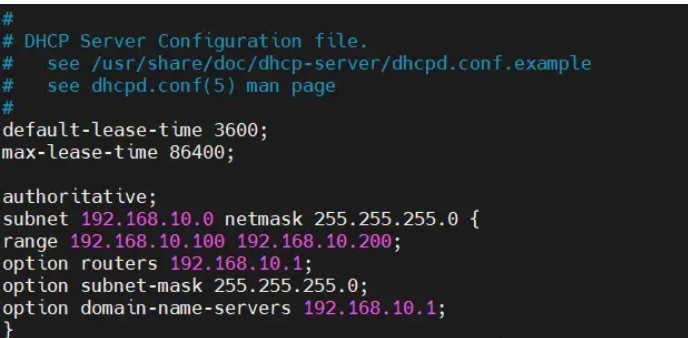
Let’s take a look at some of the values:
- The default-lease-time value specifies how long the DHCP server will lease an address to a client. In this example, the default-lease-time value is 3600 seconds or 1 hour. max-lease-time is the maximum time an IP address is leased to a client. In our case it is set to 86400 seconds or 24 hours.
- The next part is the subnet configuration. In this setup, 192.168.10.0 is the subnet and 255.255.255.0 is the subnet mask. IP addresses range from 192.168.10.100 to 192.168.10.200.
- The option router option defines the default gateway. In this case, it's 192.168.10.1.
- The option subnet-mask option determines the subnet mask assigned to each client or host. In this case, it's 255.255.255.0.
- Finally, domain-name-servers specifies DNS servers. In this case 192.168.10.1.
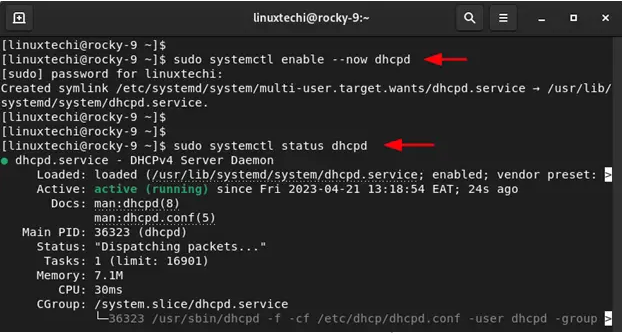
When finished, save changes and exit. Then enable and start the DHCP service.
$ sudo systemctl enable --now dhcpd
$ sudo systemctl status dhcpd
Please note
At this point, the DHCP service should be distributing IP addresses. If you have another DHCP server or router on your LAN, it's a good idea to turn it off to prevent IP address allocation conflicts. This will result in some clients getting their IP assignments from the RHEL or Rocky Linux server and others from the router, which is certainly not what you want. Therefore, remember to turn off any other DHCP servers in your LAN setup.
3) 测试 DHCP 服务器安装
在我们模拟的 LAN 设置中,您可以看到 Ubuntu 系统已从 RHEL 或 Rocky Linux DHCP 服务器上获取了一个 IP 地址。
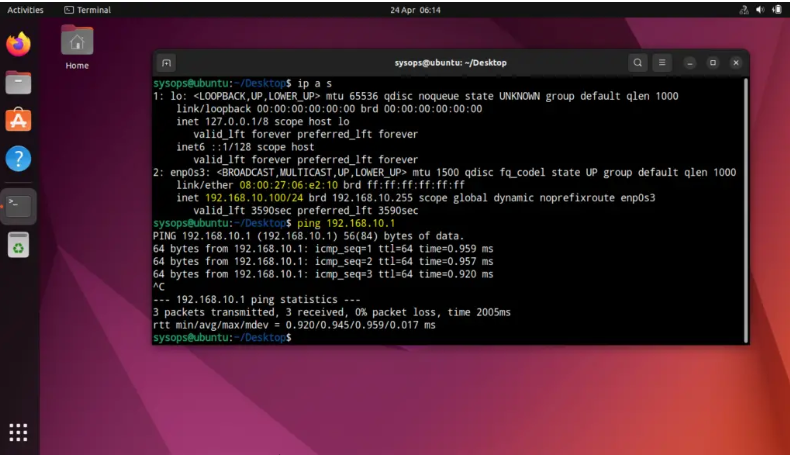
回到我们的 DHCP 服务器,搜索 Ubuntu 机器的 IP 地址在 /var/log/message 文件中。
$ sudo tail -50 /var/log/messages | grep -i 192.168.10.100

很好,以上输出确认 Ubuntu 机器从我们的 DHCP 服务器获取了 IP。
结论
这篇文章就到这里了。在本指南中,您已学习了如何在 RHEL 9 / Rocky Linux 9 上安装和配置 DHCP 服务器。如有任何疑问或反馈,请在下面的评论区发布。
The above is the detailed content of Configure DHCP server on RHEL 9 / Rocky Linux 9. For more information, please follow other related articles on the PHP Chinese website!

Hot AI Tools

Undresser.AI Undress
AI-powered app for creating realistic nude photos

AI Clothes Remover
Online AI tool for removing clothes from photos.

Undress AI Tool
Undress images for free

Clothoff.io
AI clothes remover

Video Face Swap
Swap faces in any video effortlessly with our completely free AI face swap tool!

Hot Article
Hot Tools

Notepad++7.3.1
Easy-to-use and free code editor

SublimeText3 Chinese version
Chinese version, very easy to use

Zend Studio 13.0.1
Powerful PHP integrated development environment

Dreamweaver CS6
Visual web development tools

SublimeText3 Mac version
God-level code editing software (SublimeText3)
Hot Topics
 1666
1666
 14
1425
52
1325
25
1273
29
1252
24
14
1425
52
1325
25
1273
29
1252
24

 Linux Architecture: Unveiling the 5 Basic Components
Apr 20, 2025 am 12:04 AM
Linux Architecture: Unveiling the 5 Basic Components
Apr 20, 2025 am 12:04 AM
The five basic components of the Linux system are: 1. Kernel, 2. System library, 3. System utilities, 4. Graphical user interface, 5. Applications. The kernel manages hardware resources, the system library provides precompiled functions, system utilities are used for system management, the GUI provides visual interaction, and applications use these components to implement functions.
 How to check the warehouse address of git
Apr 17, 2025 pm 01:54 PM
How to check the warehouse address of git
Apr 17, 2025 pm 01:54 PM
To view the Git repository address, perform the following steps: 1. Open the command line and navigate to the repository directory; 2. Run the "git remote -v" command; 3. View the repository name in the output and its corresponding address.
 How to run java code in notepad
Apr 16, 2025 pm 07:39 PM
How to run java code in notepad
Apr 16, 2025 pm 07:39 PM
Although Notepad cannot run Java code directly, it can be achieved by using other tools: using the command line compiler (javac) to generate a bytecode file (filename.class). Use the Java interpreter (java) to interpret bytecode, execute the code, and output the result.
 How to run sublime after writing the code
Apr 16, 2025 am 08:51 AM
How to run sublime after writing the code
Apr 16, 2025 am 08:51 AM
There are six ways to run code in Sublime: through hotkeys, menus, build systems, command lines, set default build systems, and custom build commands, and run individual files/projects by right-clicking on projects/files. The build system availability depends on the installation of Sublime Text.
 What is the main purpose of Linux?
Apr 16, 2025 am 12:19 AM
What is the main purpose of Linux?
Apr 16, 2025 am 12:19 AM
The main uses of Linux include: 1. Server operating system, 2. Embedded system, 3. Desktop operating system, 4. Development and testing environment. Linux excels in these areas, providing stability, security and efficient development tools.
 laravel installation code
Apr 18, 2025 pm 12:30 PM
laravel installation code
Apr 18, 2025 pm 12:30 PM
To install Laravel, follow these steps in sequence: Install Composer (for macOS/Linux and Windows) Install Laravel Installer Create a new project Start Service Access Application (URL: http://127.0.0.1:8000) Set up the database connection (if required)
 git software installation
Apr 17, 2025 am 11:57 AM
git software installation
Apr 17, 2025 am 11:57 AM
Installing Git software includes the following steps: Download the installation package and run the installation package to verify the installation configuration Git installation Git Bash (Windows only)
 How to use VSCode
Apr 15, 2025 pm 11:21 PM
How to use VSCode
Apr 15, 2025 pm 11:21 PM
Visual Studio Code (VSCode) is a cross-platform, open source and free code editor developed by Microsoft. It is known for its lightweight, scalability and support for a wide range of programming languages. To install VSCode, please visit the official website to download and run the installer. When using VSCode, you can create new projects, edit code, debug code, navigate projects, expand VSCode, and manage settings. VSCode is available for Windows, macOS, and Linux, supports multiple programming languages and provides various extensions through Marketplace. Its advantages include lightweight, scalability, extensive language support, rich features and version
