win7 fast boot
php editor Strawberry introduces you an exciting technique to make your Win7 system boot up extremely quickly! Win7 is a stable and reliable operating system, but as the time of use increases, the boot speed may become slower. With some simple optimizations and tweaks, you can dramatically improve boot speed and have your computer booting up in a flash. This article will introduce you in detail some practical tips and methods to make your Win7 system boot up to extremely fast speed, making your work and entertainment more efficient and enjoyable!
You can set the system startup selection when booting through the computer properties options. By default, the system startup selection will wait for 30 seconds. It is recommended to set it to 0 seconds so that there will be no waiting time when the computer starts.

Set the boot time
Step 2: In the startup options column of the system configuration, many automatically set startup items will be listed. If you know which ones are required at startup, it is recommended to check them. For items that are unclear, it is recommended to disable them all. This improves system startup speed and performance.

Close redundant startup selections
There is an option under the boot tab called No GUI boot. If checked, the Windows startup LOGO animation will not be displayed when booting.
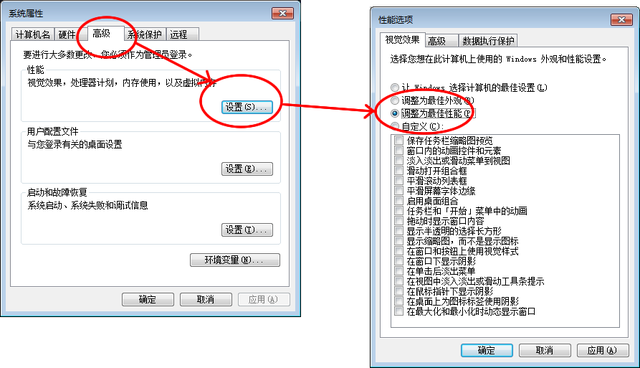
Step 3: Optimize performance mainly for visual effects. If customization feels troublesome, please adjust to the best performance, optimize computer running speed, and turn off animation special effects.

Adjust for best optimization
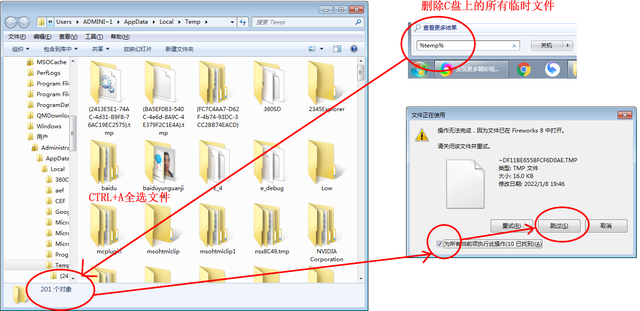
Step 4: Clear junk files. After the computer has been running for a period of time, a large number of temporary files will accumulate, and these files occupy valuable storage space. You can open the trash folder by running the command %temp%, then select all files (Ctrl A) and delete them. During the removal process, you may encounter some error dialog boxes and you can choose to skip them. This operation will not affect the security of your computer.

Temporary file deletion
The above is the detailed content of win7 fast boot. For more information, please follow other related articles on the PHP Chinese website!

Hot AI Tools

Undresser.AI Undress
AI-powered app for creating realistic nude photos

AI Clothes Remover
Online AI tool for removing clothes from photos.

Undress AI Tool
Undress images for free

Clothoff.io
AI clothes remover

Video Face Swap
Swap faces in any video effortlessly with our completely free AI face swap tool!

Hot Article

Hot Tools

Notepad++7.3.1
Easy-to-use and free code editor

SublimeText3 Chinese version
Chinese version, very easy to use

Zend Studio 13.0.1
Powerful PHP integrated development environment

Dreamweaver CS6
Visual web development tools

SublimeText3 Mac version
God-level code editing software (SublimeText3)

Hot Topics
 1666
1666
 14
14
 1425
1425
 52
52
 1323
1323
 25
25
 1272
1272
 29
29
 1251
1251
 24
24
 How to install WinNTSetup into Win11 system_How to install WinNTSetup into Win11 system
May 08, 2024 am 11:19 AM
First download the latest Win11 system ISO image, and then in Win10 system, you can directly right-click on the downloaded ISO image file and select [Load]; if it is under WinPE, WinXP, or Win7 system, you need to use the virtual optical drive tool to load the ISO Image; or you can directly decompress the ISO image file without using a virtual optical drive. Then run WinNTSetup. The software interface is as shown in the figure: First locate the location of the install.wim file. You can find the install.wim file in the sources directory of the Win11 ISO image loaded or decompressed by the virtual optical drive. Then set the location of the boot disk and installation disk. Generally, you are going to put W
 When I turn on the computer, it always stops at the motherboard logo screen. Nothing happens when I press anything, and I can't enter the bios?
Apr 23, 2024 am 09:13 AM
When I turn on the computer, it always stops at the motherboard logo screen. Nothing happens when I press anything, and I can't enter the bios? This is usually because the BIOS battery voltage is too low, and the system time has returned to the BIOS preset time, such as 2000.1.1, 00:00. You can use it after pressing F1 to enter the bios and set the time. Do not turn off the AC power after shutting down at night. Generally, the system time will not be lost when you turn on the computer the next day, and you can still enter the system normally. If the AC power is cut off, the battery voltage cannot sustain the power consumption of the bios, and the computer will be in the same state again the next day when it is turned on. Replacing the bios battery is the ultimate solution. Win11 is stuck on the motherboard logo interface when booting? 1. It is a problem with bios settings. We only need to find the corresponding setting items.
 How to connect to mobile phone hotspot network in win7 system
Apr 13, 2024 pm 11:48 PM
To connect Windows 7 to a Cellular Hotspot, follow these steps: Open the Wireless Network Connections panel and find the Cellular Hotspot network. Right-click on the hotspot network and select Connect. Verify connection.
 What should I do if the Win7 taskbar does not display the icon? How to solve the problem of the computer taskbar icon disappearing
Jun 09, 2024 pm 01:49 PM
Recently, many users using Win7 system have found that the icons in the taskbar suddenly disappeared, which makes the operation very inconvenient and they do not know how to solve the problem. This article will introduce to you how to solve the problem of disappearing taskbar icons in Win7 system. Bar! Cause Analysis When encountering such a situation, there are generally two situations: one is that the taskbar on the computer does not really disappear, but is just hidden, and the other is that the taskbar does disappear. Method 1: 1. There is a situation that you need to confirm first, that is, when the mouse is placed at the bottom of the screen, the taskbar will be displayed. You can directly click the mouse on the taskbar and select "Properties". 2. In the dialog box that opens, click & on the "Hide taskbar" option.
 How to clear all desktop background images in Win7? Tips for deleting personalized background images in Win7
Jun 02, 2024 am 09:01 AM
In Win7 system, many users want to delete personalized desktop background images, but do not know how to delete them. This article will show you how to delete personalized background images in Win7 system. 1. First, open the control panel interface of the Win7 system and click to enter the "Appearance and Personalization" settings; 2. Then, in the opened interface, click the "Change Desktop Background" setting; 3. Then, click below "Desktop background" option; 4. Then, select Select all, and then click Clear all. Of course, you can also use it under "Customize", right-click the theme you want to delete, and then click &q on the shortcut menu
 Where is the network discovery in Win7? Tips for enabling the network discovery function in Win7
Jun 04, 2024 am 09:02 AM
Many computer users know that network discovery is a network setting. This setting will affect whether the computer can find other computers and devices on the network and whether it can find the computer when other computers on the network are found. So how to enable network discovery in win7? The following computer System Home U Disk Installation will introduce you to the tutorial on how to enable network discovery in win7 system. 1. First, click the "Start Menu" icon on the desktop taskbar and choose to open the "Control Panel" interface. 2. Then, in the interface that opens, set "View by" to "Category", and then choose to enter "Network and Internet"
 Win7 network adapter is missing, how to restore it (methods and steps to solve the problem of Win7 network adapter disappearing)
Apr 23, 2024 pm 06:19 PM
But sometimes users may encounter the problem that the network adapter suddenly disappears. Win7 operating system is a widely used operating system, which brings great troubles to network connection and use. To help users quickly solve network connection problems, this article will introduce the methods and steps on how to restore the Win7 network adapter. 1. Check the network adapter in the device manager 2. Uninstall and reinstall the network adapter driver. Select, right-click the network adapter and "Uninstall Device" and then restart the computer and install the driver automatically, or go to the official website to download the latest driver and install it manually. . 3. Check whether the device is disabled. Search for "Network Connections" in the start menu, open it, right-click the wireless connection or Ethernet connection, and select "Enable" to ensure that the device has not been disabled.
 How to connect a bluetooth mouse in win7 system
Apr 13, 2024 pm 11:45 PM
How to connect a Bluetooth mouse to a Windows 7 system: Make sure Bluetooth is turned on and the mouse is charged; click "Start" → "Devices and Printers"; click "Add Device"; find the Bluetooth mouse and enter the pairing code (if any); Click Next to complete the connection; move the mouse to verify the connection.


