

An easy tutorial to create and configure a Linux virtual machine on AWS

Cloud computing is a hot topic in today's IT industry. It can provide users with flexible, scalable, and low-cost computing resources and services. Amazon's AWS (Amazon Web Services) is the world's largest cloud computing platform and supports multiple operating systems, including Linux. This article will teach you how to create and configure a Linux virtual machine on AWS, and how to use SSH and SCP for remote management and file transfer.
AWS (Amazon Web Services) is one of the world's leading cloud server providers. You can set up a server in under a minute using the AWS platform. On AWS, you can fine-tune many technical details of the server, such as the number of CPUs, memory and disk space, disk type (faster SSD or classic IDE), etc. The best thing about AWS is that you only pay for the services you use. Before you start, AWS provides a special account called "Free Tier". You can use AWS technical services for free for one year, but there will be some small restrictions. For example, you cannot use the server for more than 750 hours per month. Any more than that and they'll charge you. You can view all relevant rules on the aws official website.
Since my article is about creating a Linux server on AWS, having a “Free Tier” account is a prerequisite. Let’s assume you have created a “Free Tier” account.
Before proceeding, you must know some terminology in AWS to understand the setup:
- EC2 (Elastic Compute Cloud): This term is used for virtual machines.
- AMI (Amazon Machine Image): Represents an operating system instance.
- EBS (Elastic Block Storage): A type of storage environment in AWS.
Log in to the AWS console via the following link: https://console.aws.amazon.com/ .
The AWS console will look like this:
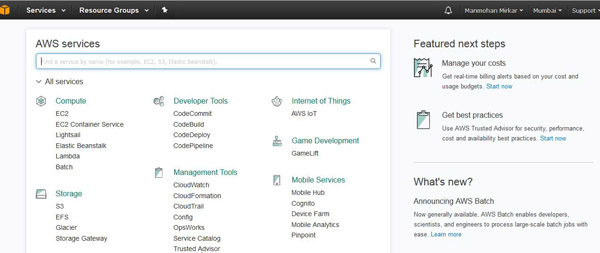
Amazon AWS console
Setting up a Linux VM in AWS
1. Create an EC2 (virtual machine) instance: Before starting to install the system, you must create a virtual machine in AWS. To create a virtual machine, click EC2 under the "compute" menu:
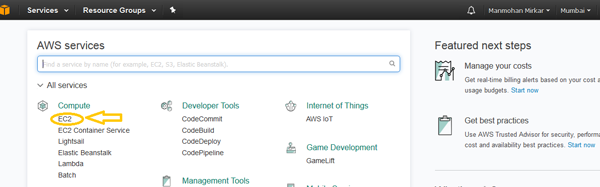
Create an EC2 instance
2. Now click the "Launch Instance" button under Create instance.
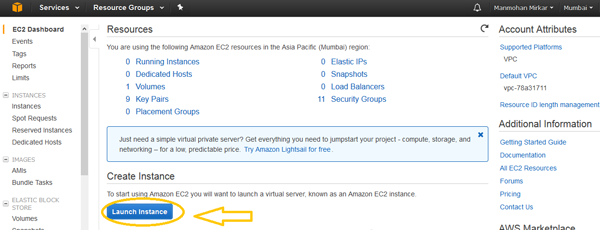
Launch the EC2 instance
3. Now, when you are using a “Free Tier” account, then it is best to select the “Free Tier” radio button so that AWS can filter out the instances that can be used for free. This allows you to not pay for the use of AWS resources.
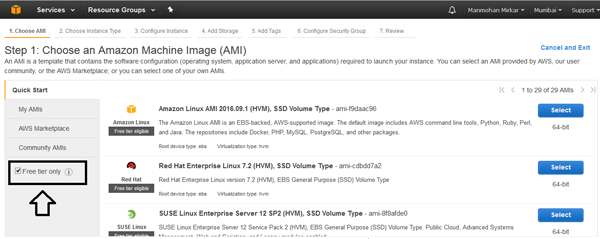
Select Free Tier instances only
4. To continue, please select the following options:
a. Select an AMI (Amazon Machine Image) in the classic instance wizard, and then choose to use Red Hat Enterprise Linux 7.2 (HVM), SSD storage
b. Select "t2.micro" as the instance details.
c. Configure instance details: Do not change anything, just click Next.
d. Add storage: Do not change anything, just click Next as we will use the default 10(GiB) hard drive at this time.
e. Add tags: Don’t change anything just click next.
f. Configure security group: Now select port 22 for ssh so that you can access this server from anywhere.
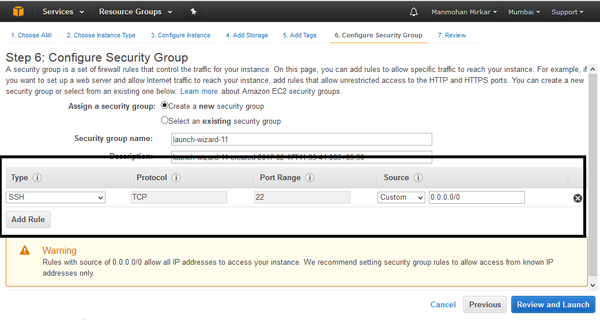
Configure AWS server
g. Select the "Review and Launch" button.
h. If all the details are correct, click the “Launch” button.
i. After clicking the "Launch" button, the system will pop up a window to create a "key pair" as shown below: Select the option "create a new key pair" and give the key pair name and download it. This key pair is required when connecting to the server using ssh. Finally, click the Launch Instance button.
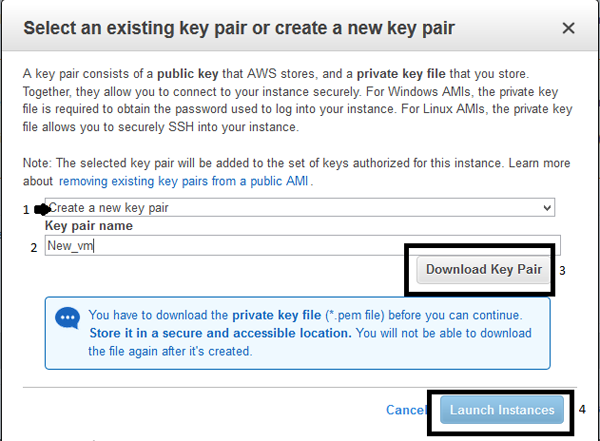
Create Key pair
j. After clicking the "Launch Instance" button, go to the service in the upper left corner. Select "compute" –> "EC2". Now click on "Running Instances":
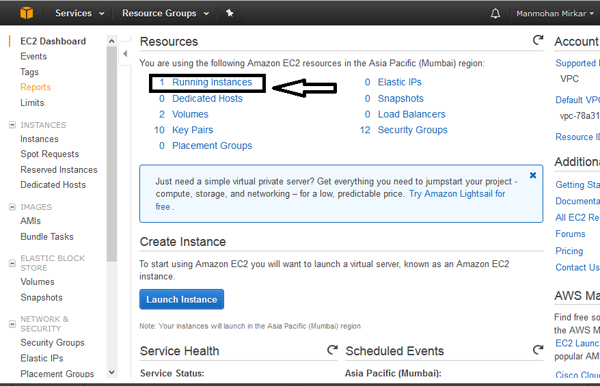
Go to the running EC2 instance
k. Now you can see that the status of your new VM is "running". Select the instance and note the Public DNS name required to log in to the server.
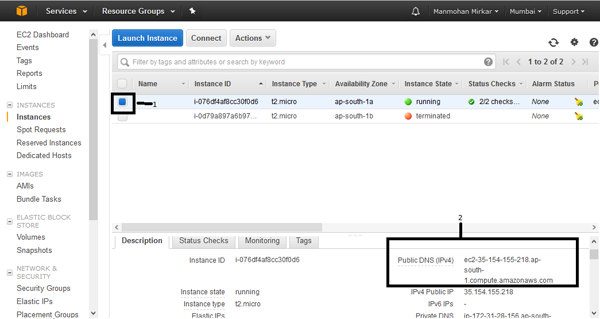
Public DNS value of the VM
Now you have finished creating a VM running Linux. To connect to the server, follow the steps below.
Connecting to an EC2 instance from Windows
1. First, you need putty gen and Putty exe to connect to the server from Windows (or SSH command on Linux). You can download putty via the link below.
2. Now open putty gen: puttygen.exe.
3. You need to click the “Load” button, browse and select the key pair file (pem file) you downloaded from Amazon.
4. You need to select the “ssh2-RSA” option and click the Save Private Key button. Please select "yes" in the next pop-up window.
5. Save the file with the extension .ppk.
6. Now you need to open putty.exe. Click "connect" in the left menu, then select "SSH" and then "Auth." You need to click the Browse button to select the .ppk file we created in step 4.
7. Now click on the “session” menu and in “host name” paste the DNS value from step “k” in this tutorial and click on the “open” button.
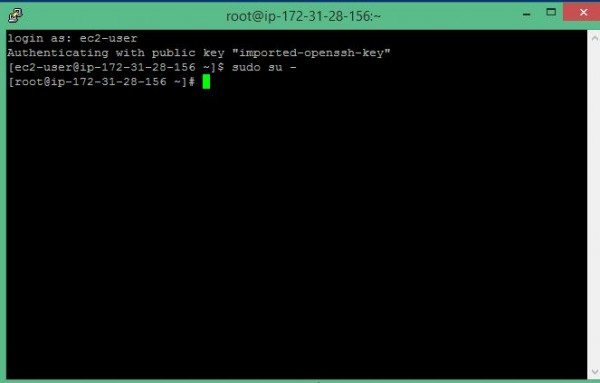
8. When asked for a username and password, enter ec2-user and a blank password, and then enter the following command.
$ sudo su -
Haha, you are now the owner of a Linux server hosted on the AWS cloud.
The above is the detailed content of An easy tutorial to create and configure a Linux virtual machine on AWS. For more information, please follow other related articles on the PHP Chinese website!

Hot AI Tools

Undresser.AI Undress
AI-powered app for creating realistic nude photos

AI Clothes Remover
Online AI tool for removing clothes from photos.

Undress AI Tool
Undress images for free

Clothoff.io
AI clothes remover

Video Face Swap
Swap faces in any video effortlessly with our completely free AI face swap tool!

Hot Article
Hot Tools

Notepad++7.3.1
Easy-to-use and free code editor

SublimeText3 Chinese version
Chinese version, very easy to use

Zend Studio 13.0.1
Powerful PHP integrated development environment

Dreamweaver CS6
Visual web development tools

SublimeText3 Mac version
God-level code editing software (SublimeText3)
Hot Topics
 1662
1662
 14
1418
52
1311
25
1261
29
1234
24
14
1418
52
1311
25
1261
29
1234
24

 Linux Architecture: Unveiling the 5 Basic Components
Apr 20, 2025 am 12:04 AM
Linux Architecture: Unveiling the 5 Basic Components
Apr 20, 2025 am 12:04 AM
The five basic components of the Linux system are: 1. Kernel, 2. System library, 3. System utilities, 4. Graphical user interface, 5. Applications. The kernel manages hardware resources, the system library provides precompiled functions, system utilities are used for system management, the GUI provides visual interaction, and applications use these components to implement functions.
 How to check the warehouse address of git
Apr 17, 2025 pm 01:54 PM
How to check the warehouse address of git
Apr 17, 2025 pm 01:54 PM
To view the Git repository address, perform the following steps: 1. Open the command line and navigate to the repository directory; 2. Run the "git remote -v" command; 3. View the repository name in the output and its corresponding address.
 vscode Previous Next Shortcut Key
Apr 15, 2025 pm 10:51 PM
vscode Previous Next Shortcut Key
Apr 15, 2025 pm 10:51 PM
VS Code One-step/Next step shortcut key usage: One-step (backward): Windows/Linux: Ctrl ←; macOS: Cmd ←Next step (forward): Windows/Linux: Ctrl →; macOS: Cmd →
 What is the main purpose of Linux?
Apr 16, 2025 am 12:19 AM
What is the main purpose of Linux?
Apr 16, 2025 am 12:19 AM
The main uses of Linux include: 1. Server operating system, 2. Embedded system, 3. Desktop operating system, 4. Development and testing environment. Linux excels in these areas, providing stability, security and efficient development tools.
 How to run sublime after writing the code
Apr 16, 2025 am 08:51 AM
How to run sublime after writing the code
Apr 16, 2025 am 08:51 AM
There are six ways to run code in Sublime: through hotkeys, menus, build systems, command lines, set default build systems, and custom build commands, and run individual files/projects by right-clicking on projects/files. The build system availability depends on the installation of Sublime Text.
 How to run java code in notepad
Apr 16, 2025 pm 07:39 PM
How to run java code in notepad
Apr 16, 2025 pm 07:39 PM
Although Notepad cannot run Java code directly, it can be achieved by using other tools: using the command line compiler (javac) to generate a bytecode file (filename.class). Use the Java interpreter (java) to interpret bytecode, execute the code, and output the result.
 laravel installation code
Apr 18, 2025 pm 12:30 PM
laravel installation code
Apr 18, 2025 pm 12:30 PM
To install Laravel, follow these steps in sequence: Install Composer (for macOS/Linux and Windows) Install Laravel Installer Create a new project Start Service Access Application (URL: http://127.0.0.1:8000) Set up the database connection (if required)
 How to use VSCode
Apr 15, 2025 pm 11:21 PM
How to use VSCode
Apr 15, 2025 pm 11:21 PM
Visual Studio Code (VSCode) is a cross-platform, open source and free code editor developed by Microsoft. It is known for its lightweight, scalability and support for a wide range of programming languages. To install VSCode, please visit the official website to download and run the installer. When using VSCode, you can create new projects, edit code, debug code, navigate projects, expand VSCode, and manage settings. VSCode is available for Windows, macOS, and Linux, supports multiple programming languages and provides various extensions through Marketplace. Its advantages include lightweight, scalability, extensive language support, rich features and version
