

How to install MATE desktop in Arch Linux

This guide will explain in detail the steps you need to install MATE desktop on Arch Linux.
This guide is divided into two parts. The first part discusses installing a basic Arch system. The second part is installing the complete MATE desktop environment on Arch Linux.
This article was tested on the following versions: MATE 1.24 and MATE 1.26.
What is MATE desktop?
When the GNOME desktop changed direction from GNOME 2 to GNOME 3, changing the user interaction and interface, the MATE desktop still continued the "older" or "traditional" GNOME 2 development direction. Therefore, the MATE desktop environment retains the traditional desktop experience in Linux. It is fast and has low memory consumption. In my opinion, the MATE desktop environment is an underrated desktop environment that needs more attention!
The MATE team has continued development of one of the popular desktops based on GNOME 2, but supports newer technologies. You can learn more on its official website.
Installing MATE Desktop in Arch Linux
Part 1: Installing Arch Linux
If you already have Arch Linux installed, you can skip this step and go directly to the MATE desktop installation section below.
To quickly install Arch Linux, follow this automated archinstall guide, which is easy to follow. Once the installation is complete, continue to Part Two.
Part 2: Installing MATE Desktop in Arch Linux
After rebooting, select Arch Linux from GRUB. From the Arch Linux prompt, run the following commands in order. These commands will install the Xorg server, display manager, MATE desktop components, controller package, and other applications.
For all commands, use the default, which is to press Enter when asked.
Install Xorg. The installation size is approximately 80 MB.
sudo pacman -S --needed xorg
Install display manager and MATE desktop components. The installation size is approximately 380 MB.
sudo pacman -S --needed mate mate-extra ttf-freefont lightdm lightdm-gtk-greeter
LCTT Translation: In Arch Linux, many times the lightdm display manager requires additional configuration to be enabled properly. You can refer to: LightDM – ArchWiki. In addition, you can install lightdm-gtk-greeter-settings to configure lightdm-gtk-greeter. 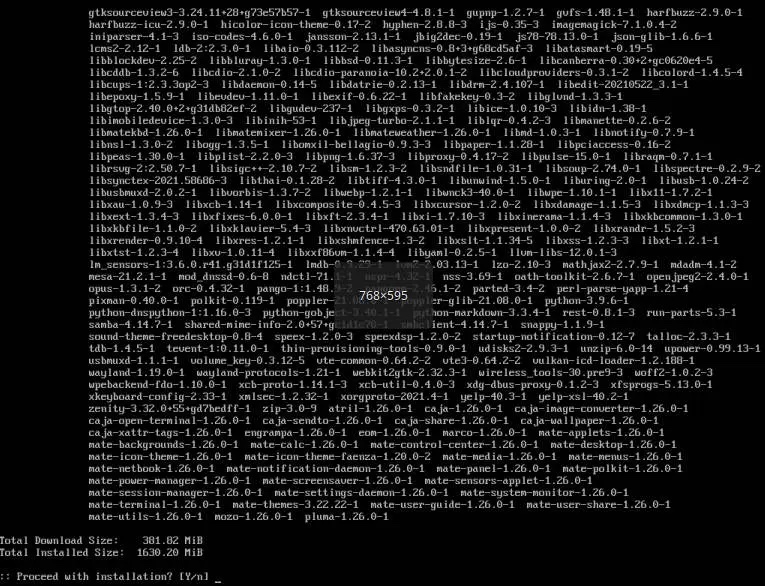
Install MATE package
Install application software:
This is just a reference. You can also install what you need.
sudo pacman -S --needed firefox vlc filezilla leafpad xscreensaver archlinux-wallpaper
Now it's time to enable Display Manager and Network Manager as services. This way, they can be run automatically via systemd the next time you log in.
systemctl enable lightdm
systemctl enable NetworkManager
Use the restart command to restart the system:
reboot
If all goes well, you should see the login prompt on the MATE desktop.
Now you can log in using the user ID and password you just created. A super-fast and traditional MATE desktop will welcome you. 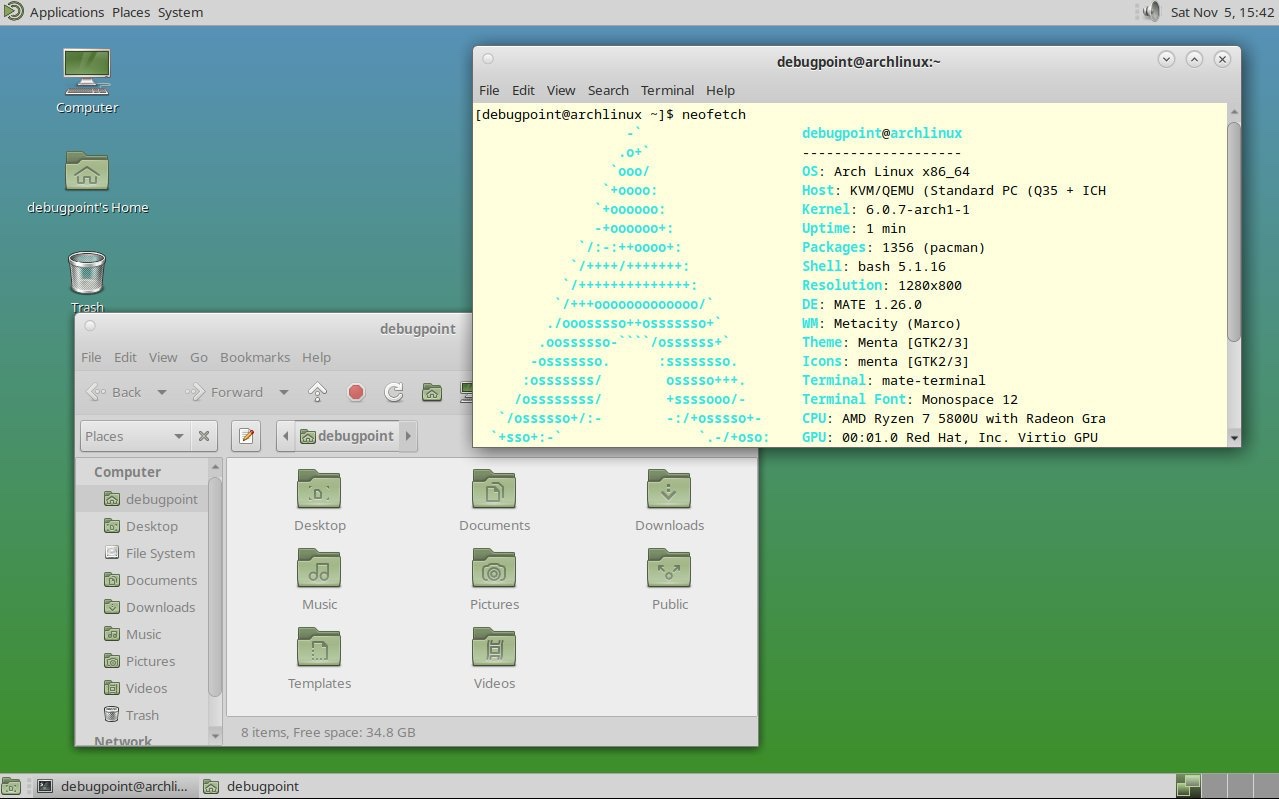
MATE Desktop in Arch Linux
I hope this guide helps you create your own Arch Linux environment from scratch, using the traditional MATE desktop.
The above is the detailed content of How to install MATE desktop in Arch Linux. For more information, please follow other related articles on the PHP Chinese website!

Hot AI Tools

Undresser.AI Undress
AI-powered app for creating realistic nude photos

AI Clothes Remover
Online AI tool for removing clothes from photos.

Undress AI Tool
Undress images for free

Clothoff.io
AI clothes remover

Video Face Swap
Swap faces in any video effortlessly with our completely free AI face swap tool!

Hot Article
Hot Tools

Notepad++7.3.1
Easy-to-use and free code editor

SublimeText3 Chinese version
Chinese version, very easy to use

Zend Studio 13.0.1
Powerful PHP integrated development environment

Dreamweaver CS6
Visual web development tools

SublimeText3 Mac version
God-level code editing software (SublimeText3)
Hot Topics
 1660
1660
 14
1416
52
1310
25
1260
29
1233
24
14
1416
52
1310
25
1260
29
1233
24

 Linux Architecture: Unveiling the 5 Basic Components
Apr 20, 2025 am 12:04 AM
Linux Architecture: Unveiling the 5 Basic Components
Apr 20, 2025 am 12:04 AM
The five basic components of the Linux system are: 1. Kernel, 2. System library, 3. System utilities, 4. Graphical user interface, 5. Applications. The kernel manages hardware resources, the system library provides precompiled functions, system utilities are used for system management, the GUI provides visual interaction, and applications use these components to implement functions.
 vscode terminal usage tutorial
Apr 15, 2025 pm 10:09 PM
vscode terminal usage tutorial
Apr 15, 2025 pm 10:09 PM
vscode built-in terminal is a development tool that allows running commands and scripts within the editor to simplify the development process. How to use vscode terminal: Open the terminal with the shortcut key (Ctrl/Cmd). Enter a command or run the script. Use hotkeys (such as Ctrl L to clear the terminal). Change the working directory (such as the cd command). Advanced features include debug mode, automatic code snippet completion, and interactive command history.
 How to check the warehouse address of git
Apr 17, 2025 pm 01:54 PM
How to check the warehouse address of git
Apr 17, 2025 pm 01:54 PM
To view the Git repository address, perform the following steps: 1. Open the command line and navigate to the repository directory; 2. Run the "git remote -v" command; 3. View the repository name in the output and its corresponding address.
 vscode Previous Next Shortcut Key
Apr 15, 2025 pm 10:51 PM
vscode Previous Next Shortcut Key
Apr 15, 2025 pm 10:51 PM
VS Code One-step/Next step shortcut key usage: One-step (backward): Windows/Linux: Ctrl ←; macOS: Cmd ←Next step (forward): Windows/Linux: Ctrl →; macOS: Cmd →
 What is the main purpose of Linux?
Apr 16, 2025 am 12:19 AM
What is the main purpose of Linux?
Apr 16, 2025 am 12:19 AM
The main uses of Linux include: 1. Server operating system, 2. Embedded system, 3. Desktop operating system, 4. Development and testing environment. Linux excels in these areas, providing stability, security and efficient development tools.
 How to run sublime after writing the code
Apr 16, 2025 am 08:51 AM
How to run sublime after writing the code
Apr 16, 2025 am 08:51 AM
There are six ways to run code in Sublime: through hotkeys, menus, build systems, command lines, set default build systems, and custom build commands, and run individual files/projects by right-clicking on projects/files. The build system availability depends on the installation of Sublime Text.
 How to run java code in notepad
Apr 16, 2025 pm 07:39 PM
How to run java code in notepad
Apr 16, 2025 pm 07:39 PM
Although Notepad cannot run Java code directly, it can be achieved by using other tools: using the command line compiler (javac) to generate a bytecode file (filename.class). Use the Java interpreter (java) to interpret bytecode, execute the code, and output the result.
 laravel installation code
Apr 18, 2025 pm 12:30 PM
laravel installation code
Apr 18, 2025 pm 12:30 PM
To install Laravel, follow these steps in sequence: Install Composer (for macOS/Linux and Windows) Install Laravel Installer Create a new project Start Service Access Application (URL: http://127.0.0.1:8000) Set up the database connection (if required)
