

How much space does the WIN7 system disk occupy?

How much space does the WIN7 system disk occupy?
About 20G, it is recommended to reserve 60G of space.
First understand Microsoft’s official requirements. The official data released by Microsoft is 20GB of hard disk space (note that the official release does not include patches and other space usage).

The 64-bit win7 system disk is at least 50G, and 60G or more is recommended. If you know that there are programs that need to be installed on the system disk, you can increase the size as appropriate according to the actual size of the program. If the hard disk is large enough, consider 100G.
It should be noted that after the system is installed, system patches need to be updated and drivers installed. In addition, daily system operations will generate cache files on the system disk. Nowadays, many WIN7 systems are installed using win7 cloned disc image files downloaded from the Internet. These win7 cloned disc images have been streamlined in different ways by the producers, so they have different capacities after installation.
Windows systems, including Windows 7, set the size to 1.5 times the physical memory by default. As a paging swap file, if it is the size managed by the system, then this volume changes automatically and often becomes larger and larger. If the physical memory is relatively small, only 512m or 1g, you can choose to keep this file.
If you keep this file, it is recommended to put it in another partition, not together with the C drive (system drive). Otherwise, you will still need to manually delete it when doing Ghost or other backups. It is recommended that you must specify the size, just specify 1.5 times the Ram physical memory size.
How to create a system disk in windows7
Step one: 1. Download the one-click U disk to install the system software;
2. Download the GHOST system to your computer. It is recommended to download: the latest win7 64-bit ultimate system download;
Step 2: Install the one-click U disk to install the system software and create a boot disk. After the installation is completed, double-click to open the one-click software, insert the mobile storage device, click the "One-click to create USB boot disk" button and start making a boot disk for you. Just disk,
Create USB boot disk with one click
Wait for a moment and a successful prompt box will pop up,
After the production is completed, please click the "Simulation Start" button to test.
Simulation started successfully
usb boot disk simulation boot
Step 3: Unzip the downloaded GHOST system file with the suffix .gho to a USB flash drive.
GHOST system suffix is .gho file
Step 4: Set the U disk as the first startup item
1. Turn on the computer and press the startup hotkey directly to enter the PE interface;
2. After booting into the BIOS settings, enter the PE interface;
Step 5: Enter the U disk system boot menu interface
1. Press number key 1 to quickly enter running PE, as shown in Figure 6.
Run PE
2. The PE startup interface will appear. It will run for 1-3 minutes depending on the computer model, as shown in Figure 7.
PE startup interface
Step 6: Enter WindowsPE and start restoring the system.
1. For new computers or new hard drives, please partition them first before installing the system.
2. You can directly run ONEKEY (one-click restore) to restore the system without partitioning.
3. Select the path where the system files are located.
4. Select Yes to start the system restore operation.
5. Restart after the system is completely restored, and the remaining operations can be performed unattended.
System restart
The above content is the detailed process of installing the system on a USB flash drive. I think it has been explained clearly. If you don’t understand, you can refer to the above tutorial to complete the system installation on a USB flash drive step by step. More exciting content is welcome. Visit win7 system download site
How to reinstall the system using the system disk in Windows 7
Start the computer first and hold down the DEL key until the BIOS setting window appears.
2. Select and enter the second item on the left, "BIOS SETUP". Find the item or group containing the BOOT text inside, and find the three items "FIRST", "SECEND" and "THIRD" arranged in order, which represent "first startup", "second startup" and "third startup" respectively. Here we set it to "optical drive", "floppy drive" and "hard disk" in order. (If you do not see these three E-texts on this page, usually the option menu on the right side of BOOT is "SETUP", then press Enter to enter and you can see it) You should select "FIRST" and hit the Enter key. Select CD-ROM from the submenu. Press the Enter key again
3. After selecting the startup method, press the F10 key. An E-text dialog box will appear. Press the "Y" key (can be omitted) and press Enter. The computer will automatically restart, proving that the changed settings have taken effect.
Then use the CD to start. Just follow the prompts after startup. As long as the installation path is the C drive, there is nothing else. You don’t have to worry about damaging the machine.
The above is the detailed content of How much space does the WIN7 system disk occupy?. For more information, please follow other related articles on the PHP Chinese website!

Hot AI Tools

Undresser.AI Undress
AI-powered app for creating realistic nude photos

AI Clothes Remover
Online AI tool for removing clothes from photos.

Undress AI Tool
Undress images for free

Clothoff.io
AI clothes remover

Video Face Swap
Swap faces in any video effortlessly with our completely free AI face swap tool!

Hot Article
Hot Tools

Notepad++7.3.1
Easy-to-use and free code editor

SublimeText3 Chinese version
Chinese version, very easy to use

Zend Studio 13.0.1
Powerful PHP integrated development environment

Dreamweaver CS6
Visual web development tools

SublimeText3 Mac version
God-level code editing software (SublimeText3)
Hot Topics


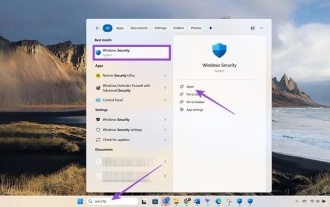
 Microsoft's New PowerToys Search Is the Missing Feature Windows 11 Needs
Apr 03, 2025 am 03:53 AM
Microsoft's New PowerToys Search Is the Missing Feature Windows 11 Needs
Apr 03, 2025 am 03:53 AM
Microsoft's latest PowerToys update introduces a game-changing search feature reminiscent of macOS' Spotlight. This improved "Command Palette" (formerly PowerToys Run) surpasses the functionality of the Windows R Run command and the task
 Windows kb5054979 update information Update content list
Apr 15, 2025 pm 05:36 PM
Windows kb5054979 update information Update content list
Apr 15, 2025 pm 05:36 PM
KB5054979 is a cumulative security update released on March 27, 2025, for Windows 11 version 24H2. It targets .NET Framework versions 3.5 and 4.8.1, enhancing security and overall stability. Notably, the update addresses an issue with file and directory operations on UNC shares using System.IO APIs. Two installation methods are provided: one through Windows Settings by checking for updates under Windows Update, and the other via a manual download from the Microsoft Update Catalog.
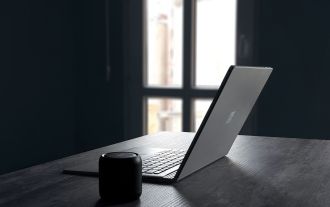
 Nanoleaf Wants to Change How You Charge Your Tech
Apr 17, 2025 am 01:03 AM
Nanoleaf Wants to Change How You Charge Your Tech
Apr 17, 2025 am 01:03 AM
Nanoleaf's Pegboard Desk Dock: A Stylish and Functional Desk Organizer Tired of the same old charging setup? Nanoleaf's new Pegboard Desk Dock offers a stylish and functional alternative. This multifunctional desk accessory boasts 32 full-color RGB
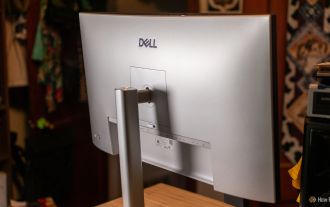 Dell UltraSharp 4K Thunderbolt Hub Monitor (U2725QE) Review: The Best Looking LCD Monitor I've Tested
Apr 06, 2025 am 02:05 AM
Dell UltraSharp 4K Thunderbolt Hub Monitor (U2725QE) Review: The Best Looking LCD Monitor I've Tested
Apr 06, 2025 am 02:05 AM
Dell's UltraSharp 4K Thunderbolt Hub Monitor (U2725QE): An LCD That Rivals OLED For years, I've coveted OLED monitors. However, Dell's new UltraSharp 4K Thunderbolt Hub Monitor (U2725QE) has changed my mind, exceeding expectations with its impressiv
 3 Best Ways to Detect and Remove Malware in Windows 11
Apr 02, 2025 pm 06:27 PM
3 Best Ways to Detect and Remove Malware in Windows 11
Apr 02, 2025 pm 06:27 PM
Mastering Malware Detection in Windows 11: Three Easy Methods Malware, encompassing viruses, adware, and data-stealing code, poses a significant threat. With a staggering 190,000 attacks per second, effective malware detection is crucial. This guide
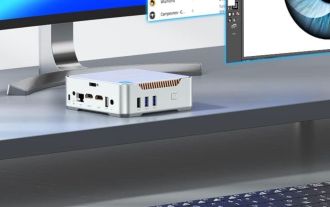 You Can Get This Powerful Mini PC for Under $150 Today
Apr 02, 2025 am 03:55 AM
You Can Get This Powerful Mini PC for Under $150 Today
Apr 02, 2025 am 03:55 AM
Kamrui GK3Plus Mini PC: Small and powerful, affordable! During Amazon's spring sale, the Kamrui GK3Plus Mini PC is priced as low as $150! This mini computer has powerful performance, easy upgrade and small size, making it an ideal choice for users who pursue cost-effectiveness. Whether it’s a mini computer enthusiast or a first-time user who’s trying out a small computer, the Kamrui GK3Plus Mini PC is an excellent starter choice. Originally priced at $199, Amazon currently enjoys a 15% discount (and a $20 coupon) and can be purchased for less than $149. Such a affordable price, but with a good configuration: equipped with a slightly old but competent In
 These Are My Go-To Free Alternatives for Paid Windows Apps
Apr 04, 2025 am 03:42 AM
These Are My Go-To Free Alternatives for Paid Windows Apps
Apr 04, 2025 am 03:42 AM
Many free apps rival their paid counterparts in functionality. This list showcases excellent free Windows alternatives to popular paid software. I firmly believe in using free software unless a paid option offers a crucial, missing feature. These
 I Never Use Windows Without Tweaking These Accessibility Features
Apr 02, 2025 am 06:01 AM
I Never Use Windows Without Tweaking These Accessibility Features
Apr 02, 2025 am 06:01 AM
The accessibility features of Windows systems are not designed only for people with disabilities, they can also significantly improve the productivity of ordinary users. Even without a disability, I rely on some accessibility features to improve efficiency and can't even imagine how to use Windows without them. Here are some features worth trying: Watch videos easily: Use real-time subtitles Sometimes to save time, I speed up the video, but this makes the audio difficult to understand. Or, the speaker has a heavier accent, contains professional terms, or I can’t use my headphones in the library. In these cases, I would rely on Windows' real-time subtitles feature, which generates real-time subtitles for any audio for easy reading. Enable this feature, open the Settings app, and navigate to Assistant
