

How do I set up my router to connect to a WiFi network?

I have a router at home and I want to connect to wifi. Where can I set it up so that I can connect?
Follow the following steps to set up the wireless router: 1. Plug in the wireless router and reset it (restore to factory settings); 2. Do not connect the modem, connect the computer to any LAN port of the wireless router; 3. Enter the setting page and select Set up in PPPOE (ADSL virtual dial-up) mode; 4. Set SSID, encryption method and password.
After setting up, just connect the network cable from the modem to the WAN port of the wireless router.
Router setup diagrams are designed to help beginners set up a network. Although the technical points are not complicated, the tedious steps are often daunting. Here, we will show the entire process of specific operations in detail, allowing you to easily master the router settings.
TP-Link Router Settings Equipment Preparation
First of all, in order to set up a network, you need a router (you can choose a 4-port, 8-port, 16-port or more port model). If you have many computers, you can buy a multi-port switch. In addition, you will also need to prepare some network cable straight-through cables and a telecom modem (if you have a dedicated line, you do not need a modem). At least two or more PC computers are required (if there is only one, you can use a router, but the meaning of using a router will be lost).
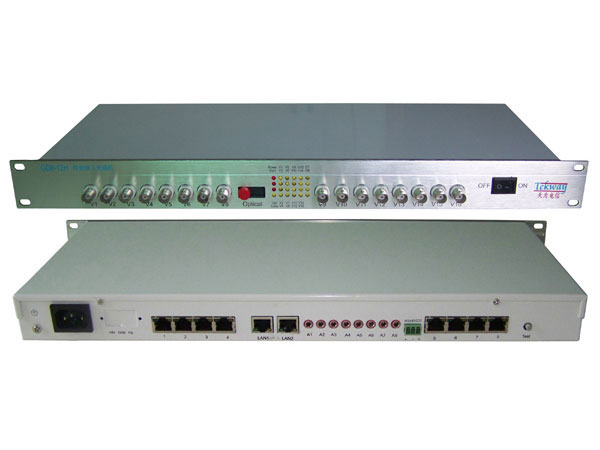
In fact, the routers launched by TP-LINK company, including TP-LINK TL-402M, 401M and other models, their routing opening methods are generally similar. The following takes TP-LINK TL-402M as an example for explanation. Please refer to the attached figure 1.
Figure 1TP-LINK TL-402M
tp-link Router instructions are here. Follow the instructions in the picture to correctly connect the PC, Telecom Broadband MODEM and router, and the network will be set up. The following explains how to enable routing functionality.
Preliminary settings before setting up TP-Link router:
If the line has been connected, we can open a connected computer at will. Open the "Network Neighborhood" properties (Picture 2), then open the "Local Area Connection" properties (Picture 3), then open the "TCP/IP Protocol" properties (Picture 4). Here we can set the IP address to 192.168.1.2, the subnet mask to 255.255.255.0, and the gateway to 192.168.1.1 (Picture 5). After clicking OK, after configuring the router, we can set up DNS.
Note: You can go to the Control Panel Network Connection to set it.
Take xp as an example, please see the details in Figure 2 to Figure 5
2 Open the Network Neighborhood properties
3 Local connection properties
4 tcp/ip protocol attributes
5 Set ip etc.
By the way, I would like to remind everyone that the IP network segment can be set between 192.168.1.2-192.168.1.254. Do not set the same IP to multiple computers, as this will cause IP conflicts. Remember .
Then you can open Internet Explorer on the desktop, enter 192.168.1.1 and press Enter. Please see picture 6
6 Open Internet Explorer on the desktop
Here you are prompted to enter your username and password. The default username and password are both admin, which is also written in the router manual. After entering, press Enter to enter the router configuration interface.
Note: The default IP of tplink router is basically 192.168.1.1 and the password is basically admin
TP-Link router settings router settings:
Enter the router interface for the first time, please see picture 7
7 Enter the router interface
Here we choose the setup wizard. Please see picture 8
8 Select the setup wizard
Then next step, please see picture 9
9 Next step
Select adsl virtual dial-up here. Most of us choose it. Other static ones are chosen by dedicated line users. We will not explain them in detail here. We know that broadband users, China Railcom, China Netcom and other virtual dial-up users can just choose it. , then please see picture 10
for the next step10 Next step
Click Next and when you see picture 11, click Finish to set up the route.
11 Next step
Then set the network parameters and WAN port settings, please see picture 12
12 Network parameters
Okay, everything in the router configuration has been set up. Now we only need to restart the router and it will be OK. Click on the system tools and restart the router. It will be fine in a few seconds. Please see picture 13
13 Restart the router
At this time, we close the configured web page window and connect to other computers to access the Internet.
Note: Because the DHCP service of this router is automatically started, as long as you connect the PC, the router will assign an IP and wait for it to the computer. Therefore, other computers basically do not need to be set up. They can directly connect the router or switch with a network cable. You can go online.
TP-Link Router Settings Details:
Of course, you can also set the IP manually:
How to set up fiber optic router
Nowadays, almost everyone has a smartphone, and many users also own laptops, tablets and other digital products. Many family members generally have high requirements for wireless networks. However, due to low bandwidth, traditional telephone line networks have also It is difficult to meet the needs of many Internet users in a family, so many friends nowadays choose optical fiber networks with better network performance when looking for broadband. So how to set up the fiber router? The following explains the setup process in detail.
Step 1: First turn on the computer, then open a web page at will, and then enter the login IP address of your router in the browser URL, as shown below:
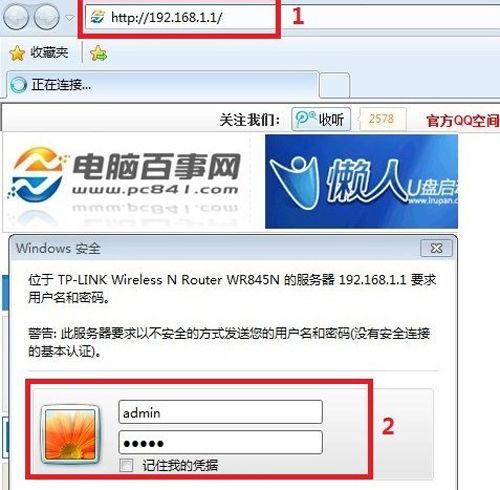
As shown in the picture above, taking the author's wireless router as an example, first enter 192.168.1.1 in the browser address bar and then press the Enter key. The following user login dialog box will pop up. We enter the default user name and password of the router, and then Click "OK" at the bottom to enter the built-in setting interface of the wireless router.
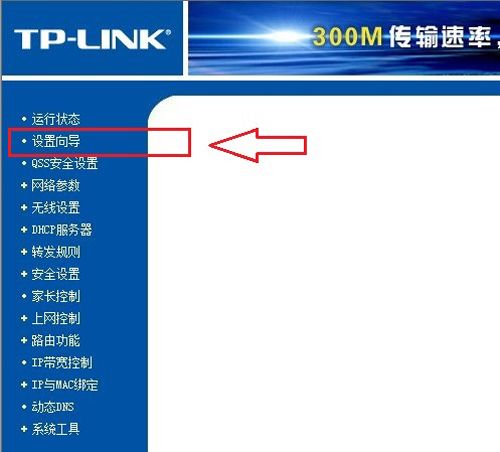
Step 2. After entering the router setting interface, we first click on the "Setup Wizard" in the left navigation as shown below:
Step 3. After clicking "Setup Wizard", a prompt interface will pop up. We can just click Next, as shown below:
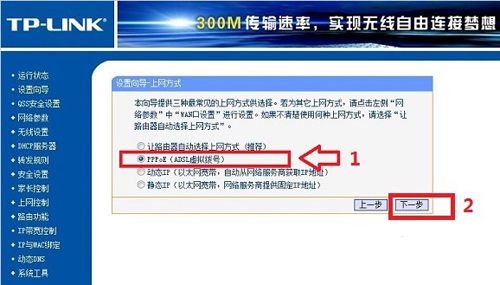
Step 4. Next we will see that we are asked to choose "Internet access method". Usually we are provided by the merchant with our Internet access account and password, so we usually choose the second item "PPoE virtual dial-up Internet access", as shown in the figure below If you are not sure, you can consult your network provider or select "Let the router automatically select the Internet access method". After completion, click Next to continue.

Step 5. Next we will see that we are asked to enter the Internet account and password. This is the Internet account and password provided to us by the network provider. As mentioned above, just fill in the account and password.
How to set up fiber optic router? After completion, we click Next to complete the most basic router settings. Sometimes we will be prompted to restart the router, and we can confirm the restart. In this way, the basic settings of the router are completed. We can try to see if we can use the computer to access the Internet normally. If we can access the Internet normally, then the above setting steps are not correct. If not, please reset the wizard and pay attention to the Internet access selected. For those who don’t understand the method, please consult your network provider, or try them one by one. Be careful when entering your Internet account and password at the end. Generally, if you carefully follow the above steps to set up, there will be no problems.
How to set up router ddwrt diagram
The setting method of wireless router is as follows:
1. Connect the broadband bus (the network cable from the modem) to the WAN port of the router.
2. Connect one end of the network cable to any LAN port of the router, and the other end to the computer, and start the computer and router equipment;
3. After starting the device, open the browser and enter the router address in the address bar (you can see it on the back of the router) to enter the wireless router settings
interface.
4. An account and password for logging into the router will appear on the setting interface. Enter the default account admin
(PS: Router account numbers and passwords are usually printed on the back or around the router. Some router passwords are created when setting them up for the first time. If you forget them, you can reset the router and set the password again.)
5. Set up step by step according to the setup wizard and select the Internet access method. Usually ADSL users choose the first item PPPoE. If they are using other networks
The service provider will choose the following two items based on the actual situation. If you don’t know how to choose, just choose the first item to automatically select it, which is convenient for novices to operate. After selecting, click Next;
6. Enter the account number and password you applied for from the network service provider. After completing the input, go to the next step;
7. Set the wifi password, and try to make the combination of letters and numbers more complex to prevent it from being used on the Internet.
8. After the input is correct, you will be prompted whether to restart the router. Select Yes to confirm to restart the router. After restarting the router, you can access the Internet normally.
The above is the detailed content of How do I set up my router to connect to a WiFi network?. For more information, please follow other related articles on the PHP Chinese website!

Hot AI Tools

Undresser.AI Undress
AI-powered app for creating realistic nude photos

AI Clothes Remover
Online AI tool for removing clothes from photos.

Undress AI Tool
Undress images for free

Clothoff.io
AI clothes remover

Video Face Swap
Swap faces in any video effortlessly with our completely free AI face swap tool!

Hot Article
Hot Tools

Notepad++7.3.1
Easy-to-use and free code editor

SublimeText3 Chinese version
Chinese version, very easy to use

Zend Studio 13.0.1
Powerful PHP integrated development environment

Dreamweaver CS6
Visual web development tools

SublimeText3 Mac version
God-level code editing software (SublimeText3)
Hot Topics
 1656
1656
 14
1415
52
1309
25
1257
29
1229
24
14
1415
52
1309
25
1257
29
1229
24

 Fixdisk Windows 7: Check Your Hard Disk for Errors on Windows 7
Apr 14, 2025 am 12:40 AM
Fixdisk Windows 7: Check Your Hard Disk for Errors on Windows 7
Apr 14, 2025 am 12:40 AM
If you suspect your hard drive encounters issues, you can check the drive for errors on Windows 7. This php.cn post talks about fixdisk Windows 7. You can follow the guide to check the hard drive for errors on Windows 7.
 Effortles Fixes for Black Screen After Installing a Graphics Driver
Apr 15, 2025 am 12:11 AM
Effortles Fixes for Black Screen After Installing a Graphics Driver
Apr 15, 2025 am 12:11 AM
Have you ever encountered a black screen after installing a graphics driver like an Nvidia driver in Windows 10/11? Now in this post from php.cn, you can find a couple of worth trying solutions to the Nvidia driver update black screen.
 How to Install Windows X-Lite Optimum 11 23H2 Home/Pro via ISO
Apr 09, 2025 am 12:49 AM
How to Install Windows X-Lite Optimum 11 23H2 Home/Pro via ISO
Apr 09, 2025 am 12:49 AM
Windows X-Lite Optimum 11 23H2 Home or Optimum 11 Pro could be your option if you need a custom lite system based on Windows 11 23H2. Go on reading and php.cn will show you how to download Optimum 11 23H2 ISO and install Pro or Home on your PC.
 Is Core Isolation Blocked by ew_usbccgpfilter.sys? Here Are Fixes!
Apr 13, 2025 am 12:47 AM
Is Core Isolation Blocked by ew_usbccgpfilter.sys? Here Are Fixes!
Apr 13, 2025 am 12:47 AM
Many SurfaceBook users report that they meet the “core isolation blocked by ew_usbccgpfilter.sys” issue on Windows 11/10. This post from php.cn helps to fix the annoying issue. Keep on your reading.
 Win 11 Builds 22621.3078 and 22631.3078 (KB5034204) Released
Apr 05, 2025 am 01:35 AM
Win 11 Builds 22621.3078 and 22631.3078 (KB5034204) Released
Apr 05, 2025 am 01:35 AM
Want to know the new improvements and bug fixes in Windows 11 KB5034204? Want to how to get Windows 11 KB5034204 on your device? In this post, php.cn Software will introduce the information you want to know.
 How to Turn Off Tips and Suggestions Notifications in Windows?
Apr 09, 2025 am 12:46 AM
How to Turn Off Tips and Suggestions Notifications in Windows?
Apr 09, 2025 am 12:46 AM
Tips and Suggestions Notifications is a new design of Windows 11. It will give you suggestions and tips on some new features. But some of you may be bothered by the popup tips. You can read this post from php.cn to learn how to turn off tips and sugg
 Advanced Tips for Windows P Not Working on Windows
Apr 11, 2025 am 12:49 AM
Advanced Tips for Windows P Not Working on Windows
Apr 11, 2025 am 12:49 AM
You must be familiar with the Windows P shortcut if you have more than one monitor. However, the Windows P not working properly might happen occasionally. If you are facing this problem, this post from php.cn can help you indeed.
 Difference Between RAID Recovery and Hard Drive Recovery
Apr 17, 2025 am 12:50 AM
Difference Between RAID Recovery and Hard Drive Recovery
Apr 17, 2025 am 12:50 AM
Data recovery is always a heated topic. To successfully restore data from your device, you should know how it stores data. You can learn the difference between RAID recovery and hard drive recovery from this php.cn post.
