

How to colorize photos to create an artistic effect?

Please tell me how to PS the photo into the artistic tone as shown in the picture
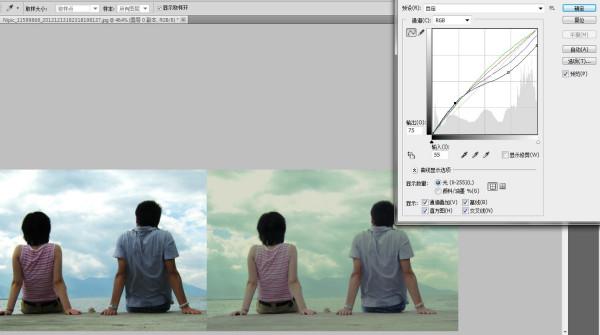
Actually, if you are familiar with PS curve adjustment commands, this color is easy to adjust. . . Please refer to the picture below.
Let’s take a closer look at this picture provided by the original poster. . .
1 The tone of the picture is gray, the bright parts are darker, and the dark parts are not dark, so the RGB curve in the curve darkens the bright parts and brightens the dark parts.
2 The overall color of the picture is yellowish green, which has a nostalgic effect. Then, we need to improve the green curve as a whole. .
3 The dark part of the picture is warmer and the bright part is cooler, so the red curve and the blue curve both push down the bright part and lift up the dark part. . . The change range of the red curve is smaller, and the change range of the blue curve can be larger. . .
How about it? It's very simple. . . . I hope it will be helpful to you. The picture below is an ordinary picture. It is estimated that a mobile phone camera can take a picture like this. A simple color adjustment will make it tasteful. If you want the picture to have more feeling, you can also use other Richer means. . . If you have any questions, you can add them. . .
How to adjust the characters that feel like they are carved out in PS
1. Create a new file, set the width to 10 cm, the height to 8 cm, and the resolution to 300 pixels.
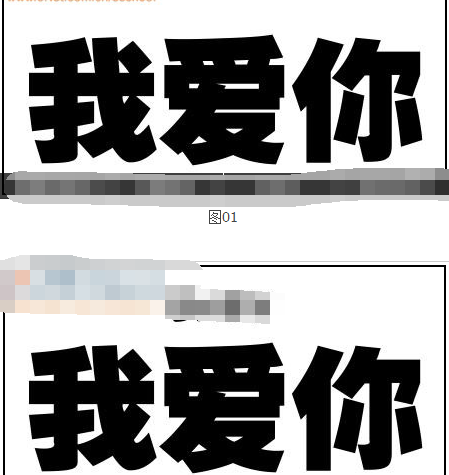
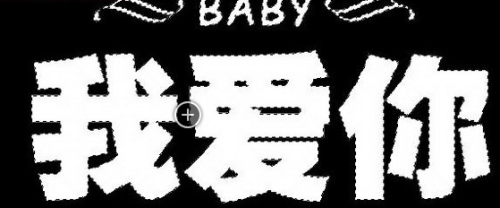
2. Select the "Text Tool" in the toolbox, set the appropriate font and font size in its property bar, and enter text in the screen. The effect is shown in Figures 01 and 02.
3. Select the "Custom Shape Tool" in the toolbox and add shapes to the image. The effect is as shown in Figure 03.
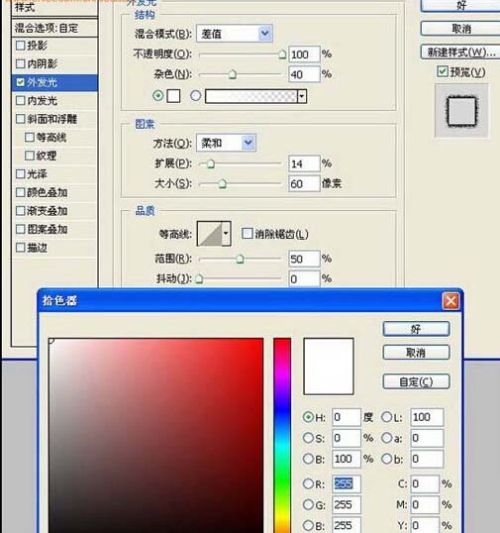
4. Merge all layers except the background to generate layer 1. Set the opacity of layer 1 to 0% in the layer panel. Then double-click layer 1 to bring up the layer style dialog box, check the outer glow style, and set the parameters in the pop-up dialog box as shown in Figure 04. After clicking OK, the text effect is as shown in Figure 05.

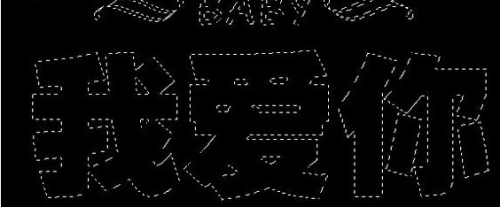
5. Hold down the Ctrl key and click the thumbnail of layer 1 to bring up the selection. The effect is as shown in Figure 06. Switch to the channel panel and click the Create New Channel button below the channel panel to create a " Alpha 1” channel, the effect is shown in Figure 07, set the foreground color to white, and fill the selection with white as shown in Figure 08.
6. Switch to the layers panel and press the "Ctrl D" key to cancel the selection.
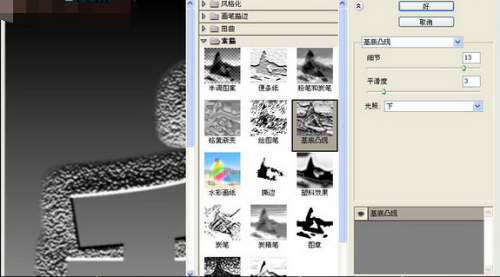
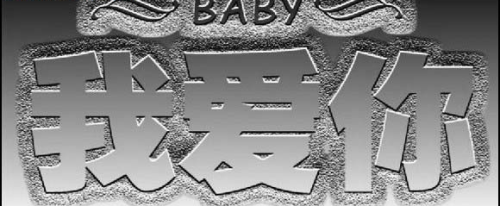
7. Press the Ctrl E key to merge the layers upward. The merged layer will be the background layer. Execute the "Filter", "Sketch" and "Base Extrusion" commands in the menu bar, and set the base extrusion dialog box that pops up. The parameters are shown in Figure 09, and the effect after clicking the OK button is shown in Figure 10.
8. Switch to the channel panel, hold down the Ctrl key and click the "Alpha 1" channel, load its selection into the background layer, press the Shift Ctrl I key to invert the selection, the effect is shown in Figure 11.
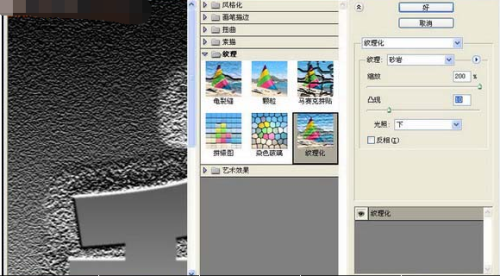
9. Execute the "Filter", "Texture" and "Texture" commands in the menu bar, and set the parameters in the pop-up "Texture" dialog box as shown in Figure 12. After clicking the OK button, cancel the selected text. The effect is shown in Figure 13.
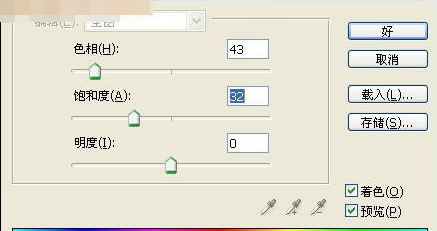
10. Execute the "Image", "Adjustment" and "Hue/Saturation" commands in the menu bar, check the coloring option in the pop-up "Hue/Saturation" dialog box, and set the parameters as shown in Figure 14. The text effect after clicking the OK button is shown in Figure 15. That is, the engraving effect is completed.

How to use Photoshop to create a fresh effect
Foreword: Many people like the fresh and fresh photo style, but they are not very good at adjusting it. Here is a very simple method to make the picture look clearer. Here are the specific steps, let’s learn together !
The steps are as follows:
1. Tools required
(1)photoshop
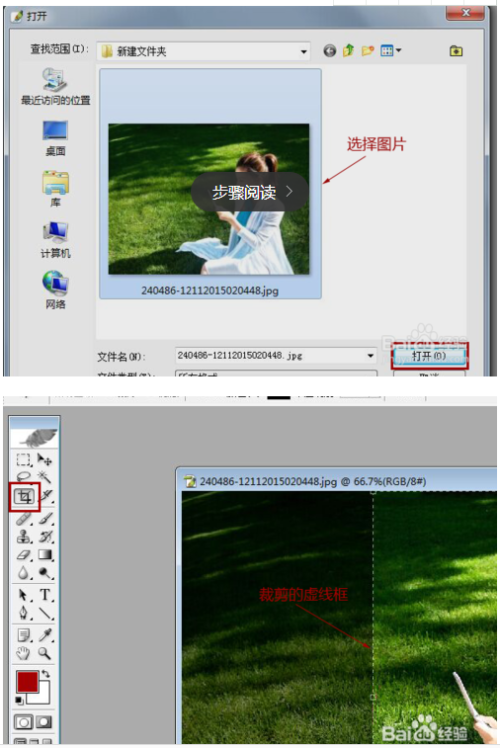
2. First, we open a piece of material, click the crop tool, drag a box on the material picture, move the box, and crop the material appropriately until you are satisfied. Take the picture as an example
(1) Then, create a new blank layer above the cropped material layer. Click the penultimate button at the bottom of the layers panel to create a new blank layer.
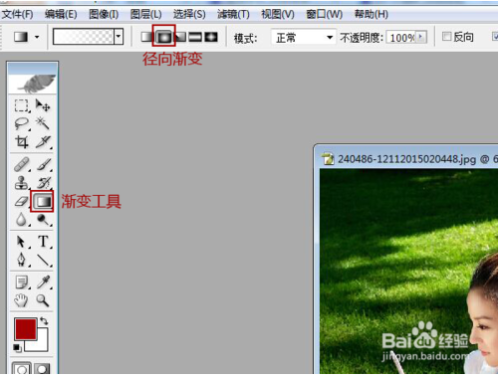
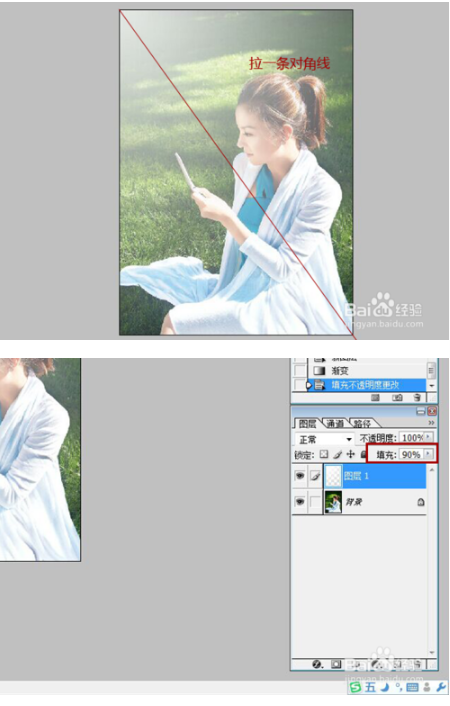
(2) Then click to select the newly created blank layer, click the Gradient Tool in the tool box, and select the second radial gradient. The remaining values in the menu bar do not need to be changed. as the picture shows
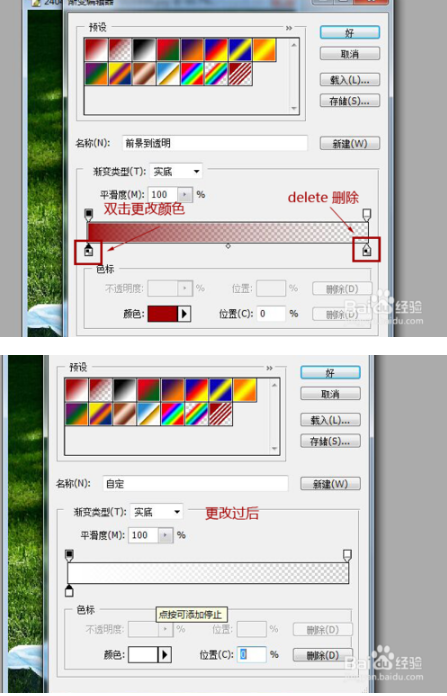
3. Next, we click on the color gradient box, and then a gradient editor will appear. Select the second color in the preset (from foreground to transparent).
(1) Then click the color patch in the lower right corner, press the Delete key to delete the color patch, then double-click the color patch in the lower left corner, and then a color picker will appear, change the color to white. Then click OK.
(2) Finally, we select the newly created blank layer, draw a line along the diagonal, and then a white to transparent gradient effect will appear. Change the fill to 90% and save the image. The effect is as follows As shown in the picture
The above is: How to use Photoshop to create a small and fresh effect, for the reference and use of friends who have this problem.
4. If none of the above functions can be used, there may be a problem with the program. It is recommended to re-download and install it. It is recommended to use photoshop cs6:.3322.cc/soft/201509051786.html
The above is the detailed content of How to colorize photos to create an artistic effect?. For more information, please follow other related articles on the PHP Chinese website!

Hot AI Tools

Undresser.AI Undress
AI-powered app for creating realistic nude photos

AI Clothes Remover
Online AI tool for removing clothes from photos.

Undress AI Tool
Undress images for free

Clothoff.io
AI clothes remover

Video Face Swap
Swap faces in any video effortlessly with our completely free AI face swap tool!

Hot Article
Hot Tools

Notepad++7.3.1
Easy-to-use and free code editor

SublimeText3 Chinese version
Chinese version, very easy to use

Zend Studio 13.0.1
Powerful PHP integrated development environment

Dreamweaver CS6
Visual web development tools

SublimeText3 Mac version
God-level code editing software (SublimeText3)
Hot Topics
 1664
1664
 14
1422
52
1316
25
1268
29
1240
24
14
1422
52
1316
25
1268
29
1240
24

 Fixdisk Windows 7: Check Your Hard Disk for Errors on Windows 7
Apr 14, 2025 am 12:40 AM
Fixdisk Windows 7: Check Your Hard Disk for Errors on Windows 7
Apr 14, 2025 am 12:40 AM
If you suspect your hard drive encounters issues, you can check the drive for errors on Windows 7. This php.cn post talks about fixdisk Windows 7. You can follow the guide to check the hard drive for errors on Windows 7.
 Is Core Isolation Blocked by ew_usbccgpfilter.sys? Here Are Fixes!
Apr 13, 2025 am 12:47 AM
Is Core Isolation Blocked by ew_usbccgpfilter.sys? Here Are Fixes!
Apr 13, 2025 am 12:47 AM
Many SurfaceBook users report that they meet the “core isolation blocked by ew_usbccgpfilter.sys” issue on Windows 11/10. This post from php.cn helps to fix the annoying issue. Keep on your reading.
 Effortles Fixes for Black Screen After Installing a Graphics Driver
Apr 15, 2025 am 12:11 AM
Effortles Fixes for Black Screen After Installing a Graphics Driver
Apr 15, 2025 am 12:11 AM
Have you ever encountered a black screen after installing a graphics driver like an Nvidia driver in Windows 10/11? Now in this post from php.cn, you can find a couple of worth trying solutions to the Nvidia driver update black screen.
 How to Install Windows X-Lite Optimum 11 23H2 Home/Pro via ISO
Apr 09, 2025 am 12:49 AM
How to Install Windows X-Lite Optimum 11 23H2 Home/Pro via ISO
Apr 09, 2025 am 12:49 AM
Windows X-Lite Optimum 11 23H2 Home or Optimum 11 Pro could be your option if you need a custom lite system based on Windows 11 23H2. Go on reading and php.cn will show you how to download Optimum 11 23H2 ISO and install Pro or Home on your PC.
 KB2267602 Fails to Install: Here Is How to Fix It!
Apr 15, 2025 am 12:48 AM
KB2267602 Fails to Install: Here Is How to Fix It!
Apr 15, 2025 am 12:48 AM
KB2267602 is a protection or definition update for Windows Defender designed to fix vulnerabilities and threats in Windows. Some users reported that they were unable to install KB2267602. This post from php.cn introduces how to fix the “KB2267602 fai
 How to Turn Off Tips and Suggestions Notifications in Windows?
Apr 09, 2025 am 12:46 AM
How to Turn Off Tips and Suggestions Notifications in Windows?
Apr 09, 2025 am 12:46 AM
Tips and Suggestions Notifications is a new design of Windows 11. It will give you suggestions and tips on some new features. But some of you may be bothered by the popup tips. You can read this post from php.cn to learn how to turn off tips and sugg
 Advanced Tips for Windows P Not Working on Windows
Apr 11, 2025 am 12:49 AM
Advanced Tips for Windows P Not Working on Windows
Apr 11, 2025 am 12:49 AM
You must be familiar with the Windows P shortcut if you have more than one monitor. However, the Windows P not working properly might happen occasionally. If you are facing this problem, this post from php.cn can help you indeed.
 Difference Between RAID Recovery and Hard Drive Recovery
Apr 17, 2025 am 12:50 AM
Difference Between RAID Recovery and Hard Drive Recovery
Apr 17, 2025 am 12:50 AM
Data recovery is always a heated topic. To successfully restore data from your device, you should know how it stores data. You can learn the difference between RAID recovery and hard drive recovery from this php.cn post.
