
 Backend Development
Python Tutorial
Step-by-step guide to creating a virtual environment using pipenv
Backend Development
Python Tutorial
Step-by-step guide to creating a virtual environment using pipenv
Step-by-step guide to creating a virtual environment using pipenv


Teach you step by step how to use pipenv to create a virtual environment
Introduction:
In the Python development process, using a virtual environment can help us better manage dependencies and project, and pipenv is a powerful tool that simplifies the creation and management of virtual environments. This article will give you detailed steps and specific code examples to teach you how to use pipenv to create a virtual environment.
1. Install pipenv
-
Use pip to install pipenv
Open a terminal or command prompt and enter the following command to install pipenv:pip install pipenv
Copy after login Use brew to install pipenv (for macOS)
If you are using a macOS system and have Homebrew installed, you can use the following command to install pipenv:brew install pipenv
Copy after login
2. Create a virtual environment
Enter the project folder
First, switch to the root directory of your project folder. If you have not created a project folder, you can use the following command to create it:mkdir myproject cd myproject
Copy after loginCreate a virtual environment
In the project folder, enter the following command to create a virtual environment:pipenv install
Copy after loginThis command will automatically create a virtual environment containing the Python interpreter and a blank Pipfile.
3. Add dependencies
Installation package
Use the following command to install the package into the virtual environment:pipenv install package_name
Copy after loginFor example, to install Django, you can use the following command:
pipenv install django
Copy after loginInstall a specific version of the package
If you need to install a specific version of the package, you can add the version number after the package name , such as:pipenv install package_name==1.0.0
Copy after loginInstalling development dependencies
If you need to install some dependencies only for development, you can use the following command:pipenv install --dev package_name
Copy after loginInstalled packages like this It will only be installed in the development environment and will not be deployed to the production environment.
4. Enter the virtual environment
Working in a virtual environment can help us avoid package conflicts with the system environment. Use the following command to enter the virtual environment:
pipenv shell
This command will activate the virtual environment and display the name of the virtual environment in the terminal or command prompt, for example:
(myproject) $
5. Uninstall the package
To uninstall the package, you can use the following command:
pipenv uninstall package_name
6. Exit the virtual environment
After completing the work, use the following command to exit the virtual environment:
exit
7. Clean up the virtual environment
If you no longer need the virtual environment, you can use the following command to delete the virtual environment and associated files:
pipenv --rm
Summary:
By using pipenv, we can easily manage the dependencies and environment of the Python project. This article introduces the steps of installing pipenv, creating a virtual environment, adding dependencies, entering and exiting the virtual environment, and cleaning up the virtual environment, and comes with specific code examples. I hope this article can help you quickly get started using pipenv and improve Python development efficiency.
The above is the detailed content of Step-by-step guide to creating a virtual environment using pipenv. For more information, please follow other related articles on the PHP Chinese website!

Hot AI Tools

Undresser.AI Undress
AI-powered app for creating realistic nude photos

AI Clothes Remover
Online AI tool for removing clothes from photos.

Undress AI Tool
Undress images for free

Clothoff.io
AI clothes remover

Video Face Swap
Swap faces in any video effortlessly with our completely free AI face swap tool!

Hot Article
Hot Tools

Notepad++7.3.1
Easy-to-use and free code editor

SublimeText3 Chinese version
Chinese version, very easy to use

Zend Studio 13.0.1
Powerful PHP integrated development environment

Dreamweaver CS6
Visual web development tools

SublimeText3 Mac version
God-level code editing software (SublimeText3)
Hot Topics


 Tutorial on how to use Dewu
Mar 21, 2024 pm 01:40 PM
Tutorial on how to use Dewu
Mar 21, 2024 pm 01:40 PM
Dewu APP is currently a very popular brand shopping software, but most users do not know how to use the functions in Dewu APP. The most detailed usage tutorial guide is compiled below. Next is the Dewuduo that the editor brings to users. A summary of function usage tutorials. Interested users can come and take a look! Tutorial on how to use Dewu [2024-03-20] How to use Dewu installment purchase [2024-03-20] How to obtain Dewu coupons [2024-03-20] How to find Dewu manual customer service [2024-03-20] How to check the pickup code of Dewu [2024-03-20] Where to find Dewu purchase [2024-03-20] How to open Dewu VIP [2024-03-20] How to apply for return or exchange of Dewu
 Quark browser usage tutorial
Feb 24, 2024 pm 04:10 PM
Quark browser usage tutorial
Feb 24, 2024 pm 04:10 PM
Quark Browser is a very popular multi-functional browser at the moment, but most friends don’t know how to use the functions in Quark Browser. The most commonly used functions and techniques will be sorted out below. Next, the editor will guide users. Here is a summary of the multi-functional usage tutorials of Quark Browser. Interested users can come and take a look together! Tutorial on how to use Quark Browser [2024-01-09]: How to scan test papers to see answers on Quark [2024-01-09]: How to enable adult mode on Quark Browser [2024-01-09]: How to delete used space on Quark [2024 -01-09]: How to clean up the Quark network disk storage space [2024-01-09]: How to cancel the backup of Quark [2024-01-09]: Quark
 Upgrading numpy versions: a detailed and easy-to-follow guide
Feb 25, 2024 pm 11:39 PM
Upgrading numpy versions: a detailed and easy-to-follow guide
Feb 25, 2024 pm 11:39 PM
How to upgrade numpy version: Easy-to-follow tutorial, requires concrete code examples Introduction: NumPy is an important Python library used for scientific computing. It provides a powerful multidimensional array object and a series of related functions that can be used to perform efficient numerical operations. As new versions are released, newer features and bug fixes are constantly available to us. This article will describe how to upgrade your installed NumPy library to get the latest features and resolve known issues. Step 1: Check the current NumPy version at the beginning
 In summer, you must try shooting a rainbow
Jul 21, 2024 pm 05:16 PM
In summer, you must try shooting a rainbow
Jul 21, 2024 pm 05:16 PM
After rain in summer, you can often see a beautiful and magical special weather scene - rainbow. This is also a rare scene that can be encountered in photography, and it is very photogenic. There are several conditions for a rainbow to appear: first, there are enough water droplets in the air, and second, the sun shines at a low angle. Therefore, it is easiest to see a rainbow in the afternoon after the rain has cleared up. However, the formation of a rainbow is greatly affected by weather, light and other conditions, so it generally only lasts for a short period of time, and the best viewing and shooting time is even shorter. So when you encounter a rainbow, how can you properly record it and photograph it with quality? 1. Look for rainbows. In addition to the conditions mentioned above, rainbows usually appear in the direction of sunlight, that is, if the sun shines from west to east, rainbows are more likely to appear in the east.
 What software is photoshopcs5? -photoshopcs5 usage tutorial
Mar 19, 2024 am 09:04 AM
What software is photoshopcs5? -photoshopcs5 usage tutorial
Mar 19, 2024 am 09:04 AM
PhotoshopCS is the abbreviation of Photoshop Creative Suite. It is a software produced by Adobe and is widely used in graphic design and image processing. As a novice learning PS, let me explain to you today what software photoshopcs5 is and how to use photoshopcs5. 1. What software is photoshop cs5? Adobe Photoshop CS5 Extended is ideal for professionals in film, video and multimedia fields, graphic and web designers who use 3D and animation, and professionals in engineering and scientific fields. Render a 3D image and merge it into a 2D composite image. Edit videos easily
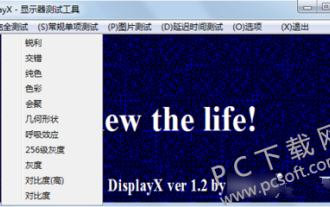 DisplayX (monitor testing software) tutorial
Mar 04, 2024 pm 04:00 PM
DisplayX (monitor testing software) tutorial
Mar 04, 2024 pm 04:00 PM
Testing a monitor when buying it is an essential part to avoid buying a damaged one. Today I will teach you how to use software to test the monitor. Method step 1. First, search and download the DisplayX software on this website, install it and open it, and you will see many detection methods provided to users. 2. The user clicks on the regular complete test. The first step is to test the brightness of the display. The user adjusts the display so that the boxes can be seen clearly. 3. Then click the mouse to enter the next link. If the monitor can distinguish each black and white area, it means the monitor is still good. 4. Click the left mouse button again, and you will see the grayscale test of the monitor. The smoother the color transition, the better the monitor. 5. In addition, in the displayx software we
 Tutorial on how to turn off the payment sound on WeChat
Mar 26, 2024 am 08:30 AM
Tutorial on how to turn off the payment sound on WeChat
Mar 26, 2024 am 08:30 AM
1. First open WeChat. 2. Click [+] in the upper right corner. 3. Click the QR code to collect payment. 4. Click the three small dots in the upper right corner. 5. Click to close the voice reminder for payment arrival.
 Experts teach you! The Correct Way to Cut Long Pictures on Huawei Mobile Phones
Mar 22, 2024 pm 12:21 PM
Experts teach you! The Correct Way to Cut Long Pictures on Huawei Mobile Phones
Mar 22, 2024 pm 12:21 PM
With the continuous development of smart phones, the functions of mobile phones have become more and more powerful, among which the function of taking long pictures has become one of the important functions used by many users in daily life. Long screenshots can help users save a long web page, conversation record or picture at one time for easy viewing and sharing. Among many mobile phone brands, Huawei mobile phones are also one of the brands highly respected by users, and their function of cropping long pictures is also highly praised. This article will introduce you to the correct method of taking long pictures on Huawei mobile phones, as well as some expert tips to help you make better use of Huawei mobile phones.
