

Turn your CentOS into an OSPF router

| Introduction | Quagga is an open source routing software suite that turns Linux into a router that supports major routing protocols such as RIP, OSPF, BGP and IS-IS. It has full support for IPv4 and IPv6 and supports route/prefix filtering. Quagga can be a lifesaver in case your production router ever goes down and you don't have a spare but are waiting for a replacement. With proper configuration, Quagga can even function as a production router. |

In this tutorial, we will connect two branch office networks assuming there is a dedicated line connection between them (for example, 192.168.1.0/24 and 172.17.1.0/24).
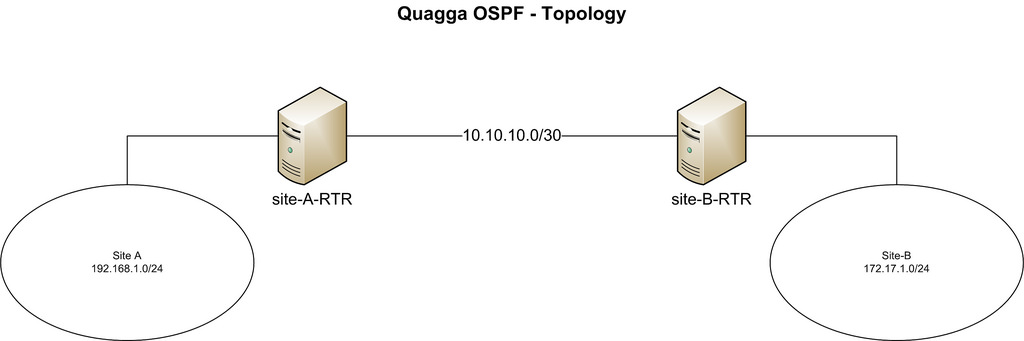
Our CentOS is on both ends of said private link. The two host names are set to "site-A-RTR" and "site-B-RTR' respectively. The following are the details of the IP addresses.
•Site-A: 192.168.1.0/24
•Site-B: 172.16.1.0/24
•Peer-to-peer network between two Linux routers: 10.10.10.0/30
Quagga includes several daemons that work together. In this tutorial, we will focus on setting up the following daemons.
1.Zebra: Core daemon, responsible for kernel interface and static routing.
2.Ospfd: IPv4 OSPF daemon.
We use yum to install Quagga.
# yum install quagga
In CentOS7, SELinux will prevent quagga from writing configuration files to /usr/sbin/zebra by default. This SELinux policy will interfere with the installation process we will introduce next, so we need to disable this policy. For this, either turning off SELinux (not recommended here) or enabling "zebrawriteconfig" as follows will work. If you are using CentOS 6 please skip this step.
# setsebool -P zebra_write_config 1
If this modification is not made, we will see the following error when we try to save the configuration in the Quagga command line.
Can't open configuration file /etc/quagga/zebra.conf.OS1Uu5.
After installing Quagga, we need to configure the necessary peer IP addresses and update OSPF settings. Quagga comes with a command line called vtysh. The Quagga commands used in vtysh are similar to those of major router manufacturers such as Cisco and Juniper.
Step 1: Configure ZebraWe first create the Zebra configuration file and enable the Zebra daemon.
# cp /usr/share/doc/quagga-XXXXX/zebra.conf.sample /etc/quagga/zebra.conf
# service zebra start
# chkconfig zebra on
Start vtysh command line:
#vtysh
First, we configure the log file for Zebra. Enter the following command to enter the global configuration mode of vtysh:
site-A-RTR# configure terminal
Specify the log file location, then exit the mode:
site-A-RTR(config)# log file /var/log/quagga/quagga.log
site-A-RTR(config)# exit
Save configuration permanently:
site-A-RTR# write
Next, we need to identify the available interfaces and configure their IP addresses as needed.
site-A-RTR# show interface
Interface eth0 is up, line protocol detection is disabled
. . . . .
Interface eth1 is up, line protocol detection is disabled
. . . . .
Configure eth0 parameters:
site-A-RTR# configure terminal
site-A-RTR(config)# interface eth0
site-A-RTR(config-if)# ip address 10.10.10.1/30
site-A-RTR(config-if)# description to-site-B
site-A-RTR(config-if)# no shutdown
Continue to configure eth1 parameters:
site-A-RTR(config)# interface eth1
site-A-RTR(config-if)# ip address 192.168.1.1/24
site-A-RTR(config-if)# description to-site-A-LAN
site-A-RTR(config-if)# no shutdown
Now verify the configuration:
site-A-RTR(config-if)# do show interface
Interface eth0 is up, line protocol detection is disabled
. . . . .
  inet 10.10.10.1/30 broadcast 10.10.10.3
. . . . .
Interface eth1 is up, line protocol detection is disabled
. . . . .
  inet 192.168.1.1/24 broadcast 192.168.1.255
. . . . .
site-A-RTR(config-if)# do show interface description
Interface      Status  Protocol  Description
eth0           up      unknown   to-site-B
eth1           up      unknown   to-site-A-LAN
Save configuration permanently:
site-A-RTR(config-if)# do write
Repeat the above steps to configure the IP address on site-B.
If all goes well, you should be able to ping the peer IP address 10.10.10.2 on site-B from site-A's server.
Note: Once the Zebra daemon is started, any changes in the vtysh command line will take effect immediately. Therefore there is no need to restart the Zebra daemon after changing the configuration.
Step 2: Configure OSPFWe first create the OSPF configuration file and start the OSPF daemon:
# cp /usr/share/doc/quagga-XXXXX/ospfd.conf.sample /etc/quagga/ospfd.conf
# service ospfd start
# chkconfig ospfd on
Now start the vtysh command line to continue OSPF configuration:
# vtysh
Enter routing configuration mode:
site-A-RTR# configure terminal
site-A-RTR(config)# router ospf
Optional configuration routing id:
site-A-RTR(config-router)# router-id 10.10.10.1
Network added in OSPF:
site-A-RTR(config-router)# network 10.10.10.0/30 area 0
site-A-RTR(config-router)# network 192.168.1.0/24 area 0
Save configuration permanently:
site-A-RTR(config-router)# do write
Repeat OSPF configuration similar to above on site-B:
site-B-RTR(config-router)# network 10.10.10.0/30 area 0
site-B-RTR(config-router)# network 172.16.1.0/24 area 0
site-B-RTR(config-router)# do write
The OSPF neighbor should now be started. As long as ospfd is running, any OSPF-related configuration changes made through vtysh will take effect immediately without restarting ospfd.
verify1. Pass ping test
First you should be able to ping the same LAN subnet as site-B from site-A. Make sure your firewall is not blocking ping traffic.
[root@site-A-RTR ~]# ping 172.16.1.1 -c 2
2. Check routing table
The necessary routes should appear in both the kernel and Quagga reason tables.
[root@site-A-RTR ~]# ip route
10.10.10.0/30 dev eth0  proto kernel  scope link  src 10.10.10.1
172.16.1.0/30 via 10.10.10.2 dev eth0  proto zebra  metric 20
192.168.1.0/24 dev eth1  proto kernel  scope link  src 192.168.1.1
[root@site-A-RTR ~]# vtysh
site-A-RTR# show ip route
Codes: K - kernel route, C - connected, S - static, R - RIP, O - OSPF,
      I - ISIS, B - BGP, > - selected route, * - FIB route

O>* 10.10.10.0/30 [110/10] is directly connected, eth0, 00:14:29
C>* 10.10.10.0/30 is directly connected, eth0
C>* 127.0.0.0/8 is directly connected, lo
O>* 172.16.1.0/30 [110/20] via 10.10.10.2, eth0, 00:14:14
C>* 192.168.1.0/24 is directly connected, eth13. Verify OSPF neighbors and routes
In the vtysh command line, you can check whether the necessary neighbors are online and whether appropriate routes have been learned.
[root@site-A-RTR ~]# vtysh
site-A-RTR# show ip ospf neighbor
In this tutorial, we will focus on configuring basic OSPF using Quagga. In general, Quagga allows us to easily configure dynamic routing protocols such as OSPF, RIP or BGP on an ordinary Linux machine. Quagga-enabled machines can communicate and exchange routing information with other routers on your network. Because it supports the major open standard routing protocols, it may be the first choice in many situations. What's more, Quagga's command line interface is nearly identical to that of major router vendors such as Cisco and Juniper, which makes deploying and maintaining Quagga machines very easy.
The above is the detailed content of Turn your CentOS into an OSPF router. For more information, please follow other related articles on the PHP Chinese website!

Hot AI Tools

Undresser.AI Undress
AI-powered app for creating realistic nude photos

AI Clothes Remover
Online AI tool for removing clothes from photos.

Undress AI Tool
Undress images for free

Clothoff.io
AI clothes remover

Video Face Swap
Swap faces in any video effortlessly with our completely free AI face swap tool!

Hot Article
Hot Tools

Notepad++7.3.1
Easy-to-use and free code editor

SublimeText3 Chinese version
Chinese version, very easy to use

Zend Studio 13.0.1
Powerful PHP integrated development environment

Dreamweaver CS6
Visual web development tools

SublimeText3 Mac version
God-level code editing software (SublimeText3)
Hot Topics


 What computer configuration is required for vscode
Apr 15, 2025 pm 09:48 PM
What computer configuration is required for vscode
Apr 15, 2025 pm 09:48 PM
VS Code system requirements: Operating system: Windows 10 and above, macOS 10.12 and above, Linux distribution processor: minimum 1.6 GHz, recommended 2.0 GHz and above memory: minimum 512 MB, recommended 4 GB and above storage space: minimum 250 MB, recommended 1 GB and above other requirements: stable network connection, Xorg/Wayland (Linux)
 Linux Architecture: Unveiling the 5 Basic Components
Apr 20, 2025 am 12:04 AM
Linux Architecture: Unveiling the 5 Basic Components
Apr 20, 2025 am 12:04 AM
The five basic components of the Linux system are: 1. Kernel, 2. System library, 3. System utilities, 4. Graphical user interface, 5. Applications. The kernel manages hardware resources, the system library provides precompiled functions, system utilities are used for system management, the GUI provides visual interaction, and applications use these components to implement functions.
 vscode terminal usage tutorial
Apr 15, 2025 pm 10:09 PM
vscode terminal usage tutorial
Apr 15, 2025 pm 10:09 PM
vscode built-in terminal is a development tool that allows running commands and scripts within the editor to simplify the development process. How to use vscode terminal: Open the terminal with the shortcut key (Ctrl/Cmd). Enter a command or run the script. Use hotkeys (such as Ctrl L to clear the terminal). Change the working directory (such as the cd command). Advanced features include debug mode, automatic code snippet completion, and interactive command history.
 How to check the warehouse address of git
Apr 17, 2025 pm 01:54 PM
How to check the warehouse address of git
Apr 17, 2025 pm 01:54 PM
To view the Git repository address, perform the following steps: 1. Open the command line and navigate to the repository directory; 2. Run the "git remote -v" command; 3. View the repository name in the output and its corresponding address.
 How to run java code in notepad
Apr 16, 2025 pm 07:39 PM
How to run java code in notepad
Apr 16, 2025 pm 07:39 PM
Although Notepad cannot run Java code directly, it can be achieved by using other tools: using the command line compiler (javac) to generate a bytecode file (filename.class). Use the Java interpreter (java) to interpret bytecode, execute the code, and output the result.
 Where to write code in vscode
Apr 15, 2025 pm 09:54 PM
Where to write code in vscode
Apr 15, 2025 pm 09:54 PM
Writing code in Visual Studio Code (VSCode) is simple and easy to use. Just install VSCode, create a project, select a language, create a file, write code, save and run it. The advantages of VSCode include cross-platform, free and open source, powerful features, rich extensions, and lightweight and fast.
 What is the main purpose of Linux?
Apr 16, 2025 am 12:19 AM
What is the main purpose of Linux?
Apr 16, 2025 am 12:19 AM
The main uses of Linux include: 1. Server operating system, 2. Embedded system, 3. Desktop operating system, 4. Development and testing environment. Linux excels in these areas, providing stability, security and efficient development tools.
 vscode terminal command cannot be used
Apr 15, 2025 pm 10:03 PM
vscode terminal command cannot be used
Apr 15, 2025 pm 10:03 PM
Causes and solutions for the VS Code terminal commands not available: The necessary tools are not installed (Windows: WSL; macOS: Xcode command line tools) Path configuration is wrong (add executable files to PATH environment variables) Permission issues (run VS Code as administrator) Firewall or proxy restrictions (check settings, unrestrictions) Terminal settings are incorrect (enable use of external terminals) VS Code installation is corrupt (reinstall or update) Terminal configuration is incompatible (try different terminal types or commands) Specific environment variables are missing (set necessary environment variables)
