

Here Are Four Best Fixes for iPhone Updates

One of the most common issues with iOS devices is getting stuck during an update. Some users have gotten so used to it that they don't even budge when their device displays an error message during an iOS update. But usually or not, this is a problem and for new users, it can be quite shocking if an iPhone update gets stuck. But worry no more, there are some very effective solutions discussed below that will help you resolve the issue completely and then you can try installing new updates again.
Part 1: iPhone Update Issues You May Have
There are many possible reasons why your iPhone is stuck in the update screen, but you may also get stuck in the process. . Most of the time, different users have very different problems.
The following is a list of some common iPhone lag problems: 1. Too many applications: If too many applications are installed on the phone, it will cause insufficient memory, causing the iPhone to freeze. The solution is to delete some infrequently used applications or perform a system reset. 2. Insufficient memory: If the phone has insufficient memory, it will cause applications to fail to run properly, leading to lags. The solution is to clean the phone's memory, delete some unnecessary files or perform a system reset. 3. Software update issues: Sometimes, updates to certain applications may cause lag issues. The solution is to update the application promptly or try to uninstall and reinstall the application. 4. Aging hardware: If the iPhone's hardware is aging, such as battery aging or memory problems, it will also cause lagging. The solution is to replace the battery or perform hardware repair. 5. Errors occur during operation: Sometimes, errors may occur during operation of certain applications, causing lags. The solution is to close the application and restart it, or try reinstalling the application. In short, if your iPhone often suffers from freezing problems, you can try the above solutions and hope they can help you. If the problem persists, it is recommended to contact Apple customer service or professional repair personnel for help.
- iPhone stuck on verifying update
- iPhone stuck on update request
- iPhone update stuck on Apple logo
- iPhone update stuck on waiting for iPhone
- iPhone update stuck on iTunes logo
- iPhone update stuck on loading screen
- iPhone update stuck on updating iCloud settings
Chapter Part 2: How to Fix iPhone Update Stuck
Actually, the solutions to these problems can be summarized in 3 words "restart", "restore" and "reset". Basically, there are no other options, you need to restart your iPhone if you are stuck on a specific screen, or force restart if you cannot restart the device through traditional means. If this doesn't work and you need to restore your device, the last option is to reset your device.
Solution 1: Force restart iPhone and remove software updates
If the iPhone is stuck in update mode, then you can try to force restart the device, maybe after it starts up again it will no longer be stuck. Force restart can solve many problems, but the force restart sequence is different for different versions of iPhone, we list each one:
Only for iPhone 6 or previous versions:
Steps 1: Click and press the power button and home button.
Step 2: Wait until you see the slider on the screen.
Step 3: After a while, the screen will go completely black, but you will need to hold the buttons until you see the Apple logo again.
Step 4: At this point, you can release the button to complete the forced restart.
For iPhone 7 and 7 Plus only:
The iPhone 7 Plus differs from other iPhone models in that it does not have a physical home button.
Step 1: Click and press the Power and Volume Down keys.
Step 2: Press and hold them until the screen goes black and the Apple logo can be seen.
Step 3: After this, you can abandon them as the force restart is complete.
Only for iPhone 8 or later:
Things have changed dramatically with these new versions of iPhone. Therefore, the program will be completely different from the previous one;
Step 1: First, tap the Volume Up key and then tap the Volume Down key.
Step 2: Then, click and press the side button, and the screen will turn black.
Step 3: Continue to keep pressing on the screen until you see the Apple logo appear on the screen again.
Step 4: Now, you can release the button after the force restart is complete.
Under normal circumstances, this kind of problem will be solved if you just force restart the device. Once, it boots again, the stuck update screen returns to normal. However, if your iPhone is still struggling to resolve the issue, then you must delete the software update and try again from scratch.
The first step is to open the phone's settings and find the general options in the settings interface.
Step 2: Here, select "iPhone Storage" and delete iOS updates from iPhone.
Step 3: Simply click "Delete Update" to delete the update.
You need to follow these steps to reinstall the removed updates: First, go back to the "General" option from "Settings" and then find and tap "Software Update". Next, you can download a fresh copy of the update and try installing it again. This way, you can update your device and enjoy new features and improvements.
Solution 2: Use iTunes to try to update the system
If your iPhone is stuck on the Apple logo when updating, then you need to try other methods to complete the update. If you choose to update iOS via OTA, you may encounter these problems, so using iTunes to update would be a better option.
Step 1: First, if you have not updated it yet, you need to update the iTunes application on your computer, which will improve the performance and efficiency of the application.
The second step is to connect the device to the computer and open the iTunes application.
Step 3: iTunes will automatically detect the iPhone, then you need to go to the iTunes panel and click "Summary" on the left side of the panel.
Step 4: Click "Check for Updates". You can see any available updates and then you can just click Download and Update.

Step 5: You may be asked for your iPhone’s passcode, just provide it when asked.
Solution 3: Fix iPhone Update with No Data Loss
If any of the above solutions failed to fix your iPhone and your device still shows "iOS update stuck", then we are pretty sure that your The iPhone operating system is severely damaged. You can take it to the nearest Apple support center and they will fix it for you, but if your iPhone warranty is voided, then the company will charge you a lot of money to fix the device.
A better option to solve iOS problems is to use an efficient system recovery software. Apple Phone Repair Tool is a software that can quickly repair various system problems on iPhone/iPad/iPod/AppleTV with one click. It can easily solve various common system problems including white apples, black screens, constant restarts, stuck in recovery mode, failed updates, and inability to boot. The repair operation using this software is very simple, just follow the steps below:
Step 1: Install the startup tool, connect the device to the computer through the data cable, and click "Repair iOS System Problems".
Then select "Standard Repair" and click to download the firmware. The software provides the latest version of iOS system firmware by default.

The second step is to click the "Start Repair" button after successfully downloading the firmware to automatically start the repair process.

Step 3: Wait for the repair to be completed. The entire repair process takes about 10 minutes. Be careful not to disconnect the data cable during the operation. Wait for "Repair Completed" to be displayed to complete the system repair.
 Safe Download Free Download Safe Download for macOS 10.14 and lower
 Solution 4: DFU Restore using iTunes
If your iPhone is stuck in the process of requesting an update it cannot be fixed , then the final option is to put the device into DFU mode and then use iTunes to restore it. The success rate of repairing your device using this method is very high because experts at Apple Support Center also use DFU mode to resolve iOS issues.
Unfortunately, putting the device into DFU mode will erase all data on the device, so we recommend that you use Apple Data Management Tool, a proper data management tool, to back up the device before launching the program.
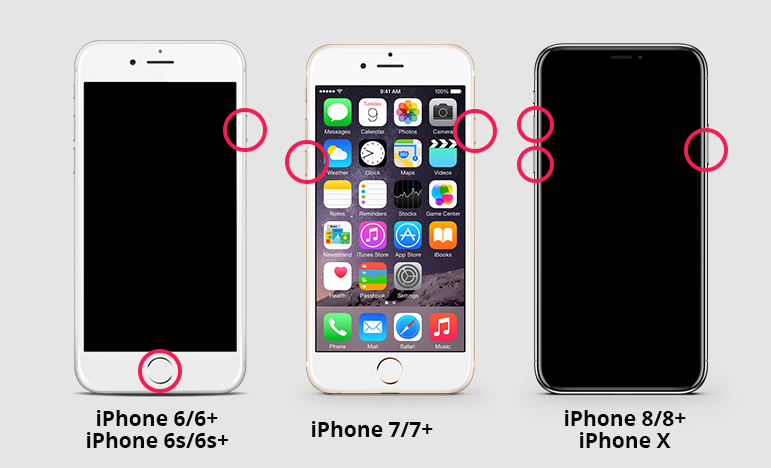
To make a backup, you can put your iPhone into DFU mode. However, different devices have different methods of entering DFU mode. Here is their order: 1. iPhone 6s and earlier models: First, connect the iPhone to the computer and open iTunes. Then, press and hold the power button and home button at the same time until the screen goes black. Next, release the power button but continue to hold the Home button until you see a prompt on iTunes that the device has entered recovery mode. 2. iPhone 7 and iPhone 7 Plus: Similar to the first method, connect your iPhone to your computer and open iTunes. Then, press and hold the Power button and Volume Down button simultaneously until the screen goes black. Next, release the power button but continue to hold the volume down button until you see a prompt on iTunes that the device has entered recovery mode. 3. iPhone 8 and later models (excluding iPhone X): First, connect the iPhone to the computer and open iTunes. Then, press the volume up button, then quickly press the volume down button, and finally press and hold the side power button until the screen goes black. Next, release the side power button, but continue to hold the volume down button until you see a prompt in iTunes that the device has entered recovery mode. 4. iPhone X and later models: First, connect the iPhone to the computer and open iTunes. Then, press the volume up button, then quickly press the volume down button, and finally press and hold the side power button until the screen goes black. Next, release the side power button, but continue to hold the volume down button until you see a prompt in iTunes that the device has entered recovery mode. Remember, always make a backup before entering DFU mode to avoid data loss.
For iPhone 6 and below:
Step 1: First, you need to turn off your device and connect your device to your computer using a USB cable.
Step 2: Now, tap and hold the Home and Lock keys for 8 seconds.
Step 3: After that, keep the lock key but hold down the home button.
Step 4: Finally, when the screen turns black, release the buttons when entering DFU mode.
For iPhone 7 and 7 Plus:
Step 1: As usual, shut down and connect your device to your computer.
The second step is to hold down the Side and Volume Down keys at the same time for 8 seconds.
Step 3: Then leave the Side key but press the Volume Down key.
Step 4: Finally, the screen will go black and you can release the buttons.
For iPhone 8 and above:
First, we need to power off and connect the device. Next, quickly tap the "Volume Up" key, and then quickly tap the "Volume Down" key. This operation will trigger a hidden function, allowing us to enter a special interface. In this interface, we will find some anachronistic elements, and these are the places we need to find them. Remember to observe every detail carefully and click on them to complete the cleaning tasks. Good luck to everyone!
Step 2: Then, press and hold the Side button and wait for the screen to turn black, then press and hold the Volume Down button.
Step 3: After 5 seconds, release the Side button.
Step 4: Now, after the screen turns completely black, you can release the keys when entering DFU mode.
These are several methods to put iPhone into DFU mode, immediately after entering DFU mode iTunes will notify you that it has detected the device in recovery mode.
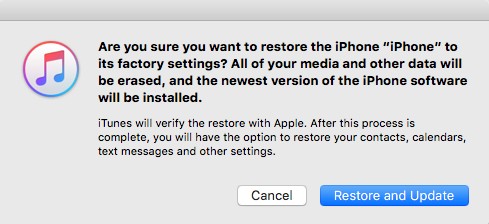
When you receive this message, just click the "Restore" button to restore your device using iTunes.
Now, just click on "Restore and Update".
Stuck during iOS update is a very common problem for iOS users. Longtime iOS users have encountered this at least once. But the solution to this problem is very simple and most of the time doing a force restart or changing the updater completely solves the problem. But those who are unfortunate enough to still be stuck can use DFU mode recovery to repair the device but will end up erasing all the data from the device. Therefore, a better option is to use Tenorshare ReiBoot to repair iOS while retaining all data.
The above is the detailed content of Here Are Four Best Fixes for iPhone Updates. For more information, please follow other related articles on the PHP Chinese website!

Hot AI Tools

Undresser.AI Undress
AI-powered app for creating realistic nude photos

AI Clothes Remover
Online AI tool for removing clothes from photos.

Undress AI Tool
Undress images for free

Clothoff.io
AI clothes remover

Video Face Swap
Swap faces in any video effortlessly with our completely free AI face swap tool!

Hot Article
Hot Tools

Notepad++7.3.1
Easy-to-use and free code editor

SublimeText3 Chinese version
Chinese version, very easy to use

Zend Studio 13.0.1
Powerful PHP integrated development environment

Dreamweaver CS6
Visual web development tools

SublimeText3 Mac version
God-level code editing software (SublimeText3)
Hot Topics
 1675
1675
 14
1429
52
1333
25
1278
29
1257
24
14
1429
52
1333
25
1278
29
1257
24

 How to upgrade your M2 Mac mini without paying Apple's high prices
Apr 27, 2025 pm 05:31 PM
How to upgrade your M2 Mac mini without paying Apple's high prices
Apr 27, 2025 pm 05:31 PM
The Mac mini, despite its affordability and powerful processors rivaling Apple's pro machines, suffers from a significant limitation: its non-upgradable internal components. This guide provides solutions for enhancing your M2 and M2 Pro Mac mini (M4
 Is iMessage not working? Here's how to fix it on your iPhone, iPad, and Mac
Apr 27, 2025 pm 06:00 PM
Is iMessage not working? Here's how to fix it on your iPhone, iPad, and Mac
Apr 27, 2025 pm 06:00 PM
Troubleshooting iMessage Issues on iPhone, iPad, and Mac Experiencing problems with iMessage? This guide offers solutions for common issues, helping you fix your messaging app on Apple devices. Whether messages aren't appearing, are out of order, o
 Where did that app go? How to find a missing app on iPhone or iPad
Apr 27, 2025 pm 05:54 PM
Where did that app go? How to find a missing app on iPhone or iPad
Apr 27, 2025 pm 05:54 PM
Finding a Missing iOS or iPadOS App: A Step-by-Step Guide iOS and iPadOS allow app searching by name, but locating them becomes tricky with numerous folders and Home Screen pages. This guide offers two methods to recover missing apps and add them ba
 The Apple Watch Is 10 Years Old. Here's Why I Never Bought One
Apr 15, 2025 am 06:09 AM
The Apple Watch Is 10 Years Old. Here's Why I Never Bought One
Apr 15, 2025 am 06:09 AM
The Apple Watch: Still Not Convinced After a Decade Despite over 200 million units sold since 2015, the Apple Watch remains absent from my wrist. While its health and fitness features are impressive, they don't appeal to someone like me who doesn't
 Word on iPhone Can Turn Your Voice Notes Into Documents
Apr 22, 2025 am 03:02 AM
Word on iPhone Can Turn Your Voice Notes Into Documents
Apr 22, 2025 am 03:02 AM
Microsoft Word for iOS now transforms your voice notes into fully formatted documents using Copilot AI. This latest enhancement simplifies document creation on mobile devices. To access this feature, tap the "New" button ( ), select "U
 The Best iPads of 2025
Apr 18, 2025 am 01:01 AM
The Best iPads of 2025
Apr 18, 2025 am 01:01 AM
Choosing the Right iPad: A Comprehensive Guide Apple's iPad lineup offers a tablet for every need, but selecting the perfect one can be overwhelming. This guide simplifies the process, helping you choose the ideal iPad based on your specific requirem
 Smartphones Are Boring Now and It's Our Fault
Apr 23, 2025 am 03:06 AM
Smartphones Are Boring Now and It's Our Fault
Apr 23, 2025 am 03:06 AM
The golden age of smartphones has passed? Future Outlook Technology enthusiasts often complain that modern mobile phones are the same and lack of innovation. Although manufacturers are to blame, we also play an important role. Let us review the development history of smartphones and explore the causes of the current situation. The Golden Age of Smartphones In 1973, Motorola engineer Martin Cooper made historic calls with the DynaTAC 8000X on the streets of New York. This "brick" phone opened the era of wireless networks. Nearly 20 years later, IBM Simon was released, becoming the world's first smartphone, equipped with a resistive touch screen and simple applications. Today, although it is a hundred times more powerful, the core function of modern smartphones is still used as an application portal. Early innovation slows down
 How to Turn Off Mail Categories on iPad
Apr 28, 2025 am 11:33 AM
How to Turn Off Mail Categories on iPad
Apr 28, 2025 am 11:33 AM
The Mail App updated on iPadOS 18.4 introduces the mail category feature. The feature is designed to automatically categorize inbox messages in the Mail App into specific categories, including "Main", "Transaction", "Update" and "Promotion", as well as a nearly hidden "All Mail" option. While this feature is designed to clean up and organize users’ inboxes, in practice, many users find that the Mail Category feature prioritizes old useless messages (such as DoorDash promotional emails a few months ago) and hides recent useful messages from real people (such as family, friends, colleagues). In addition, the Mail Category feature adds an additional layer of interaction between the inbox in the Mail App and the actual view of all messages. For these reasons, and other
