Introducing the Tmux terminal command line usage guide
Tmux (short for "Terminal Multiplexer"), is an excellent terminal multiplexing software, similar to GNU screen, but better than screen. tmux comes from OpenBSD and is licensed by BSD. The most intuitive benefit of using it is that after logging in to the remote host through a terminal and running tmux, you can open multiple consoles without "wasting" extra terminals to connect to the remote host. Another benefit is that when the terminal After closing, the task process running in the shell will also be interrupted. This problem can be easily solved by using tmux.
2. Usage scenarios:1. Close the terminal and the task process in the original terminal will still not be interrupted when you open it again;
2. Two people in different places can operate the same session, and the operations of one party can be seen by the other party in real time ;
3. You can open many terminals under the flexible layout of a single screen, and then use them collaboratively ;
3. Command usage:First install this command (EPEL repo is required under CentOS):
[root@ames ~]# cat /etc/RedHat-release
CentOS Linux release 7.3.1611 (Core)
[root@ames ~]# yum -y install tmux
View command usage:
[root@ames ~]# tmux --help
usage: tmux [-28lquvV] [-c shell-command] [-f file] [-L socket-name]
            [-S socket-path] [command [flags]]
[root@ames ~]#
Individual options and parameter introduction:
1. Run tmux:
[root@ames ~]# tmux
2. Create a new session: # tmux new -s SESSION-NAME
(Note: SESSION-NAME represents the session name, which can be letters or numbers)
You can also specify a session name without specifying it (not recommended): # tmux new
[root@ames ~]# tmux new -s second-tmux
3. View created sessions:
[root@ames ~]# tmux ls
4. Enter a known session: # tmux a -t SESSION-NAME or # tmux attach -t SESSION-NAME
[root@ames ~]# tmux ls
0: 1 windows (created Wed Aug 30 11:15:29 2017) [61x16]
second-tmux: 1 windows (created Wed Aug 30 11:23:51 2017) [85x16]
[root@ames ~]# tmux a -t second-tmux
5. Temporarily leave the current session:
(This command will exit from the current session, so there is a saying about reconnecting to the session later)
[root@ames ~]# tmux detach
6. Close the session: # tmux kill-session -t SESSION-NAME
(Can be executed inside or outside the session)
[root@ames ~]# tmux ls
0: 1 windows (created Wed Aug 30 11:15:29 2017) [61x16]
second-tmux: 1 windows (created Wed Aug 30 11:40:24 2017) [85x16]
[root@ames ~]# tmux kill-session -t second-tmux
[root@ames ~]# tmux ls
0: 1 windows (created Wed Aug 30 11:15:29 2017) [61x16]
[root@ames ~]#
Note: 1. Run the tmux command alone, that is, open a tmux session; 2. You cannot create a new session in the tmux session, and an error will be reported: "sessions should be nested with care, unset $TMUX to force"
4. Split screen operation:In many cases, we need to run multiple commands and perform multiple tasks in one session. We can organize them in multiple windows in one session.
1. Split screen: divided into horizontal split screen and vertical split screen
Horizontal split screen
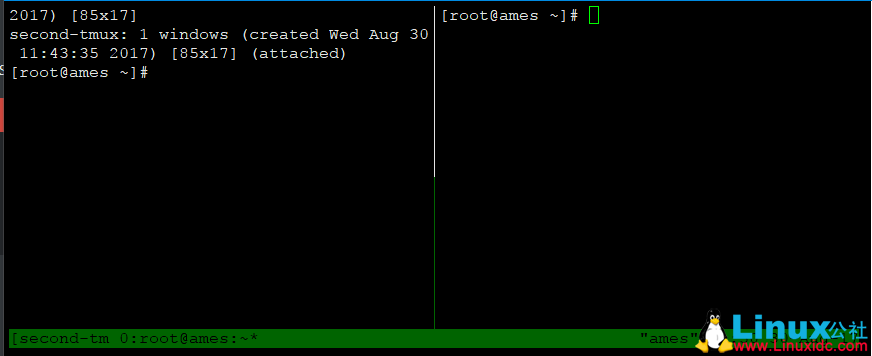
Shortcut keys: press ctrl b first, release and then press %

Vertical Split Screen
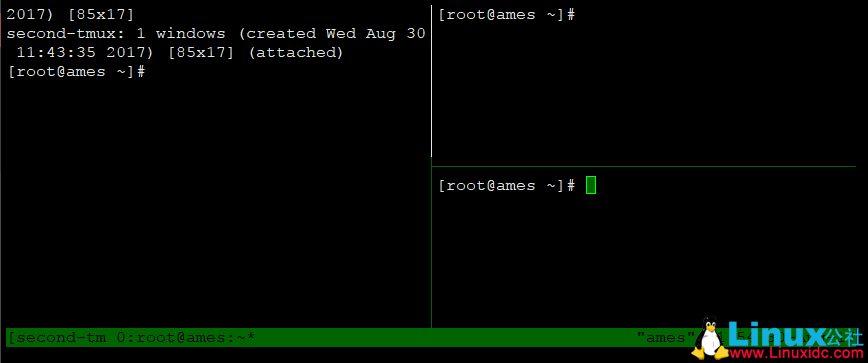
Shortcut keys: Press ctrl b first, release and then press "

The cursors in the split-screen window switch to each other
Shortcut keys: press ctrl b first, release and then press o
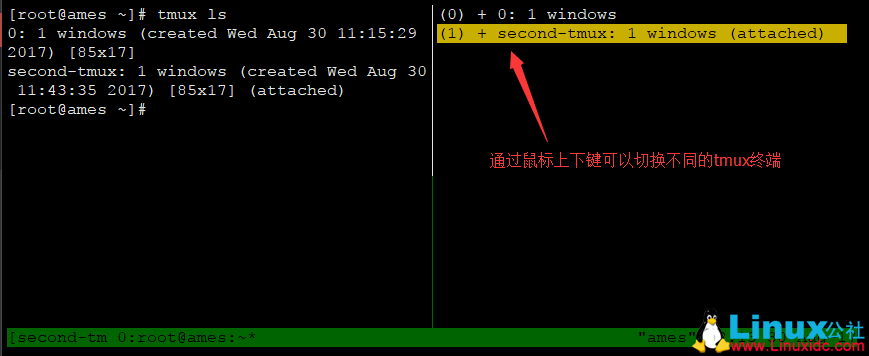
Switch tmux session terminal
Shortcut keys: press ctrl b first, release and then press s

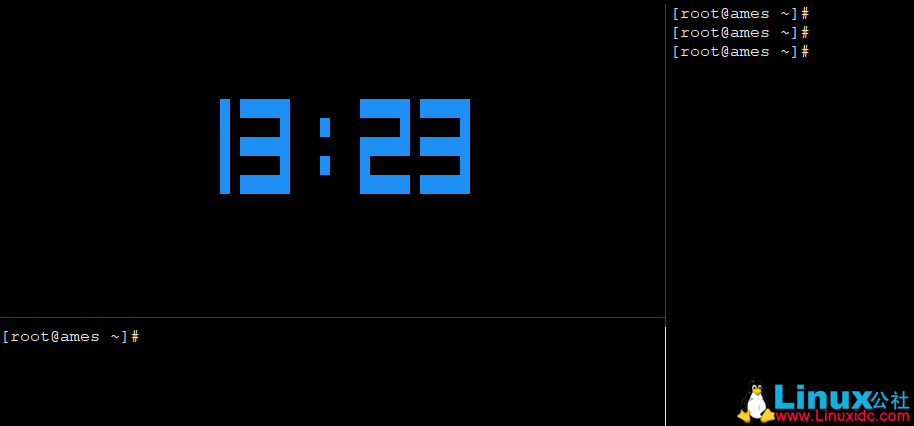
Display time in terminal
Shortcut keys: press ctrl b first, release and then press t
Exit the time interface: press the q key

Terminate a terminal window (confirmation required)
Shortcut key: exit or press ctrl b first, release and then press &
Open a new window based on the current window
Shortcut key: press ctrl b first, release and then press c
Temporarily exit the current session
Shortcut keys: press ctrl b first, release and then press d
View panel number
Shortcut keys: press ctrl b first, release and then press q
Close all split-screen windows, that is, merge them into one window
Shortcut keys: press ctrl b first, release and press again!
The above is the detailed content of Introducing the Tmux terminal command line usage guide. For more information, please follow other related articles on the PHP Chinese website!

Hot AI Tools

Undresser.AI Undress
AI-powered app for creating realistic nude photos

AI Clothes Remover
Online AI tool for removing clothes from photos.

Undress AI Tool
Undress images for free

Clothoff.io
AI clothes remover

Video Face Swap
Swap faces in any video effortlessly with our completely free AI face swap tool!

Hot Article

Hot Tools

Notepad++7.3.1
Easy-to-use and free code editor

SublimeText3 Chinese version
Chinese version, very easy to use

Zend Studio 13.0.1
Powerful PHP integrated development environment

Dreamweaver CS6
Visual web development tools

SublimeText3 Mac version
God-level code editing software (SublimeText3)

Hot Topics
 1662
1662
 14
14
 1419
1419
 52
52
 1312
1312
 25
25
 1262
1262
 29
29
 1235
1235
 24
24
 Linux Architecture: Unveiling the 5 Basic Components
Apr 20, 2025 am 12:04 AM
The five basic components of the Linux system are: 1. Kernel, 2. System library, 3. System utilities, 4. Graphical user interface, 5. Applications. The kernel manages hardware resources, the system library provides precompiled functions, system utilities are used for system management, the GUI provides visual interaction, and applications use these components to implement functions.
 How to check the warehouse address of git
Apr 17, 2025 pm 01:54 PM
To view the Git repository address, perform the following steps: 1. Open the command line and navigate to the repository directory; 2. Run the "git remote -v" command; 3. View the repository name in the output and its corresponding address.
 What is the main purpose of Linux?
Apr 16, 2025 am 12:19 AM
The main uses of Linux include: 1. Server operating system, 2. Embedded system, 3. Desktop operating system, 4. Development and testing environment. Linux excels in these areas, providing stability, security and efficient development tools.
 How to run java code in notepad
Apr 16, 2025 pm 07:39 PM
Although Notepad cannot run Java code directly, it can be achieved by using other tools: using the command line compiler (javac) to generate a bytecode file (filename.class). Use the Java interpreter (java) to interpret bytecode, execute the code, and output the result.
 How to run sublime after writing the code
Apr 16, 2025 am 08:51 AM
There are six ways to run code in Sublime: through hotkeys, menus, build systems, command lines, set default build systems, and custom build commands, and run individual files/projects by right-clicking on projects/files. The build system availability depends on the installation of Sublime Text.
 laravel installation code
Apr 18, 2025 pm 12:30 PM
To install Laravel, follow these steps in sequence: Install Composer (for macOS/Linux and Windows) Install Laravel Installer Create a new project Start Service Access Application (URL: http://127.0.0.1:8000) Set up the database connection (if required)
 How to use VSCode
Apr 15, 2025 pm 11:21 PM
Visual Studio Code (VSCode) is a cross-platform, open source and free code editor developed by Microsoft. It is known for its lightweight, scalability and support for a wide range of programming languages. To install VSCode, please visit the official website to download and run the installer. When using VSCode, you can create new projects, edit code, debug code, navigate projects, expand VSCode, and manage settings. VSCode is available for Windows, macOS, and Linux, supports multiple programming languages and provides various extensions through Marketplace. Its advantages include lightweight, scalability, extensive language support, rich features and version
 git software installation
Apr 17, 2025 am 11:57 AM
Installing Git software includes the following steps: Download the installation package and run the installation package to verify the installation configuration Git installation Git Bash (Windows only)


