Steps to install Ubuntu 14.04 using USB flash drive
| Introduction | For students who are doing operation and maintenance, isn’t it just a matter of minutes to install a system on a USB flash drive? What is there to say? However, installing Ubuntu through a USB flash drive is full of problems. Let's talk about some problems encountered when installing Ubuntu Server from a USB flash drive. |
For students who are engaged in operation and maintenance, isn’t it just a matter of minutes to install a system on a USB flash drive? What is there to say? U disk installation system generally involves the following steps:
- Download system image.
- Write to U disk through burning software.
- Modify the BIOS and boot from the USB disk.
- Have a cup of coffee and happily wait for the installation to be completed.
Usually following the above steps is always tried and true, but installing Ubuntu through a USB flash drive is full of problems. Let's talk about some problems encountered when installing Ubuntu Server from a USB flash drive.
The installation process prompts a CD-ROM not found errorUsing a USB flash drive to install Ubuntu Desktop usually has no problem, but when installing Ubuntu Server, it is easy to have problems with detecting and mounting the CD-ROM.
After entering the installation image, select the installation system. Everything goes smoothly at first, such as selecting language, region, time zone, etc. Everything seemed so good, but suddenly a CD-ROM not found error popped up.
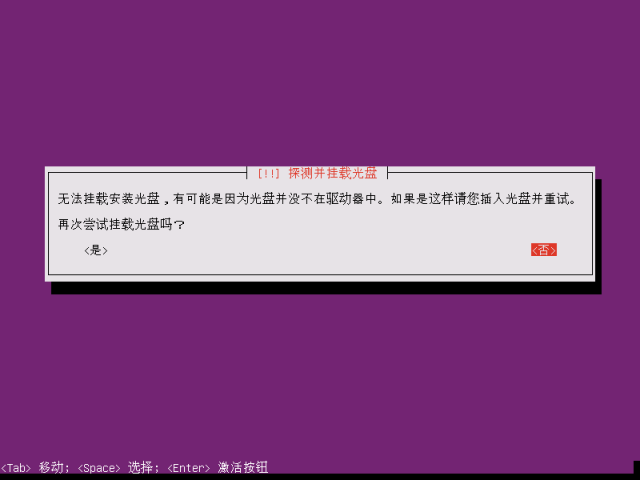
After choosing to continue, it prompts that the installation failed in this step. Let us remount the CD-ROM before continuing.
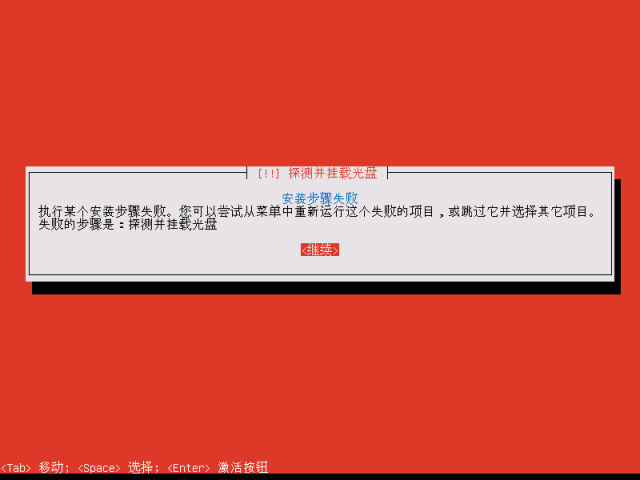
But there is really no optical drive on the server, what should I do? Are there many students who feel bad when they encounter this mistake? Today, let’s talk about how to solve this error. Do you immediately feel that there is hope in life, haha!
After selecting Continue on the above interface, the following interface will appear. At this time, if you choose to run the shell, you will enter a shell interface.
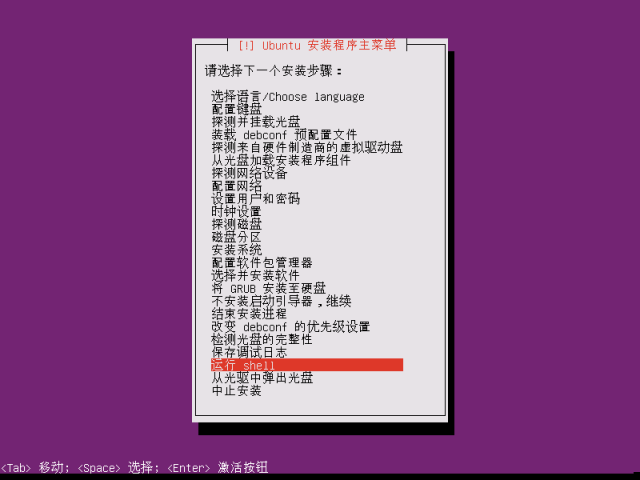
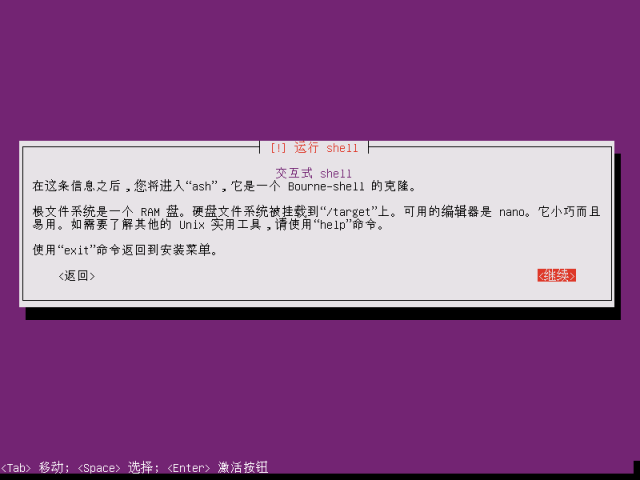
Execute the following command under Shell:
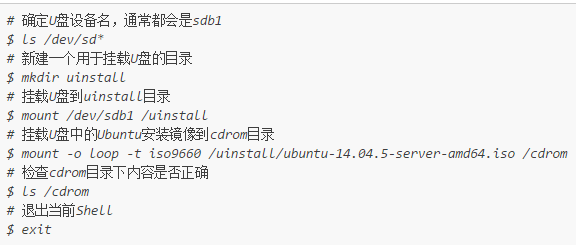
Re-detect and mount the CD, and then continue all the way. Usually the subsequent process should be smooth.
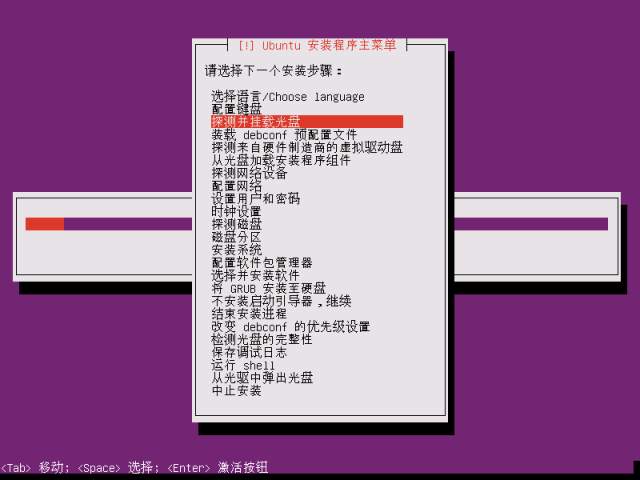
It is said that this is normal. If you are unlucky, you will encounter the second problem below.
Unable to perform configuration and package management stepsUnder normal circumstances, when the installation reaches this step, a window will pop up prompting what software needs to be installed. Usually, you will choose to let the system install the necessary software first
OpenSSH Server
of. But this time after reaching this step, the manual selection installation menu below pops up directly.
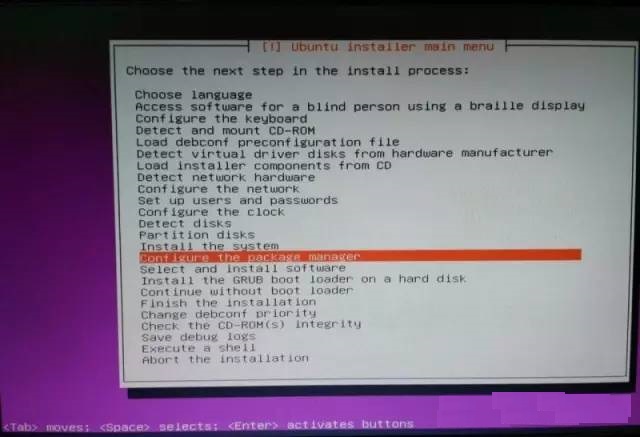
Whether it is the [Manually Select Configuration and Package Management] or [Select and Install Software] steps, the steps will pop up and you will not be able to enter the next step. Seeing victory in sight, but returning to the starting point, does it feel like the world is about to collapse? Now that the previous problems have been solved, there is no reason not to take you out of the ditch. Let’s talk about how to solve it:
- Skip the software package installation temporarily and continue to choose to install GRUB boot.
- In the final installation step after installing GRUB boot, do not choose to continue but choose to return.

- Select [Configuration and Package Management] in the manual selection installation menu again. This time you can finally see the familiar process of installing various software packages.

After many difficulties, I finally successfully completed the installation of Ubuntu Server 14.04 through a USB flash drive.
Note: The above process has been verified. Since screenshots cannot be taken during the installation process, the above pictures are from the Internet. It's a bit inconsistent, so we'll have to look into it.
The above is the detailed content of Steps to install Ubuntu 14.04 using USB flash drive. For more information, please follow other related articles on the PHP Chinese website!

Hot AI Tools

Undresser.AI Undress
AI-powered app for creating realistic nude photos

AI Clothes Remover
Online AI tool for removing clothes from photos.

Undress AI Tool
Undress images for free

Clothoff.io
AI clothes remover

Video Face Swap
Swap faces in any video effortlessly with our completely free AI face swap tool!

Hot Article

Hot Tools

Notepad++7.3.1
Easy-to-use and free code editor

SublimeText3 Chinese version
Chinese version, very easy to use

Zend Studio 13.0.1
Powerful PHP integrated development environment

Dreamweaver CS6
Visual web development tools

SublimeText3 Mac version
God-level code editing software (SublimeText3)

Hot Topics
 What computer configuration is required for vscode
Apr 15, 2025 pm 09:48 PM
VS Code system requirements: Operating system: Windows 10 and above, macOS 10.12 and above, Linux distribution processor: minimum 1.6 GHz, recommended 2.0 GHz and above memory: minimum 512 MB, recommended 4 GB and above storage space: minimum 250 MB, recommended 1 GB and above other requirements: stable network connection, Xorg/Wayland (Linux)
 Linux Architecture: Unveiling the 5 Basic Components
Apr 20, 2025 am 12:04 AM
The five basic components of the Linux system are: 1. Kernel, 2. System library, 3. System utilities, 4. Graphical user interface, 5. Applications. The kernel manages hardware resources, the system library provides precompiled functions, system utilities are used for system management, the GUI provides visual interaction, and applications use these components to implement functions.
 vscode terminal usage tutorial
Apr 15, 2025 pm 10:09 PM
vscode built-in terminal is a development tool that allows running commands and scripts within the editor to simplify the development process. How to use vscode terminal: Open the terminal with the shortcut key (Ctrl/Cmd). Enter a command or run the script. Use hotkeys (such as Ctrl L to clear the terminal). Change the working directory (such as the cd command). Advanced features include debug mode, automatic code snippet completion, and interactive command history.
 How to check the warehouse address of git
Apr 17, 2025 pm 01:54 PM
To view the Git repository address, perform the following steps: 1. Open the command line and navigate to the repository directory; 2. Run the "git remote -v" command; 3. View the repository name in the output and its corresponding address.
 Where to write code in vscode
Apr 15, 2025 pm 09:54 PM
Writing code in Visual Studio Code (VSCode) is simple and easy to use. Just install VSCode, create a project, select a language, create a file, write code, save and run it. The advantages of VSCode include cross-platform, free and open source, powerful features, rich extensions, and lightweight and fast.
 How to run java code in notepad
Apr 16, 2025 pm 07:39 PM
Although Notepad cannot run Java code directly, it can be achieved by using other tools: using the command line compiler (javac) to generate a bytecode file (filename.class). Use the Java interpreter (java) to interpret bytecode, execute the code, and output the result.
 What is the main purpose of Linux?
Apr 16, 2025 am 12:19 AM
The main uses of Linux include: 1. Server operating system, 2. Embedded system, 3. Desktop operating system, 4. Development and testing environment. Linux excels in these areas, providing stability, security and efficient development tools.
 How to run sublime after writing the code
Apr 16, 2025 am 08:51 AM
There are six ways to run code in Sublime: through hotkeys, menus, build systems, command lines, set default build systems, and custom build commands, and run individual files/projects by right-clicking on projects/files. The build system availability depends on the installation of Sublime Text.


