
 System Tutorial
Windows Series
Detailed explanation of how to solve the disk cleanup problem in win11 system
System Tutorial
Windows Series
Detailed explanation of how to solve the disk cleanup problem in win11 system
Detailed explanation of how to solve the disk cleanup problem in win11 system

Many users have encountered the problem of too much disk garbage when using the win11 system, but sometimes they find that they cannot perform traditional disk cleaning. This may be due to a system conflict. We only need to delete the corresponding folder in the system management. Let’s take a look below.
What to do if disk cleanup cannot be performed in win11
1. Originally, we could select Disk Cleanup in the disk properties to clean the disk, but we may encounter situations where it cannot be cleaned.

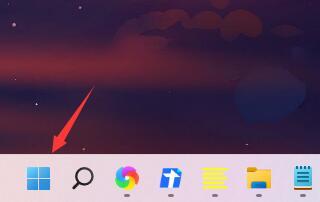
2. At this time, we right-click the start menu and find "Computer Management"

3. Then click on Task Scheduler and select "Task Scheduler Library"

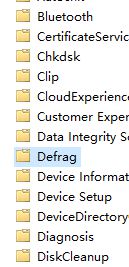
4. Then find the "defrag" folder under the "windows" folder. Just delete it.
The above is the detailed content of Detailed explanation of how to solve the disk cleanup problem in win11 system. For more information, please follow other related articles on the PHP Chinese website!

Hot AI Tools

Undresser.AI Undress
AI-powered app for creating realistic nude photos

AI Clothes Remover
Online AI tool for removing clothes from photos.

Undress AI Tool
Undress images for free

Clothoff.io
AI clothes remover

Video Face Swap
Swap faces in any video effortlessly with our completely free AI face swap tool!

Hot Article
Hot Tools

Notepad++7.3.1
Easy-to-use and free code editor

SublimeText3 Chinese version
Chinese version, very easy to use

Zend Studio 13.0.1
Powerful PHP integrated development environment

Dreamweaver CS6
Visual web development tools

SublimeText3 Mac version
God-level code editing software (SublimeText3)
Hot Topics
 1657
1657
 14
1415
52
1309
25
1257
29
1230
24
14
1415
52
1309
25
1257
29
1230
24

 LOL crash problem solving tutorial, Win11 version
Jan 04, 2024 pm 01:58 PM
LOL crash problem solving tutorial, Win11 version
Jan 04, 2024 pm 01:58 PM
After updating the win11 system, many lol players found that they often crashed during the game. Generally speaking, this problem does not occur, so it is probably because our graphics card driver does not meet the requirements of win11 and needs to be updated, or the directx component is missing. Let’s solve it together. What to do if win11 crashes while playing lol: Method 1: 1. First click on the start menu, search and open "Device Manager" at the top 2. Find "Display Adapters" in the device manager, expand the device, right-click to select it, and select "Update driver" 3. Select "Automatically search for driver" in the pop-up window and then install the latest driver to solve the lol crash problem. method
 Detailed explanation of the steps to obtain Win11 system administrator permissions
Mar 08, 2024 pm 09:09 PM
Detailed explanation of the steps to obtain Win11 system administrator permissions
Mar 08, 2024 pm 09:09 PM
Windows 11, as the latest operating system launched by Microsoft, is deeply loved by users. In the process of using Windows 11, sometimes we need to obtain system administrator rights in order to perform some operations that require permissions. Next, we will introduce in detail the steps to obtain system administrator rights in Windows 11. The first step is to click "Start Menu". You can see the Windows icon in the lower left corner. Click the icon to open the "Start Menu". In the second step, find and click "
 The IT administrator has restricted access to win11 in some areas. Please refer to the solution.
Jan 29, 2024 pm 02:03 PM
The IT administrator has restricted access to win11 in some areas. Please refer to the solution.
Jan 29, 2024 pm 02:03 PM
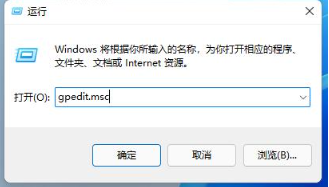
Many users will find that when running some programs, the system prompts that your IT administrator has restricted access to some areas of the application. So what is going on? Let this site provide users with a detailed introduction to the solution to the win11 error message that your IT administrator has restricted access to some areas of this application. Win11 error message: Your IT administrator has restricted access to some areas of this application. Solution tutorial 1. Press win+R to open Run, then enter gpedit.msc to open the Local Group Policy Editor. 3. In the security options, find User Account Control: Run all administrators in administrator approval mode.
 How to delete installed language pack in win10 system
Jan 06, 2024 pm 10:37 PM
How to delete installed language pack in win10 system
Jan 06, 2024 pm 10:37 PM
When we use the win10 operating system, in some cases we may need to delete the language pack in the system. At this time, just find the language option first, then choose to add a language pack. During this process, uncheck the language pack to be deleted and then delete it. How to delete the installed language pack in win10 system: 1. Use win+i to open settings and find the time and language options. 2. Select the "Language" option in the time and language options. 3. Select "Add Language" and go to the next step. 4. Uncheck the language pack when adding a language. After the addition is completed, you can download the language pack and voice pack separately;
 How to display file suffix under Win11 system? Detailed interpretation
Mar 09, 2024 am 08:24 AM
How to display file suffix under Win11 system? Detailed interpretation
Mar 09, 2024 am 08:24 AM
How to display file suffix under Win11 system? Detailed explanation: In the Windows 11 operating system, the file suffix refers to the dot after the file name and the characters after it, which is used to indicate the type of file. By default, the Windows 11 system hides the suffix of the file, so that you can only see the name of the file in the file explorer but cannot intuitively understand the file type. However, for some users, displaying file suffixes is necessary because it helps them better identify file types and perform related operations.
 Share methods to improve Win11 boot speed
Jan 02, 2024 pm 03:12 PM
Share methods to improve Win11 boot speed
Jan 02, 2024 pm 03:12 PM
The boot speed of Windows system is a very important part when we use computers. It has a great impact on our system usage experience. If you feel that your win11 boot speed is slow, you can speed up the boot speed by turning off the startup items. , let’s solve it together. What to do if win11 is slow to boot: 1. First, we click the "Windows button" to enter the start menu. 2. Then open the "Settings" 3. Then click to enter the "Apps" option on the left. 4. Then click on the "Startup" setting at the bottom on the right. 5. Then change the sorting basis to "Status" and turn off all unnecessary startup items.
 How to initialize the computer in win7
Jan 07, 2024 am 11:53 AM
How to initialize the computer in win7
Jan 07, 2024 am 11:53 AM
The win7 system is a very excellent high-performance system. During the continuous use of win7, many friends are asking how to initialize the computer in win7! Today, the editor will bring you how to restore the factory settings of a win7 computer. Related information on how to initialize the computer in win7: Detailed instructions with pictures and text. Steps: 1. Open the "Start Menu" and enter. 2. Click to enter the settings at the bottom of the left side. 3. In the Win10 update and recovery settings interface, select. 4. Click below "Remove all content and reinstall Windows". 5. You can see the following "Initialization" settings, and then click. 6. Enter the "Your computer has multiple drives" setting option. There are two options here, you can choose according to the situation.
 How to implement dual system switching in Win10 system
Jan 03, 2024 pm 05:41 PM
How to implement dual system switching in Win10 system
Jan 03, 2024 pm 05:41 PM
Many friends may not be used to the win system when they first come into contact with it. There are dual systems in the computer. At this time, you can actually switch between the two systems. Let's take a look at the detailed steps for switching between the two systems. How to switch between two systems in win10 system 1. Shortcut key switching 1. Press the "win" + "R" keys to open Run 2. Enter "msconfig" in the run box and click "OK" 3. In the open "System Configuration" In the interface, select the system you need and click "Set as Default". After completion, "Restart" can complete the switch. Method 2. Select switch when booting 1. When you have dual systems, a selection operation interface will appear when booting. You can use the keyboard " Up and down keys to select the system
