

Learn the basics of Spring MVC: Master this popular framework from scratch


Spring MVC Getting Started Guide: Learn this popular framework from scratch, specific code examples are required
Introduction:
With the rapid development of the Internet and Web applications With the increasing popularity of web applications, building efficient and scalable web applications has become a focus of developers. The Spring MVC framework, as one of the most popular web application frameworks in Java development, has the advantages of flexibility, modularity and testability, and is widely used in many projects. This article will provide you with an introductory guide to Spring MVC, learn this popular framework from scratch, and provide specific code examples.
- Environment setup and configuration:
First, we need to set up the development environment of the Spring MVC framework. You can use IDE tools, such as Eclipse or IntelliJ IDEA, to import Spring MVC projects for development. In addition, you also need to configure related dependencies, such as Maven or Gradle, to introduce the library files required by the Spring MVC framework. - Create and configure a Spring MVC project:
Next, let us start creating a simple Spring MVC project and make the necessary configurations.
2.1 Create a project:
In the IDE, select New Project, select the Spring MVC project template, and fill in relevant information, such as project name and package name.
2.2 Configure web.xml:
Find the web.xml file in the project's WebContent/WEB-INF directory, and configure the core controller of Spring MVC - DispatcherServlet. Add the following code in web.xml:
<servlet>
    <servlet-name>dispatcher</servlet-name>
    <servlet-class>org.springframework.web.servlet.DispatcherServlet</servlet-class>
    <init-param>
        <param-name>contextConfigLocation</param-name>
        <param-value>/WEB-INF/spring-mvc.xml</param-value>
    </init-param>
    <load-on-startup>1</load-on-startup>
</servlet>

<servlet-mapping>
    <servlet-name>dispatcher</servlet-name>
    <url-pattern>/</url-pattern>
</servlet-mapping>In the above configuration, we specified the location of the DispatcherServlet configuration file spring-mvc.xml, and mapped the DispatcherServlet to the root path "/".
- Create Controller and View:
In the Spring MVC framework, the Controller is responsible for processing user requests and returning the processing results to the view for display. Next, we create a simple Controller and write the corresponding processing logic and views.
3.1 Create the Controller class:
Create a Java class named HelloController in the src directory, and add the @Controller annotation and @RequestMapping annotation, as shown below:
@Controller
@RequestMapping("/hello")
public class HelloController {

    @RequestMapping("/greeting")
    public String greeting(Model model) {
        model.addAttribute("message", "Hello, Spring MVC!");
        return "greeting";
    }
}In the above code, we use the @Controller annotation to mark this class as a Controller, and use the @RequestMapping annotation to specify the Controller's request path as "/hello". In the greeting method, we pass a message to the view named "greeting" through the Model object.
3.2 Create a view:
Create a JSP page named greeting.jsp in the WEB-INF directory to display messages passed by the Controller. In greeting.jsp, we can use the JSTL tag library and EL expressions to display messages, as shown below:
<!DOCTYPE html>
<html>
<head>
    <title>Greeting</title>
</head>
<body>
    <h1>${message}</h1>
</body>
</html>In the above code, we use the EL expression ${message} to obtain the Controller delivery message and display it on the page.
- Compile, deploy and run:
Now, we have completed the creation and configuration of a simple Spring MVC project. Next, let us compile, deploy and run this project.
4.1 Compile and build the project:
In the IDE, select the project, right-click to select the Build or Rebuild option, compile the source code of the project, and generate the corresponding build output according to the project configuration information.
4.2 Deploy the project:
Deploy the compiled project to a web server, such as Tomcat or Jetty.
4.3 Run the project:
After the Web server is started, enter "http://localhost:8080/
Conclusion:
This article provides you with a guide to getting started with Spring MVC by creating a simple Spring MVC project and providing specific code examples. I hope this article can help you learn this popular framework from scratch and provide a reference for your future web application development work. Through continuous practice and in-depth learning, you will be able to use Spring MVC more proficiently and improve your development efficiency and web application performance through its powerful functions. I wish you success in your journey of learning Spring MVC!
The above is the detailed content of Learn the basics of Spring MVC: Master this popular framework from scratch. For more information, please follow other related articles on the PHP Chinese website!

Hot AI Tools

Undresser.AI Undress
AI-powered app for creating realistic nude photos

AI Clothes Remover
Online AI tool for removing clothes from photos.

Undress AI Tool
Undress images for free

Clothoff.io
AI clothes remover

Video Face Swap
Swap faces in any video effortlessly with our completely free AI face swap tool!

Hot Article
Hot Tools

Notepad++7.3.1
Easy-to-use and free code editor

SublimeText3 Chinese version
Chinese version, very easy to use

Zend Studio 13.0.1
Powerful PHP integrated development environment

Dreamweaver CS6
Visual web development tools

SublimeText3 Mac version
God-level code editing software (SublimeText3)
Hot Topics
 1664
1664
 14
1423
52
1317
25
1268
29
1246
24
14
1423
52
1317
25
1268
29
1246
24

 A Diffusion Model Tutorial Worth Your Time, from Purdue University
Apr 07, 2024 am 09:01 AM
A Diffusion Model Tutorial Worth Your Time, from Purdue University
Apr 07, 2024 am 09:01 AM
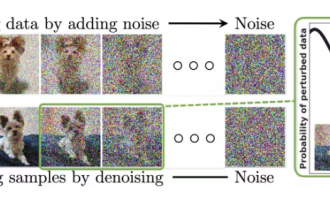
Diffusion can not only imitate better, but also "create". The diffusion model (DiffusionModel) is an image generation model. Compared with the well-known algorithms such as GAN and VAE in the field of AI, the diffusion model takes a different approach. Its main idea is a process of first adding noise to the image and then gradually denoising it. How to denoise and restore the original image is the core part of the algorithm. The final algorithm is able to generate an image from a random noisy image. In recent years, the phenomenal growth of generative AI has enabled many exciting applications in text-to-image generation, video generation, and more. The basic principle behind these generative tools is the concept of diffusion, a special sampling mechanism that overcomes the limitations of previous methods.
 Generate PPT with one click! Kimi: Let the 'PPT migrant workers' become popular first
Aug 01, 2024 pm 03:28 PM
Generate PPT with one click! Kimi: Let the 'PPT migrant workers' become popular first
Aug 01, 2024 pm 03:28 PM
Kimi: In just one sentence, in just ten seconds, a PPT will be ready. PPT is so annoying! To hold a meeting, you need to have a PPT; to write a weekly report, you need to have a PPT; to make an investment, you need to show a PPT; even when you accuse someone of cheating, you have to send a PPT. College is more like studying a PPT major. You watch PPT in class and do PPT after class. Perhaps, when Dennis Austin invented PPT 37 years ago, he did not expect that one day PPT would become so widespread. Talking about our hard experience of making PPT brings tears to our eyes. "It took three months to make a PPT of more than 20 pages, and I revised it dozens of times. I felt like vomiting when I saw the PPT." "At my peak, I did five PPTs a day, and even my breathing was PPT." If you have an impromptu meeting, you should do it
 All CVPR 2024 awards announced! Nearly 10,000 people attended the conference offline, and a Chinese researcher from Google won the best paper award
Jun 20, 2024 pm 05:43 PM
All CVPR 2024 awards announced! Nearly 10,000 people attended the conference offline, and a Chinese researcher from Google won the best paper award
Jun 20, 2024 pm 05:43 PM
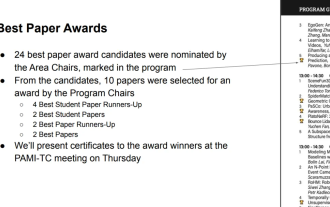
In the early morning of June 20th, Beijing time, CVPR2024, the top international computer vision conference held in Seattle, officially announced the best paper and other awards. This year, a total of 10 papers won awards, including 2 best papers and 2 best student papers. In addition, there were 2 best paper nominations and 4 best student paper nominations. The top conference in the field of computer vision (CV) is CVPR, which attracts a large number of research institutions and universities every year. According to statistics, a total of 11,532 papers were submitted this year, and 2,719 were accepted, with an acceptance rate of 23.6%. According to Georgia Institute of Technology’s statistical analysis of CVPR2024 data, from the perspective of research topics, the largest number of papers is image and video synthesis and generation (Imageandvideosyn
 From bare metal to a large model with 70 billion parameters, here is a tutorial and ready-to-use scripts
Jul 24, 2024 pm 08:13 PM
From bare metal to a large model with 70 billion parameters, here is a tutorial and ready-to-use scripts
Jul 24, 2024 pm 08:13 PM
We know that LLM is trained on large-scale computer clusters using massive data. This site has introduced many methods and technologies used to assist and improve the LLM training process. Today, what we want to share is an article that goes deep into the underlying technology and introduces how to turn a bunch of "bare metals" without even an operating system into a computer cluster for training LLM. This article comes from Imbue, an AI startup that strives to achieve general intelligence by understanding how machines think. Of course, turning a bunch of "bare metal" without an operating system into a computer cluster for training LLM is not an easy process, full of exploration and trial and error, but Imbue finally successfully trained an LLM with 70 billion parameters. and in the process accumulate
 AI in use | AI created a life vlog of a girl living alone, which received tens of thousands of likes in 3 days
Aug 07, 2024 pm 10:53 PM
AI in use | AI created a life vlog of a girl living alone, which received tens of thousands of likes in 3 days
Aug 07, 2024 pm 10:53 PM
Editor of the Machine Power Report: Yang Wen The wave of artificial intelligence represented by large models and AIGC has been quietly changing the way we live and work, but most people still don’t know how to use it. Therefore, we have launched the "AI in Use" column to introduce in detail how to use AI through intuitive, interesting and concise artificial intelligence use cases and stimulate everyone's thinking. We also welcome readers to submit innovative, hands-on use cases. Video link: https://mp.weixin.qq.com/s/2hX_i7li3RqdE4u016yGhQ Recently, the life vlog of a girl living alone became popular on Xiaohongshu. An illustration-style animation, coupled with a few healing words, can be easily picked up in just a few days.
 A must-read for technical beginners: Analysis of the difficulty levels of C language and Python
Mar 22, 2024 am 10:21 AM
A must-read for technical beginners: Analysis of the difficulty levels of C language and Python
Mar 22, 2024 am 10:21 AM
Title: A must-read for technical beginners: Difficulty analysis of C language and Python, requiring specific code examples In today's digital age, programming technology has become an increasingly important ability. Whether you want to work in fields such as software development, data analysis, artificial intelligence, or just learn programming out of interest, choosing a suitable programming language is the first step. Among many programming languages, C language and Python are two widely used programming languages, each with its own characteristics. This article will analyze the difficulty levels of C language and Python
 Counting down the 12 pain points of RAG, NVIDIA senior architect teaches solutions
Jul 11, 2024 pm 01:53 PM
Counting down the 12 pain points of RAG, NVIDIA senior architect teaches solutions
Jul 11, 2024 pm 01:53 PM
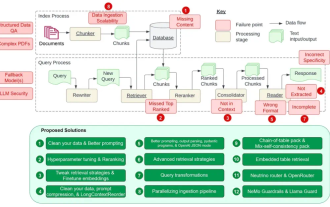
Retrieval-augmented generation (RAG) is a technique that uses retrieval to boost language models. Specifically, before a language model generates an answer, it retrieves relevant information from an extensive document database and then uses this information to guide the generation process. This technology can greatly improve the accuracy and relevance of content, effectively alleviate the problem of hallucinations, increase the speed of knowledge update, and enhance the traceability of content generation. RAG is undoubtedly one of the most exciting areas of artificial intelligence research. For more details about RAG, please refer to the column article on this site "What are the new developments in RAG, which specializes in making up for the shortcomings of large models?" This review explains it clearly." But RAG is not perfect, and users often encounter some "pain points" when using it. Recently, NVIDIA’s advanced generative AI solution
 Let's learn how to input the root number in Word together
Mar 19, 2024 pm 08:52 PM
Let's learn how to input the root number in Word together
Mar 19, 2024 pm 08:52 PM
When editing text content in Word, you sometimes need to enter formula symbols. Some guys don’t know how to input the root number in Word, so Xiaomian asked me to share with my friends a tutorial on how to input the root number in Word. Hope it helps my friends. First, open the Word software on your computer, then open the file you want to edit, and move the cursor to the location where you need to insert the root sign, refer to the picture example below. 2. Select [Insert], and then select [Formula] in the symbol. As shown in the red circle in the picture below: 3. Then select [Insert New Formula] below. As shown in the red circle in the picture below: 4. Select [Radical Formula], and then select the appropriate root sign. As shown in the red circle in the picture below:
