

How to check the version number of deepin system

deepin If you want to check the system version information under the Linux system, how should you check it? We can query through the graphical interface, through commands, or by installing software. Let’s talk about it in detail below.
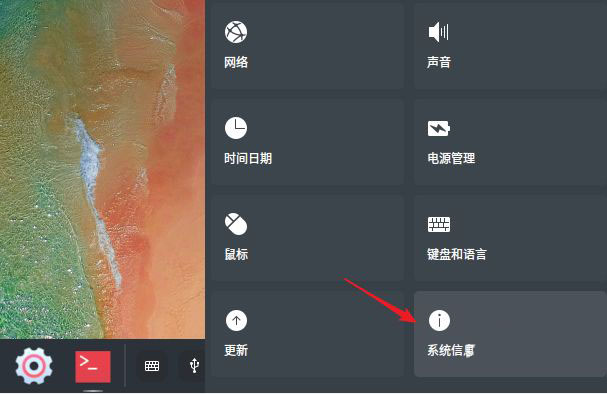
Method 1. Check the deepin linux version through graphical interface
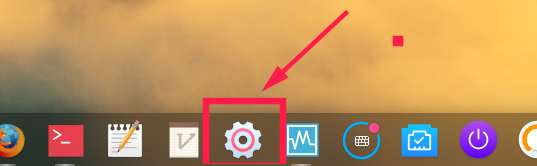
Click "Control Center" on the taskbar.

Click "System Information".
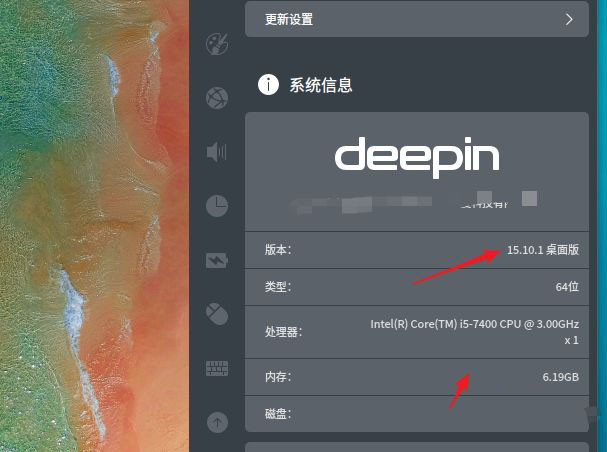
You can view the version information of deepin linux
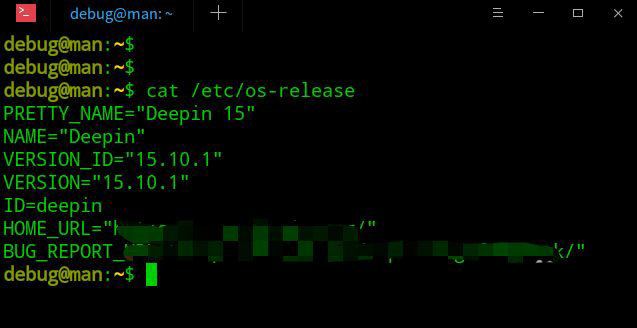
Method 2: Check the deepin linux system version from the command line
On the command line, you can check the deepin linux system version by viewing the /etc/os-release file .
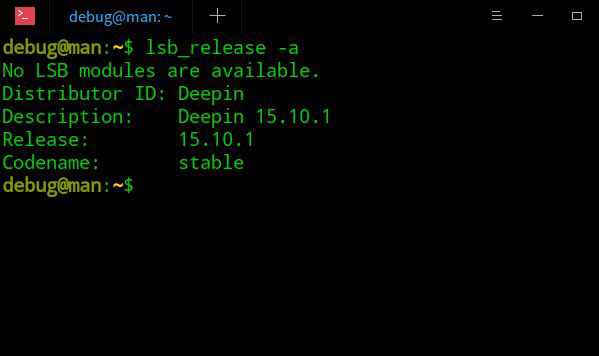
You can also check the deepin linux system version through the lsb-release command.
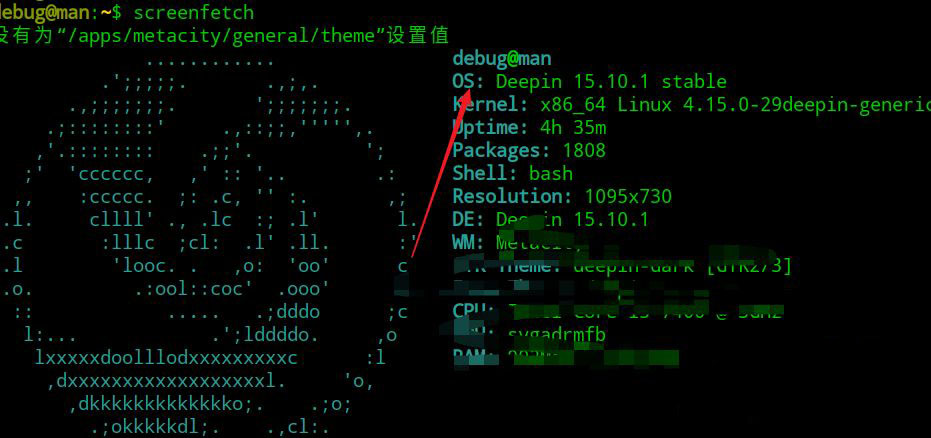
Method 3, Install screenfetch
In addition, you can also install screenfetch, which can graphically display the system version information of deepin linux.
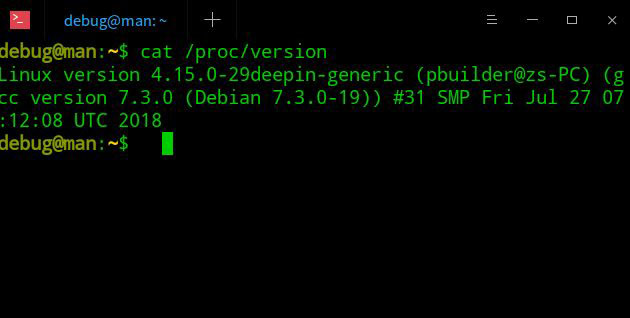
View deepin linux kernel, compiler and other version information, You can view the /proc/version file.
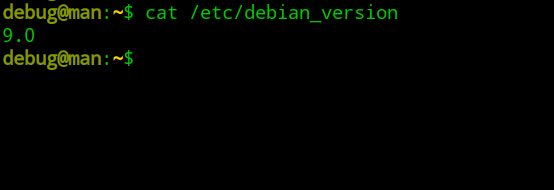
The deepin linux system is based on the debian system. To check the debian version, you can check /etc/debian_version.
The above is the detailed content of How to check the version number of deepin system. For more information, please follow other related articles on the PHP Chinese website!

Hot AI Tools

Undresser.AI Undress
AI-powered app for creating realistic nude photos

AI Clothes Remover
Online AI tool for removing clothes from photos.

Undress AI Tool
Undress images for free

Clothoff.io
AI clothes remover

Video Face Swap
Swap faces in any video effortlessly with our completely free AI face swap tool!

Hot Article
Hot Tools

Notepad++7.3.1
Easy-to-use and free code editor

SublimeText3 Chinese version
Chinese version, very easy to use

Zend Studio 13.0.1
Powerful PHP integrated development environment

Dreamweaver CS6
Visual web development tools

SublimeText3 Mac version
God-level code editing software (SublimeText3)
Hot Topics


 How to check Linux Mint system version information and related tips
Dec 28, 2023 pm 05:19 PM
How to check Linux Mint system version information and related tips
Dec 28, 2023 pm 05:19 PM
How to check system version information on LinuxMint? How to check? Today we will take a look at the process of checking the current version information of the LinuxMint system. Please see the following introduction for details. 1. Click the menu icon on the left. 2. Click the system settings icon. 3. Pull down the settings page. 4. Click System Information. 5. After opening, you can see the version information.
 How to set the screen resolution in deepin system? How to set the resolution in deepin
Jan 06, 2024 pm 09:30 PM
How to set the screen resolution in deepin system? How to set the resolution in deepin
Jan 06, 2024 pm 09:30 PM
It is very common to set the resolution in deepin. How to set it? Let’s take a look at the detailed tutorial below. Method 1. Setting under graphics 1. Click "Control Center" on the taskbar. 2. Select "Display" in the Control Center. 3. In the display, click "Resolution". 4. In the pop-up window, you can see the resolutions supported by the current system, and select the corresponding resolution to set. Method 2. Command setting method 1. You can set the screen resolution through the xrandr command. First query the current resolution and currently supported resolutions. The current resolution of xrandr-q is 1680x10502, you can pass the -s parameter
 How to check version information in Ubuntu system? Master the skills of checking Linux system version
Jan 08, 2024 pm 03:41 PM
How to check version information in Ubuntu system? Master the skills of checking Linux system version
Jan 08, 2024 pm 03:41 PM
How to check version information on Linux system? The viewing method is basically the same as that of other Linux operating systems, with slight differences. Let's take a look at the details below. Open the ubuntu operating system and click on the command line window on the menu bar. Enter uname-a to see the operating system release number and operating system version. Enter uname-v to view the version number. lsb_release-a, view release version information, and the method can be applied to all Linux distributions. Cat/etc/issue can check the current version of Linux system. cat/proc/version can check the kernel version number. We can find the upper right corner
 What should I do if the deepin taskbar does not show up? What should I do if the deepin taskbar disappears?
Feb 29, 2024 am 11:01 AM
What should I do if the deepin taskbar does not show up? What should I do if the deepin taskbar disappears?
Feb 29, 2024 am 11:01 AM
When our computer system is updated, some computer novices can't wait to install and use the new system, but they don't know that new computer systems often have many bugs. For example, the new system deepin system, many friends found that the taskbar was missing during the process of downloading and using it! So how do we find the taskbar? The editor will take you to take a look at it below! Method 1: 1. Turn off taskbar synchronization in cloud synchronization. 2. Delete the rm~/.config/dconf or rm~/.config/dconf-rf folder. 3. Restart to solve the problem. Method 2: 1. Press "ctrl+alt+t" to enter the terminal. 2. Then enter the command: sudoapt-getu
 How to switch as root user in Deepin Linux? How to switch to root privileges in Deepin Linux
Dec 27, 2023 pm 02:23 PM
How to switch as root user in Deepin Linux? How to switch to root privileges in Deepin Linux
Dec 27, 2023 pm 02:23 PM
How to switch to root user in Deepin system? Let’s take a look at the detailed graphic tutorial below. First press "ctrl+lat+t" to open the terminal, then set a password for the root user and execute the su command. Enter the root user's password and switch to the root user. When using administrator privileges to perform simple operations, you will encounter more problems when using the sudo command. When you get a simple prompt that the command cannot be found, you can directly use the sudo command to elevate the permissions. You can also switch to the root user and execute it. If you create a new user and need to use root permissions, you can execute the following command sudovisudo to modify the sudo configuration file, as shown below. Just add the new user to the location shown, for example
 How to set the mouse to be left-handed? How to set the left-handed mouse in deepin20
Jan 11, 2024 pm 08:15 PM
How to set the mouse to be left-handed? How to set the left-handed mouse in deepin20
Jan 11, 2024 pm 08:15 PM
Generally, the computer mouse settings are right-handed mode, but some people like to use their left hand to operate the mouse. How to set the mouse to left-handed mode? Let’s take a look at the detailed tutorial below. 1. First, click [Launcher] on the taskbar. 2. Click the gear button in the middle of the launcher to open the [Control Center]. 3. Click [Mouse] in [Control Center]. 4. Find the [Left-Hand Mode] option. 5. Turn on the [Left-Hand Mode] switch button.
 What should I do if deepin v20 cannot start after installation? What should I do if deepinv20 cannot start?
Mar 01, 2024 am 11:55 AM
What should I do if deepin v20 cannot start after installation? What should I do if deepinv20 cannot start?
Mar 01, 2024 am 11:55 AM
Recently, someone encountered the problem of being unable to start when using deepinv20. Every time the computer is turned on and the system is entered, the error code interface as shown in the picture will appear. I don’t know how to solve it. At this time, we can try to switch the kernel or run the Linux command line Add content to solve the problem. What to do if deepinv20 cannot start: Method 1: 1. If we use a new computer, it may not be compatible with the old version of deepin kernel. 2. At this time, we can try to replace the latest system kernel, or directly upgrade the system version to solve the problem. Method 2: 1. Restart the computer and press "F1" during boot to enter the bios settings. 2. Then under the boot option, find “se
 How to solve the problem of slow network speed after deepin system installation
Dec 29, 2023 am 08:04 AM
How to solve the problem of slow network speed after deepin system installation
Dec 29, 2023 am 08:04 AM
Deepin is developed based on the Linux system. There are still incompatibilities in the network, resulting in slow network speeds. How to solve this problem? Let’s take a look at the detailed tutorial below. 1. The first choice is to click on the launcher, and then open the terminal of deepin. The location of the terminal is similar to that of macos system, but slightly different from windows. 2. After opening the terminal, enter the following code in the terminal: sudodeepin-editor/etc/modprobe.d/iwlwifi.conf 3. Click enter to run the above code. At this time, the system will require us to enter the user password. After entering the password, click enter. tips: based on linux
