

Teach you how to switch from win10 system back to win7 system

After we install and download the win10 operating system, some friends may find that the compatibility of the win10 system is not that good when playing games or running other software. I want to change my system to the previous win7. Regarding this problem, the editor thinks that we can download the operating system we need from this site and then install it. Let’s take a look at the specific steps of how to do it~
How to change the win10 system to win7 system
1. Insert the U disk into the computer, open Xiaobai, click, and then Click,
After entering the interface, check the U disk that needs to be created and click.

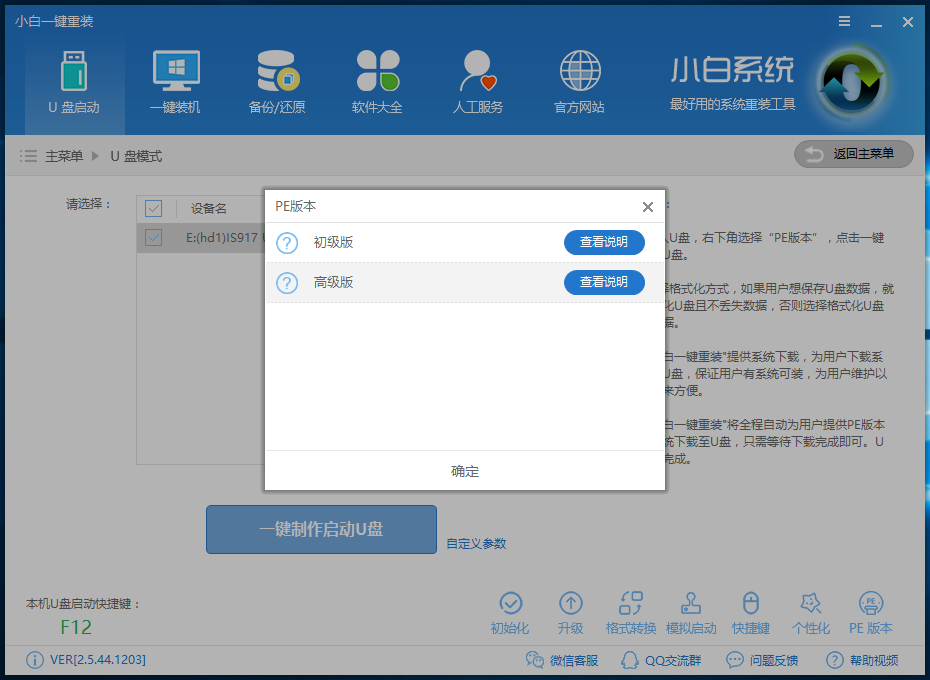
2. Find it in the lower right corner. It provides junior version and advanced version of PE.
Each PE version size has different functions. It is recommended that you download it because it has a remote operation function.
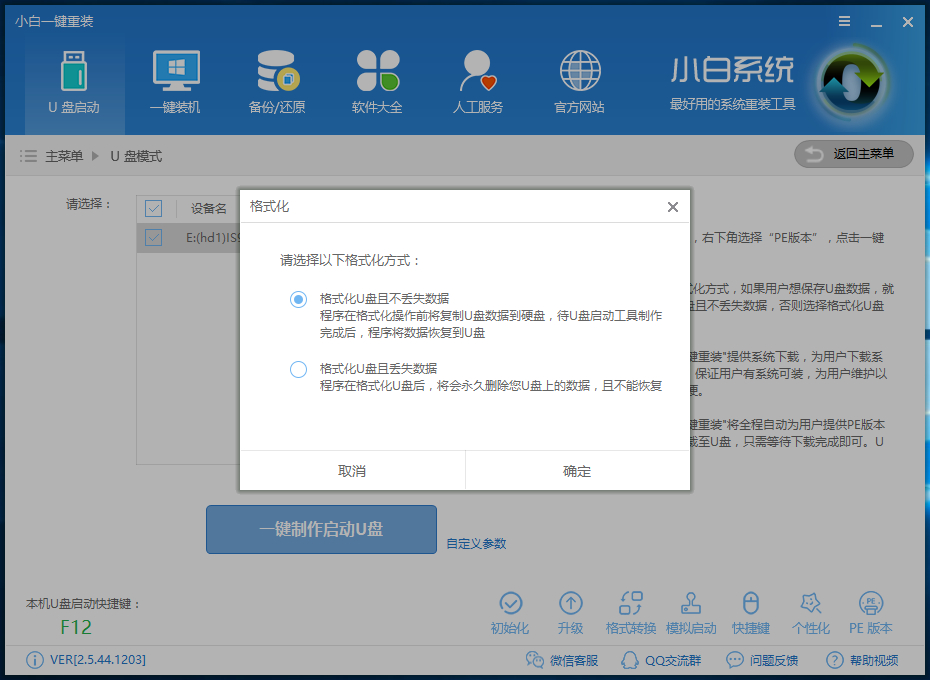
3. After selecting, click the button and a window will pop up.
There will be 2 options to choose from. And,
is recommended for everyone to choose. Of course, you can also copy it yourself and then create a U disk to boot.
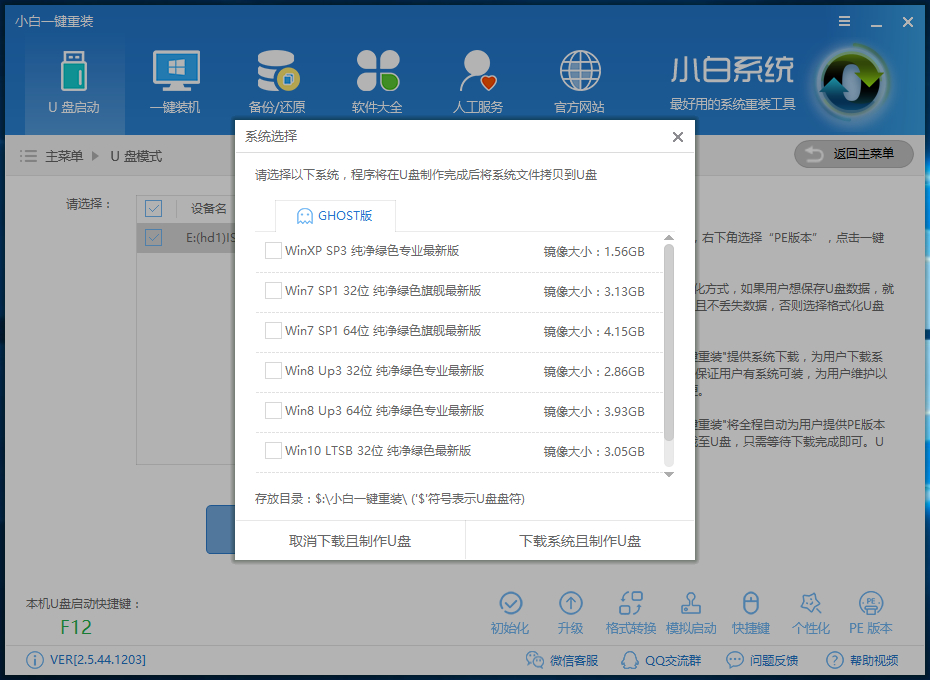
4. Next, Xiaobai provides a system download when making a USB boot disk.
You can check the system you need by the way. Or after making the boot disk, put the system image you downloaded into the USB flash drive. There is no limit to the directory where
can be placed. Because the system files are large, the process of creating the PE system will take a while.
Please wait patiently. (Of course, you don’t have to download the system here and choose to skip).
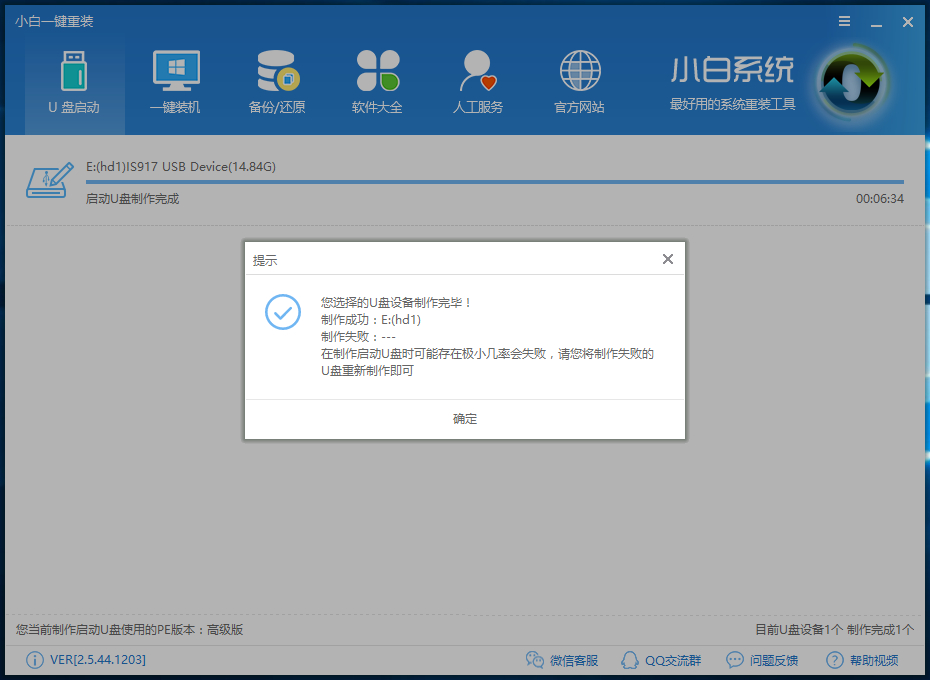
5. After downloading the system! A USB boot will be automatically created and the downloaded system and backup data will be imported into the USB flash drive.
The production process will take a while. Please wait patiently.

Now a pop-up message will appear indicating that the U disk has been produced. (Warm reminder that if the production fails, please re-create the failed U disk. plate).
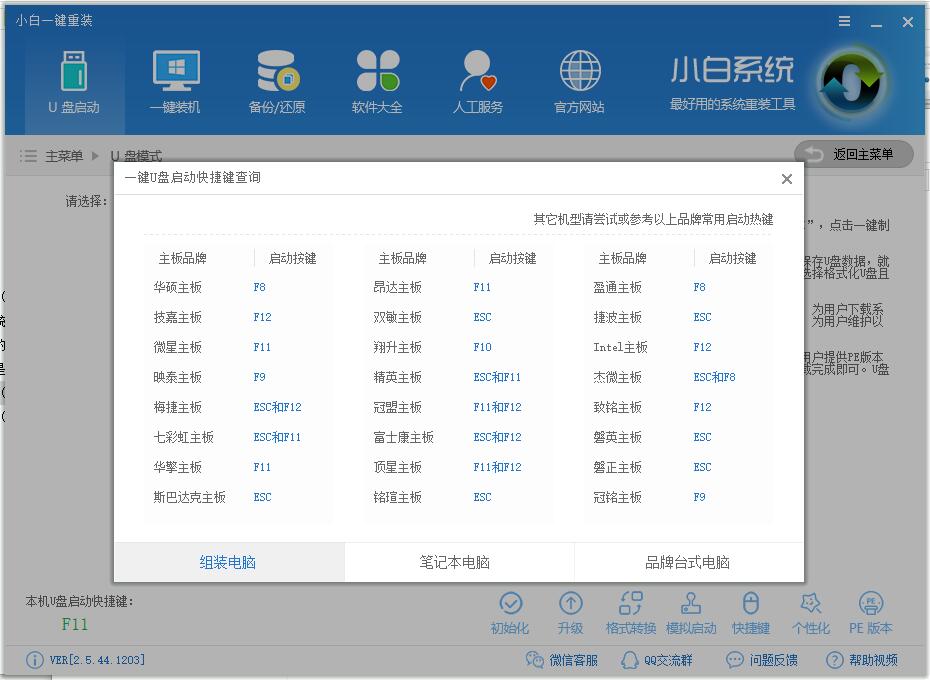
6. Next, let’s take a look at the shortcut keys for starting the U disk on our computer in the lower left corner.
However, some users can also open the corresponding computer brand query startup key when pressing the startup shortcut key detected by the software is useless.
The above is the detailed content of Teach you how to switch from win10 system back to win7 system. For more information, please follow other related articles on the PHP Chinese website!

Hot AI Tools

Undresser.AI Undress
AI-powered app for creating realistic nude photos

AI Clothes Remover
Online AI tool for removing clothes from photos.

Undress AI Tool
Undress images for free

Clothoff.io
AI clothes remover

Video Face Swap
Swap faces in any video effortlessly with our completely free AI face swap tool!

Hot Article
Hot Tools

Notepad++7.3.1
Easy-to-use and free code editor

SublimeText3 Chinese version
Chinese version, very easy to use

Zend Studio 13.0.1
Powerful PHP integrated development environment

Dreamweaver CS6
Visual web development tools

SublimeText3 Mac version
God-level code editing software (SublimeText3)
Hot Topics
 1655
1655
 14
1413
52
1306
25
1252
29
1226
24
14
1413
52
1306
25
1252
29
1226
24

 How to solve the problem of stuck installation of dx9 components in win11
Dec 26, 2023 am 08:37 AM
How to solve the problem of stuck installation of dx9 components in win11
Dec 26, 2023 am 08:37 AM
The dx9 component is a very good program that can help us play games. It can improve the picture quality and smoothness of our various games. However, many users get stuck when installing the dx9 component on the win11 system. In fact, we can install it on win11 Install dx12 on the computer, let’s take a look below. What should I do if the dx9 component is stuck when installing win11? 1. The win11 system supports dx12, not dx9, so we cannot install dx9 normally. 2. Of course, it may also be because there is a problem with our dx9 installation package. You can re-download a dx9 and give it a try. 3. As the latest DirectX program, dx12 has better performance and effects than dx9, and can improve more games.
 Methods and tutorials to solve the problem of Simplified Chinese installation in win11
Dec 22, 2023 am 10:09 AM
Methods and tutorials to solve the problem of Simplified Chinese installation in win11
Dec 22, 2023 am 10:09 AM
Some users found that the win11 system they installed was not the Chinese version, and did not want to reinstall the system. They wanted to install a simplified Chinese package directly, but found that the installation failed. This may be because when downloading and installing the Simplified Chinese package, it was blocked by the system firewall. You can install it normally by temporarily turning it off. What to do if win11 fails to install Simplified Chinese: 1. First press the "win+r" key combination on the keyboard to call up run, enter "regedit" and press Enter to confirm. 2. Then enter the "Computer\HKEY_LOCAL_MACHINE\SOFTWARE\Policies\Microsoft\WindowsDefender" path. 3. Right-click on the blank space on the right side.
 What should I do if radmin cannot be installed remotely on win10?
Jan 07, 2024 pm 01:09 PM
What should I do if radmin cannot be installed remotely on win10?
Jan 07, 2024 pm 01:09 PM
Radmin is a powerful tool that can help you remotely control any computer with Windows operating system! Then, in the Windows 10 operating system, when radmin cannot connect remotely, we can solve it as follows. What should I do if radmin cannot be remotely installed on win10? 1. Ensure that the network connection is normal. Ensure that both the local computer and the target computer can connect to the Internet. Try other remote control software or the Ping command to see how the network connection is. 2. Check the firewall settings. Sometimes the firewall settings may affect radmin's remote connection. So make sure the firewall settings on your computer allow Radmin to pass smoothly. The specific steps are as follows: 1. In Windows 10
 How to solve the problem that Win11 installation requires TPM2.0
Dec 26, 2023 pm 09:50 PM
How to solve the problem that Win11 installation requires TPM2.0
Dec 26, 2023 pm 09:50 PM
Many users have encountered problems titled "ThePCmustsupportTPM2.0" during the installation process of Windows 11 systems. We can successfully enable the TMP function in the BIOS settings interface or cleverly replace the corresponding files to bypass TPM detection. be resolved effectively! Let’s explore these solutions in depth together! What to do if win11 installation prompts tpm2.0? Method 1: 1. First restart the computer, restart the computer and use shortcut keys (hot keys) to enter the BIOS setting interface. 2. In this BIOS setting, look for TMP or CMOC related options and start them successfully. 2. Replace files 1. If in front of the BIOS setup interface
 Solve the problem of missing drive during Win11 installation
Jan 04, 2024 pm 04:37 PM
Solve the problem of missing drive during Win11 installation
Jan 04, 2024 pm 04:37 PM
When we install the win11 system, we need to select the corresponding driver for installation, but some friends said that they found that there is no driver to choose from when selecting. This may be because we have not installed the corresponding processor driver. Let’s take a look at the solution below. Bar. What to do if the driver cannot be found during the win11 installation? Method 1: 1. First, we restart the computer, use the hotkey to enter the bios settings at boot, then press "F7" or click "AdvancedMode" in the lower right corner 2. Then under the advanced tab, Find "VMDsetupmenu" 3. Select "EnableVMDcontroller" below and change it to "Enabled" 4. After the setting is completed,
 How to solve the problem of stuck win11 installation interface
Dec 26, 2023 pm 05:55 PM
How to solve the problem of stuck win11 installation interface
Dec 26, 2023 pm 05:55 PM
Many users are stuck in the installation interface when installing the win11 system and cannot continue the installation. For this reason, the following is a solution to the problem that the win11 installation is stuck in the installation interface. In fact, many times the system is unstable or lacks drivers. It's caused by this. Let's solve it quickly. What to do if the win11 installation is stuck on the installation interface: 1. First, click Skip in the lower left corner. At this time, you can skip the installation and enter the system directly, but the driver will be missing. 2. After entering, click the win icon in the lower left corner to open the settings. 3. Then select “Device Manager” inside. 4. After entering, you can see the "Display Adapter" option, click to open it. 5. Right-click to select the graphics card and click "Uninstall Device". 6. After the uninstallation is complete, re-download the driver and install it.
 Win7 installation prompts that the publisher cannot be verified and how to handle it
Jul 08, 2023 pm 11:02 PM
Win7 installation prompts that the publisher cannot be verified and how to handle it
Jul 08, 2023 pm 11:02 PM
In win7 system, when users install certain software, the system will prompt that the publisher cannot be verified. Generally, we can solve it by clicking OK, but it will pop up every time during installation, which is very annoying. How to solve the problem that the publisher cannot be verified during installation? The win7 installation prompt introduced by the editor below cannot verify the publishing program processing method. 1. Press win+r keys simultaneously to open the run window, enter "regedit", and click OK. 2. After entering, expand HKEY_CURRENT_USER\Software\Microsoft\Windwos\CurrentVersion\Policices. 3. Right-click Policies and select new item
 Detailed introduction of YuLinMuFeng win7 installation tutorial
Jul 14, 2023 am 10:37 AM
Detailed introduction of YuLinMuFeng win7 installation tutorial
Jul 14, 2023 am 10:37 AM
Yulin Mufeng win7 is one of the most popular systems among users. The installation steps of Yulin Mufeng win7 are very simple. Download Yulu Mufeng ghostwin7 locally in the system city. After decompressing it, you can install it directly on the hard disk with one click. Since Yulin Mufeng win7 The hardware driver is integrated, so you don’t have to worry about driver issues after installation. Let’s take a look at the specific tutorial. 1. After downloading the YuLinMuFeng win7 system, it is an iso format file. It needs to be downloaded to a partition other than the C drive, such as the D drive. Right-click and use WinRAR and other software to decompress it; 2. Do not decompress it to the C drive or desktop. The win7 system installation file is as shown in the figure; 3. Double-click [Install System.exe] to open the installation tool onekeyghost
