

Creating a PyroCMS Theme: A Step-by-Step Guide

Like most content management systems, PyroCMS uses front-end themes. Although PyroCMS themes are built slightly differently than themes from other systems you may be used to, they are still easy to create. In fact, they're so simple that very little PHP experience is required to assemble them!
Folder structure
PyroCMS themes consist of HTML, images, CSS, and JavaScript arranged in the following supported folders:
- CSS
- picture
- js
- Times watched
- View/Layout
- View/Part of Content
- View/Module
While these folders will no doubt look familiar to you, the "views" folder makes the most sense in an MVC context. When building a theme for PyroCMS, you are actually building the views (including assets) of an MVC pattern application. These views consist of a main layout file and multiple partial files (i.e. header.html or footer.html) that share presentation logic between different layouts. We'll discuss this shortly.
start using
To start building your first PyroCMS theme, create a supported folder structure in one of two locations within your PyroCMS instance:
addons/shared_addons/themes (for themes available to all sites)
or:
addons/[site-name]/themes (for themes available to only one specific site)
After creating the base theme folder with a supported folder structure, the first file you want to add to your theme is theme.php.
addons/shared_addons/themes/[my-theme-name]/theme.php
This theme.php file contains all the important details of the theme including its name, author, version, etc. In a way, this file is similar to a WordPress theme’s style.css file. Here is a basic example of a theme.php file for a PyroCMS theme:
<?php defined('BASEPATH') OR exit('No direct script access allowed');

class Theme_Foo extends Theme
{
    public $name = 'Foo';
    public $author = 'Zac Vineyard';
    public $author_website = 'https://zacvineyard.com';
    public $website = 'http://example.com/themes/foo';
    public $description = 'The antithesis theme to your Bar theme.';
    public $version = '1.0';
}

 /* End of file theme.php */
Please note that this file extends a PyroCMS class named Theme. Also, since you are declaring your PHP classes in this file, you need to make sure to use the name of the folder that contains your theme in the class declaration. So, if the folder containing the theme is named "foo", the class created in theme.php should be named Theme_Foo (instead of Theme_Custom, as shown in the example in the PyroCMS documentation).
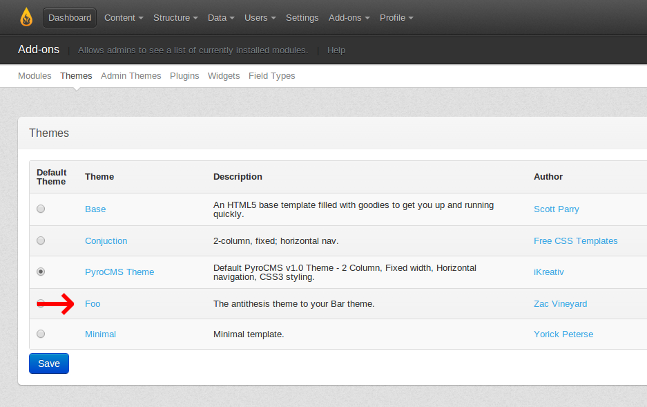
After creating the theme.php file, you can log into the PyroCMS control panel and view the themes listed in the Themes module.
layout
All layout files for a PyroCMS theme exist in one of two locations:
addons/[site-ref]/themes/[my-theme-name]/views/layouts/
or:
addons/shared_addons/themes/[my-theme-name]/views/layouts/
Every theme should have a layout file named "default.html" located in one of the locations listed above. Additional layout files are optional; I'll show you how to add more layout files later. First, it's important to check the contents of the layout file.
Layout files in PyroCMS are built using HTML and a tag parser (called the Lex tag parser). This is what a very basic PyroCMS layout file looks like:
<!DOCTYPE html>
<html>
<head>
    <title>{{ template:title }}</title>
    {{ template:metadata }}
</head>
<body>
    <h1>{{ template:title }}</h1>
    {{ template:body }}
</body>
</html>
The special tag you see in this HTML is the Lex parser tag. If you've ever used Smarty templates in PHP, these templates may look somewhat familiar. The main benefit of using Lex parser tags in your layout files is that you don't have to put PHP directly into the view (remember, we are using MVC), which gives you the ability to create patterns that follow < 的 PyroCMS 主题的最佳机会em>Don't Repeat Yourself .
Of course, the example I gave above is simple, but Lex parser tags are very powerful. They can loop through data, manipulate properties, and more. Learn more about the Lex parser in the PyroCMS documentation.
A more complex PyroCMS layout file looks like this:
<!DOCTYPE html>
<html>
<head>
    <title>{{ template:title }}</title>
    {{ template:metadata }}
    {{ theme:favicon file="favicon.png" }}
    {{ theme:css file="style.css" }}
    {{ theme:js file="site.js" }}
</head>
<body>
    <div class="header">
        <div class="logo">
            {{ theme:image file="logo.jpg" alt="Your Cool Logo" }}
        </div>
        <div class="nav">
            {{ navigation:links group="header" }}
        </div>
    </div>
    <div class="content">
        <h1>{{ template:title }}</h1>
        {{ template:body }}
    </div>
</body>
</html>
You will notice that this layout file using Lex contains resources such as CSS, JavaScript, and images. Using Lex tags and HTML allows PyroCMS developers to build layout files very quickly.
Part
Partials in PyroCMS represent partial layouts, allowing you to break your layout into reusable parts or sections. These sections can then be loaded via different layout files. This prevents you from typing the same code (header, footer, etc.) in multiple layout files.
Depending on where you place your theme files, some content will be created in one of two locations:
addons/[site-ref]/themes/[my-theme-name]/views/partials/
or:
addons/shared_addons/themes/[my-theme-name]/views/partials/
Use this Lex tag to load some content into the layout:
{{ theme:partial name="partialname" }}
This Lex tag operates exactly like a PHP include statement - similar to what you would find in WordPress or other themes. The code below is a simple example of a partial PyroCMS layout.
{{ theme:partial name="header" }}

    <div class="content">
        <h1>{{ template:title }}</h1>
        {{ template:body }}
    </div>

{{ theme:partial name="footer" }}
header.html section and the footer.html file are of course the HTML we need to reuse from the template in the code example above. A quick tip: There is no limit to the number of sections you can use in a layout. Additionally, some files may contain any combination of valid HTML and Lex.
多个布局文件
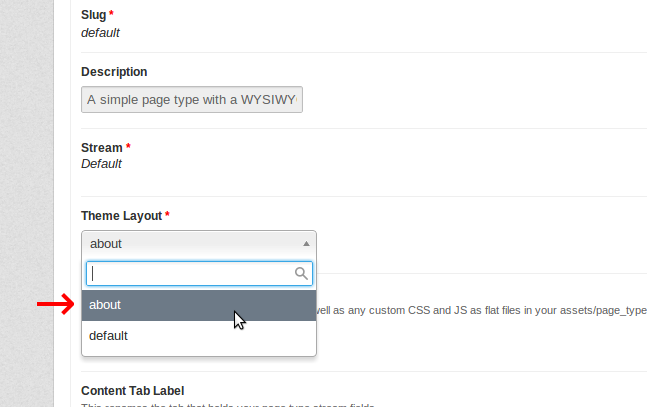
要向 PyroCMS 实例添加另一个布局,请在主题的 views/layouts/ 目录中再创建一个布局文件。该文件可以使用任何名称,但最好尽可能具有描述性地命名 - 例如 about.html。
为了增加灵活性,您可以使用任意数量的布局文件。当您在 PyroCMS 控制面板(控制面板→页面→页面类型)中编辑或创建页面类型并从下拉列表中选择所需文件时,您的所有布局主题的布局文件将可供使用。
移动布局
PyroCMS 能够轻松显示移动设备和桌面设备的单独布局。要使用此功能,请将布局文件移动到 views 文件夹中名为“web”的文件夹中,以便您的默认布局位于此处:
[your-theme]/views/web/layouts/default.html
当用户使用桌面浏览器访问您的网站时,将使用此位置的主要布局文件。如果用户使用移动设备浏览器访问您的网站,则会向用户提供您在此位置创建的移动布局:
[your-theme]/views/mobile/layouts/default.html
此功能适用于多个布局文件。
请注意 PyroCMS 文档中的警告:“PyroCMS 不认为 iPad 是移动设备,因此如果用户使用 iPad 访问您的网站,它不会加载您的移动布局。”但是,如果在您的网站上,您希望将 iPad 识别为移动设备,则可以更改 config/ 目录中的“user_agent.php”文件,以使 iPad 识别为移动设备。移动设备。
完成!
使用本文作为指南,您可以看到在 PyroCMS 中创建主题是多么容易。提供的代码示例非常简单,因此我鼓励您探索 PyroCMS 文档,以便对 PyroCMS 中的布局、移动布局、部分和 Lex 解析器有更丰富的经验。玩得开心!
The above is the detailed content of Creating a PyroCMS Theme: A Step-by-Step Guide. For more information, please follow other related articles on the PHP Chinese website!

Hot AI Tools

Undresser.AI Undress
AI-powered app for creating realistic nude photos

AI Clothes Remover
Online AI tool for removing clothes from photos.

Undress AI Tool
Undress images for free

Clothoff.io
AI clothes remover

Video Face Swap
Swap faces in any video effortlessly with our completely free AI face swap tool!

Hot Article
Hot Tools

Notepad++7.3.1
Easy-to-use and free code editor

SublimeText3 Chinese version
Chinese version, very easy to use

Zend Studio 13.0.1
Powerful PHP integrated development environment

Dreamweaver CS6
Visual web development tools

SublimeText3 Mac version
God-level code editing software (SublimeText3)
Hot Topics


 Explain JSON Web Tokens (JWT) and their use case in PHP APIs.
Apr 05, 2025 am 12:04 AM
Explain JSON Web Tokens (JWT) and their use case in PHP APIs.
Apr 05, 2025 am 12:04 AM
JWT is an open standard based on JSON, used to securely transmit information between parties, mainly for identity authentication and information exchange. 1. JWT consists of three parts: Header, Payload and Signature. 2. The working principle of JWT includes three steps: generating JWT, verifying JWT and parsing Payload. 3. When using JWT for authentication in PHP, JWT can be generated and verified, and user role and permission information can be included in advanced usage. 4. Common errors include signature verification failure, token expiration, and payload oversized. Debugging skills include using debugging tools and logging. 5. Performance optimization and best practices include using appropriate signature algorithms, setting validity periods reasonably,
 How does session hijacking work and how can you mitigate it in PHP?
Apr 06, 2025 am 12:02 AM
How does session hijacking work and how can you mitigate it in PHP?
Apr 06, 2025 am 12:02 AM
Session hijacking can be achieved through the following steps: 1. Obtain the session ID, 2. Use the session ID, 3. Keep the session active. The methods to prevent session hijacking in PHP include: 1. Use the session_regenerate_id() function to regenerate the session ID, 2. Store session data through the database, 3. Ensure that all session data is transmitted through HTTPS.
 What are Enumerations (Enums) in PHP 8.1?
Apr 03, 2025 am 12:05 AM
What are Enumerations (Enums) in PHP 8.1?
Apr 03, 2025 am 12:05 AM
The enumeration function in PHP8.1 enhances the clarity and type safety of the code by defining named constants. 1) Enumerations can be integers, strings or objects, improving code readability and type safety. 2) Enumeration is based on class and supports object-oriented features such as traversal and reflection. 3) Enumeration can be used for comparison and assignment to ensure type safety. 4) Enumeration supports adding methods to implement complex logic. 5) Strict type checking and error handling can avoid common errors. 6) Enumeration reduces magic value and improves maintainability, but pay attention to performance optimization.
 Describe the SOLID principles and how they apply to PHP development.
Apr 03, 2025 am 12:04 AM
Describe the SOLID principles and how they apply to PHP development.
Apr 03, 2025 am 12:04 AM
The application of SOLID principle in PHP development includes: 1. Single responsibility principle (SRP): Each class is responsible for only one function. 2. Open and close principle (OCP): Changes are achieved through extension rather than modification. 3. Lisch's Substitution Principle (LSP): Subclasses can replace base classes without affecting program accuracy. 4. Interface isolation principle (ISP): Use fine-grained interfaces to avoid dependencies and unused methods. 5. Dependency inversion principle (DIP): High and low-level modules rely on abstraction and are implemented through dependency injection.
 Explain late static binding in PHP (static::).
Apr 03, 2025 am 12:04 AM
Explain late static binding in PHP (static::).
Apr 03, 2025 am 12:04 AM
Static binding (static::) implements late static binding (LSB) in PHP, allowing calling classes to be referenced in static contexts rather than defining classes. 1) The parsing process is performed at runtime, 2) Look up the call class in the inheritance relationship, 3) It may bring performance overhead.
 What is REST API design principles?
Apr 04, 2025 am 12:01 AM
What is REST API design principles?
Apr 04, 2025 am 12:01 AM
RESTAPI design principles include resource definition, URI design, HTTP method usage, status code usage, version control, and HATEOAS. 1. Resources should be represented by nouns and maintained at a hierarchy. 2. HTTP methods should conform to their semantics, such as GET is used to obtain resources. 3. The status code should be used correctly, such as 404 means that the resource does not exist. 4. Version control can be implemented through URI or header. 5. HATEOAS boots client operations through links in response.
 How do you handle exceptions effectively in PHP (try, catch, finally, throw)?
Apr 05, 2025 am 12:03 AM
How do you handle exceptions effectively in PHP (try, catch, finally, throw)?
Apr 05, 2025 am 12:03 AM
In PHP, exception handling is achieved through the try, catch, finally, and throw keywords. 1) The try block surrounds the code that may throw exceptions; 2) The catch block handles exceptions; 3) Finally block ensures that the code is always executed; 4) throw is used to manually throw exceptions. These mechanisms help improve the robustness and maintainability of your code.
 What are anonymous classes in PHP and when might you use them?
Apr 04, 2025 am 12:02 AM
What are anonymous classes in PHP and when might you use them?
Apr 04, 2025 am 12:02 AM
The main function of anonymous classes in PHP is to create one-time objects. 1. Anonymous classes allow classes without names to be directly defined in the code, which is suitable for temporary requirements. 2. They can inherit classes or implement interfaces to increase flexibility. 3. Pay attention to performance and code readability when using it, and avoid repeatedly defining the same anonymous classes.
