

Develop custom modules for Magento

Magento Custom Module Development is a core part of any Magento development or Magento project as at any stage you may want to integrate your own functionality/modules into an existing Magento project.
In this series, I will cover the details of custom module development for Magento.
If you want to develop Magento further, check out the various useful Magento extensions on Envato Market.
In this series, I am referring to Magento Community Edition 1.7, albeit a custom version The module structure is the same in all versions of Magento. Before starting the actual module development, let’s quickly understand the basic structure of Magento.
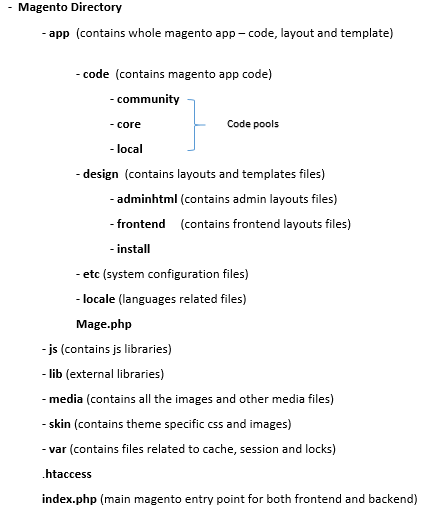
Whenever you install a new Magento, you will notice the following Magento directory structure:
Magento MVC Structure Introduction
Like any other major framework like Joomla, CakePHP, CodeIgniter, etc., Magento also follows an MVC-based architecture, although this is slightly different from the core PHP MVC architecture. Here I will explain the differences in Magento architecture by comparing it with a simple PHP MVC architecture.
PHP MVC Architecture
In a typical MVC pattern, the flow of an application looks like this:
- There is one main entry point -
index.php- from which the entire application routing mechanism is determined. - Based on this routing mechanism and the requested URL pattern, the app will call the appropriate controller.
- The controller then calls the appropriate view.
- Finally, the view file collects data from the model file and displays the data.
Magento MVC Architecture
Magento’s MVC architecture adds several layers to the MVC pattern, but the basic control flow of the application is as follows:
- There is one main entry point -
index.php- from which the entire application will be initialized. - The appropriate controller will be called based on the requested URL.
- The controller defines pages and loads the layout files for these pages.
- The layout file tells the controller which block files to use.
- Block files collect data from model and helper files and pass it to template files.
- The template file receives the data and renders the html.
Initially, this may be difficult to understand as it contains some extra layers. To get more familiar with the control flow, let's develop a custom "Hello World" module.
Before you start using modules
- I assume you already have version 1.7 or a working copy of Magento 1.7 (otherwise the version doesn't matter at this stage)
- Disable caching. To disable caching, go to Magento Admin Panel > System > Cache Management > Select all cache types from the left checkbox > Select Action: Disable from the top right dropdown > Click Submit.
Magento module structure
Code Pool
Magento contains three types of code pools where all custom and core modules of Magento reside.
- The core pool contains all the core modules that come with Magento installation by default. These modules are written by Magento developers. It is recommended not to modify these modules because whenever you upgrade your Magento installation, all core modules will be overwritten and your modifications will be lost.
- The Community Pool contains all modules (i.e. custom modules) developed by third-party programmers and installed through Magento Connect. These modules typically extend the core modules and provide their own functionality, which can usually be used anywhere in Magento.
- The local pool contains all custom modules that will be used in a specific project but will not be read in Magento Connect
So we have two pool options: community pool or local pool. Since we are developing our own project, we will use a local pool, although there are no restrictions on using a community pool.
structure
Magento modules are composed of the following components:
- BlockContains functions for displaying data in the template.
- Model Contains the business logic of the module.
- Resource ModelContains functions for database interaction.
- Controller Define the page layout and block the file and load it when the URL is requested.
- etcContains a configuration file in XML format that tells Magento how many files the module has and how the module interacts.
- HelpersContains functions for defining common business logic (e.g. image resizing, validation). These functions can be used anywhere in your Magento application
- sqlContains SQL scripts for creating, modifying, or dropping SQL tables.
Module naming
We need to name our module. Generally speaking, Magento module names consist of two parts: <namespace></namespace> as the author or company name and <module></module> as the actual module name.
Based on these naming conventions, I gave our module the Chiragdodia_Mymodule name. We will refer to this name throughout this series.
Code setup and configuration
Let’s create a directory based on the above structure. Go to the Magento installation directory and navigate to app/code/local and create a directory as shown below.
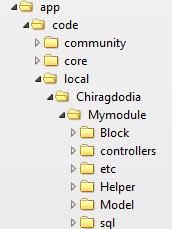
Next, we will create the configuration file Chiragdodia_Mymodule.xml in app/etc/modules directory to configure and activate our module. This directory contains configuration files for all modules.
<?xml version="1.0"?>
<config>
    <modules>
        <Chiragdodia_Mymodule>
        <active>true</active>
        <codePool>local</codePool>
        </Chiragdodia_Mymodule>
    </modules>
</config>
This file will tell Magento the location of our module. In the active tag, we specify true to enable our module. If everything is correct so far, you will find your module in the Magento Admin Panel > System > Configuration > Advanced > Advanced > Disable Module Output list. From here you can enable and disable your module.
Getting Started: Development
Next we will create the module configuration file. This file will tell Magento all the information about our module. This includes how many files our module contains, what types of files (models, helpers, database classes), etc.
Go to app/code/local/Chiragdodia/Mymodule/etc and create a config.xml < /i> Will contain the following contents of the file
<?xml version="1.0"?>
<config>
    <modules>
        <Chiragdodia_Mymodule>
            <version>0.1.0</version>    <!-- Version number of your module -->
        </Chiragdodia_Mymodule>
    </modules>
    <frontend>
        <routers>
            <mymodule>
                <use>standard</use>
                <args>
                    <module>Chiragdodia_Mymodule</module>
                    <frontName>mymodule</frontName>
                </args>
            </mymodule>
        </routers>
    </frontend>
</config>
Let’s go through each tag line by line. Here, the first tag is <module> , which contains the name and version of our module. The version number is very important when updating modules.
<frontend> tag will tell Magento information about the scheduled controller. Inside the <frontend> tag, we define <routers> which tells Magento how to access our controller through the routing mechanism.
In the <mymodule> tag we are in <module> < 中定义了模块名称i># Tags and frontend names in <frontName>#. We can access our module on the frontend by using the frontend name, for example yoursitename.com/index.php/mymodule/index.
yoursitename.com/index.php/mymodule or yoursitename.com/index.php/mymodule/index Magento will look for the index action file for the module controller. Therefore, we need to create the controller file.
app/code/local/Chiragdodia/Mymodule/controllers and create the file IndexController.php Contains the following content.
<?php
class Chiragdodia_Mymodule_IndexController extends Mage_Core_Controller_Front_Action
{
    public function indexAction()
    {
        echo "Hello tuts+ World";
    }
}
yoursite.com/index.php/mymodule/index It will print "Hello tuts World". Awesome - we finally finished our first hello world module.
Here we extend the class
Mage_Core_Controller_Front_Action , which contains all methods used in URL routing. Magento class names reflect the location of the class files. Therefore, the class Mage_Core_Controller_Front_Action is located at location Mage > Core > Controller > Front > Action.php
Chiragdodia_Mymodule_IndexController. Magento controllers should be named in a manner that reflects (tag)_(Action Controllername)(keyword Controller).<module>
- tag = <module>Chiragdodia_Mymodule
(We have defined this tag inconfig.xml)Operation - Controller Name
= IndexOperation controller followed by - Controller
keyword
Chiragdodia_Mymodule_IndexController
Now view the URL pattern that follows the routing pattern yoursite.com/index.php/frontendname/actionControllername/actionmethod
- 前端名称 = mymodule
- actionControllername = 索引
- actionmethodname = 索引
根据此网址模式,我们模块的网址为 yoursite.com/index.php/mymodule/index/index。您还可以使用 yoursite.com/index.php/mymodule 访问它,因为只要您未指定 actionController 或 actionmethod 名称,Magento 就会加载默认情况下的索引控制器和索引操作。
现在让我们再创建一个操作:testAction 。
<?php
class Chiragdodia_Mymodule_IndexController extends Mage_Core_Controller_Front_Action
{
    public function indexAction()
    {
        echo "Hello tuts+ World";
    }
    public function testAction()
    {
        echo "test action";
    }
}
我们可以使用 URL yoursite.com/index.php/mymodule/index/test 访问 testAction。 如前所述
- 前端名称 = mymodule
- actionControllername = 索引
- actionmethodname = 测试
这就是控制器在 Magento 中的工作原理。
一开始,一次理解所有内容可能很困难,因此我已将所有源代码包含到此模块中,以便您可以在将其用作指南的同时查看它并实现自己的工作。
下一步是什么?
在下一部分中,我们将通过创建布局和块文件来填充模块中的一些布局。我们将了解布局文件在 Magento 中如何工作以及块在 Magento 上下文中扮演什么角色。
在此之前,请创建您自己的模块,并让我知道任何给您带来麻烦的事情。
The above is the detailed content of Develop custom modules for Magento. For more information, please follow other related articles on the PHP Chinese website!

Hot AI Tools

Undresser.AI Undress
AI-powered app for creating realistic nude photos

AI Clothes Remover
Online AI tool for removing clothes from photos.

Undress AI Tool
Undress images for free

Clothoff.io
AI clothes remover

Video Face Swap
Swap faces in any video effortlessly with our completely free AI face swap tool!

Hot Article
Hot Tools

Notepad++7.3.1
Easy-to-use and free code editor

SublimeText3 Chinese version
Chinese version, very easy to use

Zend Studio 13.0.1
Powerful PHP integrated development environment

Dreamweaver CS6
Visual web development tools

SublimeText3 Mac version
God-level code editing software (SublimeText3)
Hot Topics
 1664
1664
 14
1423
52
1317
25
1268
29
1242
24
14
1423
52
1317
25
1268
29
1242
24

 PHP and Python: Comparing Two Popular Programming Languages
Apr 14, 2025 am 12:13 AM
PHP and Python: Comparing Two Popular Programming Languages
Apr 14, 2025 am 12:13 AM
PHP and Python each have their own advantages, and choose according to project requirements. 1.PHP is suitable for web development, especially for rapid development and maintenance of websites. 2. Python is suitable for data science, machine learning and artificial intelligence, with concise syntax and suitable for beginners.
 PHP in Action: Real-World Examples and Applications
Apr 14, 2025 am 12:19 AM
PHP in Action: Real-World Examples and Applications
Apr 14, 2025 am 12:19 AM
PHP is widely used in e-commerce, content management systems and API development. 1) E-commerce: used for shopping cart function and payment processing. 2) Content management system: used for dynamic content generation and user management. 3) API development: used for RESTful API development and API security. Through performance optimization and best practices, the efficiency and maintainability of PHP applications are improved.
 Explain secure password hashing in PHP (e.g., password_hash, password_verify). Why not use MD5 or SHA1?
Apr 17, 2025 am 12:06 AM
Explain secure password hashing in PHP (e.g., password_hash, password_verify). Why not use MD5 or SHA1?
Apr 17, 2025 am 12:06 AM
In PHP, password_hash and password_verify functions should be used to implement secure password hashing, and MD5 or SHA1 should not be used. 1) password_hash generates a hash containing salt values to enhance security. 2) Password_verify verify password and ensure security by comparing hash values. 3) MD5 and SHA1 are vulnerable and lack salt values, and are not suitable for modern password security.
 Explain the difference between self::, parent::, and static:: in PHP OOP.
Apr 09, 2025 am 12:04 AM
Explain the difference between self::, parent::, and static:: in PHP OOP.
Apr 09, 2025 am 12:04 AM
In PHPOOP, self:: refers to the current class, parent:: refers to the parent class, static:: is used for late static binding. 1.self:: is used for static method and constant calls, but does not support late static binding. 2.parent:: is used for subclasses to call parent class methods, and private methods cannot be accessed. 3.static:: supports late static binding, suitable for inheritance and polymorphism, but may affect the readability of the code.
 PHP: A Key Language for Web Development
Apr 13, 2025 am 12:08 AM
PHP: A Key Language for Web Development
Apr 13, 2025 am 12:08 AM
PHP is a scripting language widely used on the server side, especially suitable for web development. 1.PHP can embed HTML, process HTTP requests and responses, and supports a variety of databases. 2.PHP is used to generate dynamic web content, process form data, access databases, etc., with strong community support and open source resources. 3. PHP is an interpreted language, and the execution process includes lexical analysis, grammatical analysis, compilation and execution. 4.PHP can be combined with MySQL for advanced applications such as user registration systems. 5. When debugging PHP, you can use functions such as error_reporting() and var_dump(). 6. Optimize PHP code to use caching mechanisms, optimize database queries and use built-in functions. 7
 What are HTTP request methods (GET, POST, PUT, DELETE, etc.) and when should each be used?
Apr 09, 2025 am 12:09 AM
What are HTTP request methods (GET, POST, PUT, DELETE, etc.) and when should each be used?
Apr 09, 2025 am 12:09 AM
HTTP request methods include GET, POST, PUT and DELETE, which are used to obtain, submit, update and delete resources respectively. 1. The GET method is used to obtain resources and is suitable for read operations. 2. The POST method is used to submit data and is often used to create new resources. 3. The PUT method is used to update resources and is suitable for complete updates. 4. The DELETE method is used to delete resources and is suitable for deletion operations.
 How does PHP handle file uploads securely?
Apr 10, 2025 am 09:37 AM
How does PHP handle file uploads securely?
Apr 10, 2025 am 09:37 AM
PHP handles file uploads through the $\_FILES variable. The methods to ensure security include: 1. Check upload errors, 2. Verify file type and size, 3. Prevent file overwriting, 4. Move files to a permanent storage location.
 How does PHP type hinting work, including scalar types, return types, union types, and nullable types?
Apr 17, 2025 am 12:25 AM
How does PHP type hinting work, including scalar types, return types, union types, and nullable types?
Apr 17, 2025 am 12:25 AM
PHP type prompts to improve code quality and readability. 1) Scalar type tips: Since PHP7.0, basic data types are allowed to be specified in function parameters, such as int, float, etc. 2) Return type prompt: Ensure the consistency of the function return value type. 3) Union type prompt: Since PHP8.0, multiple types are allowed to be specified in function parameters or return values. 4) Nullable type prompt: Allows to include null values and handle functions that may return null values.
