OAuth can be a difficult concept to understand at first, but with the Twitter API now requiring its use, you need to understand it before creating a Twitter application. This tutorial introduces you to OAuth and walks you through the process of creating a basic application.
Introduction
In this tutorial, we will build a simple application that allows users to apply different effects to their Twitter avatar. In order to use the Twitter API, we must use OAuth to authorize our application to make requests on behalf of the user.
Our application flow will be like this:
The system will ask the user to connect to Twitter.
The system will display a list of preview avatars to the user for selection.
After selection, the user will see a confirmation screen showing the original avatar and the new avatar for comparison. Users can also choose to send tweets.
After the user confirms, the app creates the modified avatar and uploads it to Twitter, displaying a success page.
set up
First, we should set the source directory. We need a lib directory to store our PHP library (class) files, a tmp directory to save temporary files (this needs to be writable by the server), and a css Directory to hold our stylesheets, and a img directory for any images.
Your directory tree should look like this:
Tutorial
CSS
picture
lib
tmp(writable)
Register your application
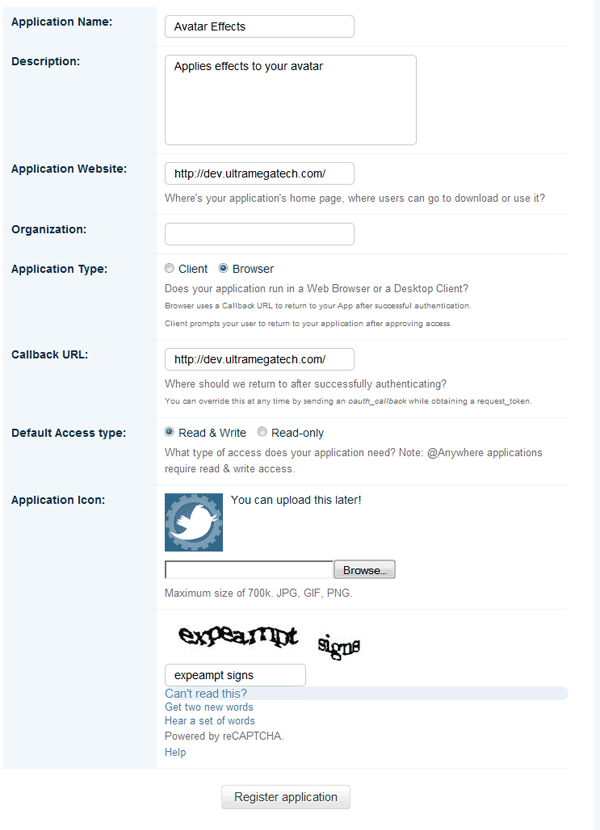
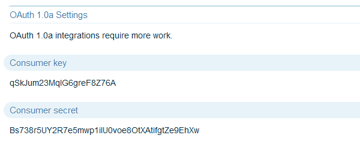
In order to use OAuth, you need what is called a consumer key and secret to identify your application. To get this information, you must follow the steps below to register your application with Twitter.
Go to the registration page and log in if necessary. You will see a table like this:
Fill out the form with details relevant to your app. In our case, the Application type is Browser and we need to set the default callback URL. The URL can be anything as long as it is in a valid format. We'll rewrite the callback in code so it doesn't matter if it's a real URL. For convenience, the default access type should be read and write.
After registering and accepting the terms, you will see information about your new application. The important details we need are the Consumer Key and Consumer Secret, which should look like this:
Download tmhOAuth library
We will utilize a library to handle all the details behind OAuth requests. In this tutorial, we'll use @themattharris' tmhOAuth library, which supports file uploads.
Download tmhOAuth from GitHub
Extract tmhOAuth.php to the lib directory we created before
Authentication
Authentication using OAuth is basically a three-step process. For a more in-depth explanation, see Twitter's page on authentication, but here's a summary:
The app gets the request token: The first step is for our app to identify itself to Twitter (using its consumer key) and get the request token. We need to save this request token for later use.
User authorizes application on Twitter: The user now needs to be sent to Twitter to grant our application permission to access their account. The user will then be sent back to the callback URL specified by the application.
Application exchanges request token for access token: Now that our application is approved, it can exchange the request token from step 1 for an access token. After obtaining the access token, our application can freely interact with the Twitter API on behalf of the user.
So let's start writing some code. We will handle all authentication tasks in a class called TwitterApp. Start the following code in a new file named lib/TwitterApp.php:
tmhOAuth = $tmhOAuth;
    }
}
Copy after login
Here we create three properties and a simple constructor. $tmhOAuth The attribute will be a tmhOAuth object that will be used throughout the class. The $userdata property will hold an object containing user information, such as their Twitter username and status. $state Property tracks the current authentication state.
The constructor simply accepts a tmhOAuth object and assigns it to the $tmhOAuth property.
Step 1: Get the request token
Here's how to get the request token:
/**
 * Obtain a request token from Twitter
 *
 * @return bool False if request failed
 */
private function getRequestToken() {

    // send request for a request token
    $this->tmhOAuth->request("POST", $this->tmhOAuth->url("oauth/request_token", ""), array(
        // pass a variable to set the callback
        'oauth_callback'    => $this->tmhOAuth->php_self()
    ));

    if($this->tmhOAuth->response["code"] == 200) {

        // get and store the request token
        $response = $this->tmhOAuth->extract_params($this->tmhOAuth->response["response"]);
        $_SESSION["authtoken"] = $response["oauth_token"];
        $_SESSION["authsecret"] = $response["oauth_token_secret"];

        // state is now 1
        $_SESSION["authstate"] = 1;

        // redirect the user to Twitter to authorize
        $url = $this->tmhOAuth->url("oauth/authorize", "") . '?oauth_token=' . $response["oauth_token"];
        header("Location: ' . $url);
        exit;
    }
    return false;
}
Copy after login
To understand the first part, you need to understand the tmhOAuth::request() method. This method allows us to make an OAuth enabled HTTP request and can be used as follows:
Now that you are familiar with the methods, we must make a POST request to the oauth/request_token API method. This will return the OAuth data in a special format, so when we use the tmhOAuth::url() method we need to set the format to blank. We also need to pass a variable called oauth_callback, which is where the user will be returned once authorized by Twitter. We will use the tmhOAuth::php_self() method to reference the current page. This is the code:
// send request for a request token
$this->tmhOAuth->request("POST", $this->tmhOAuth->url("oauth/request_token", ""), array(
    // pass a variable to set the callback
    'oauth_callback'    => $this->tmhOAuth->php_self()
));
Copy after login
Once we make the request, the response is stored as an array in the tmhOAuth::response attribute, which contains the following key data:
code - HTTP response code
response - actual returned data
headers - Response headers
So the next part of our code checks the response code (200 for success) and then puts the oauth_token and oauth_token_secret we received into session variables because later we They will be needed. These are extracted from the response data using the tmhOAuth::extract_params() method, which returns an array of data contained in the response. We also set the authstate session variable to indicate that we are in the next stage of authentication. This is the code:
if($this->tmhOAuth->response["code"] == 200) {

    // get and store the request token
    $response = $this->tmhOAuth->extract_params($this->tmhOAuth->response["response"]);
    $_SESSION["authtoken"] = $response["oauth_token"];
    $_SESSION["authsecret"] = $response["oauth_token_secret"];

    // state is now 1
    $_SESSION["authstate"] = 1;
}
Copy after login
Once completed, we must now redirect the user to the oauth/authorize URL, including the oauth_token in the GET parameters. This is the code:
// redirect the user to Twitter to authorize
$url = $this->tmhOAuth->url("oauth/authorize", "") . '?oauth_token=' . $response["oauth_token"];
header("Location: ' . $url);
exit;
Copy after login
Step 2: Obtain access token
Here's how to exchange the request token for an access token:
/**
 * Obtain an access token from Twitter
 *
 * @return bool False if request failed
 */
private function getAccessToken() {

    // set the request token and secret we have stored
    $this->tmhOAuth->config["user_token"] = $_SESSION["authtoken"];
    $this->tmhOAuth->config["user_secret"] = $_SESSION["authsecret"];

    // send request for an access token
    $this->tmhOAuth->request("POST", $this->tmhOAuth->url("oauth/access_token", ""), array(
        // pass the oauth_verifier received from Twitter
        'oauth_verifier'    => $_GET["oauth_verifier"]
    ));

    if($this->tmhOAuth->response["code"] == 200) {

        // get the access token and store it in a cookie
        $response = $this->tmhOAuth->extract_params($this->tmhOAuth->response["response"]);
        setcookie("access_token", $response["oauth_token"], time()+3600*24*30);
        setcookie("access_token_secret", $response["oauth_token_secret"], time()+3600*24*30);

        // state is now 2
        $_SESSION["authstate"] = 2;

        // redirect user to clear leftover GET variables
        header("Location: ' . $this->tmhOAuth->php_self());
        exit;
    }
    return false;
}
Copy after login
The first thing we need to do is set the user_token and user_secret in the tmhOAuth::config array to the request token we obtained earlier .
// set the request token and secret we have stored
$this->tmhOAuth->config["user_token"] = $_SESSION["authtoken"];
$this->tmhOAuth->config["user_secret"] = $_SESSION["authsecret"];
Copy after login
The next part is where we make the POST request to oauth/access_token. We pass the oauth_verifier we received in the GET variable as a parameter in this request.
// send request for an access token
$this->tmhOAuth->request("POST", $this->tmhOAuth->url("oauth/access_token", ""), array(
    // pass the oauth_verifier received from Twitter
    'oauth_verifier'    => $_GET["oauth_verifier"]
));
Copy after login
Twitter will respond with the access token and secret, we need to save these tokens for future requests. So the next piece of code takes these and saves each content in a cookie and then sets the state to 2.
if($this->tmhOAuth->response["code"] == 200) {

    // get the access token and store it in a cookie
    $response = $this->tmhOAuth->extract_params($this->tmhOAuth->response["response"]);
    setcookie("access_token", $response["oauth_token"], time()+3600*24*30);
    setcookie("access_token_secret", $response["oauth_token_secret"], time()+3600*24*30);

    // state is now 2
    $_SESSION["authstate"] = 2;

    // redirect user to clear leftover GET variables
    header("Location: ' . $this->tmhOAuth->php_self());
    exit;
}
Copy after login
The final redirection is to clear the URL parameters left by Twitter and allow the cookie to take effect.
Step 3: Verify Access Token
After obtaining the access token, we should check to make sure it is valid. Here's how to do it:
/**
 * Verify the validity of our access token
 *
 * @return bool Access token verified
 */
private function verifyAccessToken() {
    $this->tmhOAuth->config["user_token"] = $_COOKIE["access_token"];
    $this->tmhOAuth->config["user_secret"] = $_COOKIE["access_token_secret"];

    // send verification request to test access key
    $this->tmhOAuth->request("GET", $this->tmhOAuth->url("1/account/verify_credentials"));

    // store the user data returned from the API
    $this->userdata = json_decode($this->tmhOAuth->response["response"]);

    // HTTP 200 means we were successful
    return ($this->tmhOAuth->response["code"] == 200);
}
Copy after login
This code should look familiar now. All we do here is set user_token and user_secret and make a GET request to 1/account/verify_credentials. If Twitter responds with a 200 code, the access token is valid.
Another detail to note is that we are populating the $userdata property here with the data returned from this Twitter request. The data is in JSON format, so we use json_decode() to convert it to a PHP object. This is that line again:
// store the user data returned from the API
$this->userdata = json_decode($this->tmhOAuth->response["response"]);
Copy after login
Step 4: Tying everything together
With our OAuth components in place, it's time to bring everything together. We need a public-facing method to allow our client code to initiate the authentication process, like this:
/**
 * Authenticate user with Twitter
 *
 * @return bool Authentication successful
 */
public function auth() {

    // state 1 requires a GET variable to exist
    if($this->state == 1 && !isset($_GET["oauth_verifier"])) {
        $this->state = 0;
    }

    // Step 1: Get a request token
    if($this->state == 0) {
        return $this->getRequestToken();
    }
    // Step 2: Get an access token
    elseif($this->state == 1) {
        return $this->getAccessToken();
    }

    // Step 3: Verify the access token
    return $this->verifyAccessToken();
}
Copy after login
大多数 auth() 方法应该是不言自明的。根据状态,它执行该阶段的身份验证的适当方法。如果状态为 1,则 oauth_verifier GET 变量应该存在,因此该方法也会检查该变量。
/**
 * Check the current state of authentication
 *
 * @return bool True if state is 2 (authenticated)
 */
public function isAuthed() {
    return $this->state == 2;
}
// determine the authentication status
// default to 0
$this->state = 0;
// 2 (authenticated) if the cookies are set
if(isset($_COOKIE["access_token"], $_COOKIE["access_token_secret"])) {
$this->state = 2;
}
// otherwise use value stored in session
elseif(isset($_SESSION["authstate"])) {
$this->state = (int)$_SESSION["authstate"];
}
Copy after login
如果状态为 1,则表示我们正在进行身份验证。所以我们现在可以继续这个过程:
// if we are in the process of authentication we continue
if($this->state == 1) {
$this->auth();
}
Copy after login
如果状态为2,我们应该验证访问令牌。如果身份验证失败,此代码将清除 cookie 并重置状态:
// verify authentication, clearing cookies if it fails
elseif($this->state == 2 && !$this->auth()) {
$this->endSession();
}
Copy after login
这是进行了这些更改的新构造函数:
/**
* Initialize a new TwitterApp object
*
* @param tmhOAuth $tmhOAuth A tmhOAuth object with consumer key and secret
*/
public function __construct(tmhOAuth $tmhOAuth) {
// save the tmhOAuth object
$this->tmhOAuth = $tmhOAuth;
// start a session if one does not exist
if(!session_id()) {
session_start();
}
// determine the authentication status
// default to 0
$this->state = 0;
// 2 (authenticated) if the cookies are set
if(isset($_COOKIE["access_token"], $_COOKIE["access_token_secret"])) {
$this->state = 2;
}
// otherwise use value stored in session
elseif(isset($_SESSION["authstate"])) {
$this->state = (int)$_SESSION["authstate"];
}
// if we are in the process of authentication we continue
if($this->state == 1) {
$this->auth();
}
// verify authentication, clearing cookies if it fails
elseif($this->state == 2 && !$this->auth()) {
$this->endSession();
}
}
Copy after login
发送推文
现在所有授权代码都已完成,我们可以向我们的类添加一些常用功能。以下是通过 Twitter API 发送推文的方法:
/**
* Send a tweet on the user's behalf
*
* @param string $text Text to tweet
* @return bool Tweet successfully sent
*/
public function sendTweet($text) {
// limit the string to 140 characters
$text = substr($text, 0, 140);
// POST the text to the statuses/update method
$this->tmhOAuth->request("POST", $this->tmhOAuth->url("1/statuses/update"), array(
'status' => $text
));
return ($this->tmhOAuth->response["code"] == 200);
}
Copy after login
sendTweet() 方法接受一个字符串,将其限制为 140 个字符,然后在 POST 请求中将其发送到 1/statuses/update。这种模式现在应该非常熟悉了。
完整的 TwitterApp 类
tmhOAuth = $tmhOAuth;
// start a session if one does not exist
if(!session_id()) {
session_start();
}
// determine the authentication status
// default to 0
$this->state = 0;
// 2 (authenticated) if the cookies are set
if(isset($_COOKIE["access_token"], $_COOKIE["access_token_secret"])) {
$this->state = 2;
}
// otherwise use value stored in session
elseif(isset($_SESSION["authstate"])) {
$this->state = (int)$_SESSION["authstate"];
}
// if we are in the process of authentication we continue
if($this->state == 1) {
$this->auth();
}
// verify authentication, clearing cookies if it fails
elseif($this->state == 2 && !$this->auth()) {
$this->endSession();
}
}
/**
* Authenticate user with Twitter
*
* @return bool Authentication successful
*/
public function auth() {
// state 1 requires a GET variable to exist
if($this->state == 1 && !isset($_GET["oauth_verifier"])) {
$this->state = 0;
}
// Step 1: Get a request token
if($this->state == 0) {
return $this->getRequestToken();
}
// Step 2: Get an access token
elseif($this->state == 1) {
return $this->getAccessToken();
}
// Step 3: Verify the access token
return $this->verifyAccessToken();
}
/**
* Obtain a request token from Twitter
*
* @return bool False if request failed
*/
private function getRequestToken() {
// send request for a request token
$this->tmhOAuth->request("POST", $this->tmhOAuth->url("oauth/request_token", ""), array(
// pass a variable to set the callback
'oauth_callback' => $this->tmhOAuth->php_self()
));
if($this->tmhOAuth->response["code"] == 200) {
// get and store the request token
$response = $this->tmhOAuth->extract_params($this->tmhOAuth->response["response"]);
$_SESSION["authtoken"] = $response["oauth_token"];
$_SESSION["authsecret"] = $response["oauth_token_secret"];
// state is now 1
$_SESSION["authstate"] = 1;
// redirect the user to Twitter to authorize
$url = $this->tmhOAuth->url("oauth/authorize", "") . '?oauth_token=' . $response["oauth_token"];
header("Location: ' . $url);
exit;
}
return false;
}
/**
* Obtain an access token from Twitter
*
* @return bool False if request failed
*/
private function getAccessToken() {
// set the request token and secret we have stored
$this->tmhOAuth->config["user_token"] = $_SESSION["authtoken"];
$this->tmhOAuth->config["user_secret"] = $_SESSION["authsecret"];
// send request for an access token
$this->tmhOAuth->request("POST", $this->tmhOAuth->url("oauth/access_token", ""), array(
// pass the oauth_verifier received from Twitter
'oauth_verifier' => $_GET["oauth_verifier"]
));
if($this->tmhOAuth->response["code"] == 200) {
// get the access token and store it in a cookie
$response = $this->tmhOAuth->extract_params($this->tmhOAuth->response["response"]);
setcookie("access_token", $response["oauth_token"], time()+3600*24*30);
setcookie("access_token_secret", $response["oauth_token_secret"], time()+3600*24*30);
// state is now 2
$_SESSION["authstate"] = 2;
// redirect user to clear leftover GET variables
header("Location: ' . $this->tmhOAuth->php_self());
exit;
}
return false;
}
/**
* Verify the validity of our access token
*
* @return bool Access token verified
*/
private function verifyAccessToken() {
$this->tmhOAuth->config["user_token"] = $_COOKIE["access_token"];
$this->tmhOAuth->config["user_secret"] = $_COOKIE["access_token_secret"];
// send verification request to test access key
$this->tmhOAuth->request("GET", $this->tmhOAuth->url("1/account/verify_credentials"));
// store the user data returned from the API
$this->userdata = json_decode($this->tmhOAuth->response["response"]);
// HTTP 200 means we were successful
return ($this->tmhOAuth->response["code"] == 200);
}
/**
* Check the current state of authentication
*
* @return bool True if state is 2 (authenticated)
*/
public function isAuthed() {
return $this->state == 2;
}
/**
 * Remove user's access token cookies
 */
public function endSession() {
    $this->state = 0;
    $_SESSION["authstate"] = 0;
    setcookie("access_token", "", 0);
    setcookie("access_token_secret", "", 0);
}
/**
 * Send a tweet on the user's behalf
 *
 * @param string $text Text to tweet
 * @return bool Tweet successfully sent
 */
public function sendTweet($text) {

    // limit the string to 140 characters
    $text = substr($text, 0, 140);

    // POST the text to the statuses/update method
    $this->tmhOAuth->request("POST", $this->tmhOAuth->url("1/statuses/update"), array(
        'status' => $text
    ));

    return ($this->tmhOAuth->response["code"] == 200);
}
}
为了获取标准尺寸的缩略图,我们将调用 users/profile_image/:screen_name API 方法,该方法通过 302 重定向响应指定用户的头像图像。这意味着 URL 将在 Location 标头中找到。这是该方法:
/**
* Get the URL to the standard sized avatar
*
* @return string The URL to the image file
*/
protected function getImageURL() {
// request user's 'bigger' profile image
$this->tmhOAuth->request("GET", $this->tmhOAuth->url("1/users/profile_image/" . $this->userdata->screen_name), array(
'screen_name' => $this->userdata->screen_name,
'size' => 'bigger'
));
if($this->tmhOAuth->response["code"] == 302) {
// the direct URL is in the Location header
return $this->tmhOAuth->response["headers"]["location"];
}
throw new Exception("Error locating image");
}
没有 API 方法可以获取完整尺寸的图像,因此对于下一个方法,我们将稍微作弊并编辑 URL。用户数据包含一个 profile_image_url 字段,该字段指向 avatar_normal.jpg 之类的内容,并且可以在 avatar.jpg 中找到不带后缀的原始图像。所以这个方法获取URL,去掉尺寸后缀并返回修改后的URL:
/**
* Get the URL to the full sized avatar
*
* @return string The URL to the image file
*/
protected function getBuild a Twitter OAuth applicationImageURL() {
// get the regular sized avatar
$url = $this->userdata->profile_image_url;
// save the extension for later
$ext = strrchr($url, '.");
// strip the "_normal' suffix and add back the extension
return substr($url, 0, strrpos($url, "_")) . $ext;
}
/**
* Convert raw image data to a GD resource
*
* @param string $data Binary image data to parse
* @return resource A GD image resource identifier
*/
protected function readImage($data) {
// read in the original image
$src = imagecreatefromstring($data);
if(!$src) {
throw new Exception("Error reading image");
}
// get the dimensions
$width = imagesx($src);
$height = imagesy($src);
// create a blank true color image of the same size
$img = imagecreatetruecolor($width, $height);
// copy the original image to this new canvas
imagecopy($img, $src, 0, 0, 0, 0, $width, $height);
// discard the source image
imagedestroy($src);
return $img;
}
/**
* Generate previews for each image filter
*
* @return array Associative array of image previews
*/
public function generatePreviews() {
// we need valid user info to know whose avatar to handle
if(!$this->isAuthed()) {
throw new Exception("Requires oauth authorization");
}
$username = $this->userdata->screen_name;
// cache the raw data to use
$data = $this->download($this->getImageURL());
// copy the original image
$img = $this->readImage($data);
$this->saveImage($img, $username . "_orig");
// array to hold the list of previews
$images = array();
// loop through each filter to generate previews
foreach($this->filters as $filter_name => $filter) {
$img = $this->readImage($data);
imagefilter($img, $filter);
$images[$filter_name] = $this->saveImage($img, $username . "_' . $filter_name);
}
return $images;
}
Copy after login
我们要做的第一件事是检查用户是否已通过身份验证,然后获取用户名以便稍后在文件名中使用。
// we need valid user info to know whose avatar to handle
if(!$this->isAuthed()) {
throw new Exception("Requires oauth authorization");
}
$username = $this->userdata->screen_name;
// array to hold the list of previews
$images = array();
// loop through each filter to generate previews
foreach($this->filters as $filter_name => $filter) {
$img = $this->readImage($data);
imagefilter($img, $filter);
$images[$filter_name] = $this->saveImage($img, $username . "_' . $filter_name);
}
return $images;
/**
* Get the path to a previously generated preview
*
* @param string $filter The image filter to get the preview for
* @return string The path to the preview file or null if not found
*/
public function getPreview($filter = 'orig") {
if(!$this->isAuthed()) {
throw new Exception("Requires oauth authorization");
}
$path = $this->path . "/' . $this->userdata->screen_name . "_' . $filter . '.png';
if(file_exists($path)) {
return $path;
}
return null;
}
/**
* Process the user's full avatar using one of the filters
*
* @param string $filter The filter to apply to the image
* @return string Path to the output file
*/
protected function processImage($filter = "grayscale") {
// make sure the filter exists
$filter = strtolower($filter);
if(!array_key_exists($filter, $this->filters)) {
throw new Exception("Unsupported image filter");
}
$username = $this->userdata->screen_name;
// get the full sized avatar
$data = $this->download($this->getBuild a Twitter OAuth applicationImageURL());
$img = $this->readImage($data);
// apply the filter to the image
imagefilter($img, $this->filters[$filter]);
// save the image and return the path
return $this->saveImage($img, $username . "_' . $filter . "_full");
}
现在我们需要将生成的图像实际发送到 Twitter 的方法,以更新用户的头像。该方法调用 processImage() 方法创建图像并通过 1/account/update_profile_image API 方法上传到 Twitter:
/**
* Update user's avatar with a filtered version
*
* @param string $filter The filter to use
* @return bool Operation successful
*/
public function commitAvatar($filter) {
if(!$this->isAuthed()) {
throw new Exception("Requires oauth authorization");
}
// generate the image and get the path
$path = $this->processImage($filter);
if(file_exists($path)) {
// send a multipart POST request with the image file data
$this->tmhOAuth->request("POST", $this->tmhOAuth->url("1/account/update_profile_image"), array(
// format: @local/path.png;type=mime/type;filename=file_name.png
'image' => '@' . $path . ';type=image/png;filename=' . basename($path)
), true, true);
return ($this->tmhOAuth->response["code"] == 200);
}
return false;
}
Copy after login
这里棘手的部分是实际的 tmhOAuth POST 请求,它是一个包含原始图像数据的多部分请求。为此,我们必须将 tmhOAuth::request() 方法的最后一个参数设置为 true,并以特殊格式传递 image 变量:
// send a multipart POST request with the image file data
$this->tmhOAuth->request("POST", $this->tmhOAuth->url("1/account/update_profile_image"), array(
// format: @local/path.png;type=mime/type;filename=file_name.png
'image' => '@' . $path . ';type=image/png;filename=' . basename($path)
), true, true);
Copy after login
清理
所有这些文件操作的副作用是留下大量临时文件。下面是清理临时目录的方法:
/**
* Delete leftover image files
*/
public function cleanupFiles() {
// file to track when we last checked
$flag = $this->path . "/.last_check';
$time = time();
// have we checked within the last hour?
if(!file_exists($flag) || $time - filemtime($flag) > 3600) {
// get an array of PNG files in the directory
$files = glob($this->path . "/*.png");
// loop through files, deleting old files (12+ hours)
foreach($files as $file) {
if($time - filemtime($file) > 60*60*12) {
unlink($file);
}
}
// update the timestamp of our flag file
touch($flag);
}
}
&?php
class TwitterAvatars extends TwitterApp {
/**
* The path to our temporary files directory
*
* @var string Path to store image files
*/
public $path;
/**
* These are all the GD image filters available in this class
*
* @var array Associative array of image filters
*/
protected $filters = array(
'grayscale' => IMG_FILTER_GRAYSCALE,
'negative' => IMG_FILTER_NEGATE,
'edgedetect' => IMG_FILTER_EDGEDETECT,
'embossed' => IMG_FILTER_EMBOSS,
'blurry' => IMG_FILTER_GAUSSIAN_BLUR,
'sketchy' => IMG_FILTER_MEAN_REMOVAL
);
/**
* Initialize a new TwitterAvatars object
*
* @param tmhOAuth $tmhOAuth A tmhOAuth object with consumer key and secret
* @param string $path Path to store image files (default 'tmp")
*/
public function __construct(tmhOAuth $tmhOAuth, $path = 'tmp") {
// call the parent class' constructor
parent::__construct($tmhOAuth);
// save the path variable
$this->path = $path;
}
/**
 * Download data from specified URL
 *
 * @param string $url URL to download
 * @return string Downloaded data
 */
protected function download($url) {
    $ch = curl_init();
    curl_setopt($ch, CURLOPT_URL, $url);
    curl_setopt($ch, CURLOPT_RETURNTRANSFER, true);

    $ret = curl_exec($ch);
    curl_close($ch);

    return $ret;
}
/**
* Get the URL to the standard sized avatar
*
* @return string The URL to the image file
*/
protected function getImageURL() {
// request user's 'bigger' profile image
$this->tmhOAuth->request("GET", $this->tmhOAuth->url("1/users/profile_image/' . $this->userdata->screen_name), array(
'screen_name' => $this->userdata->screen_name,
'size' => 'bigger'
));
if($this->tmhOAuth->response["code"] == 302) {
// the direct URL is in the Location header
return $this->tmhOAuth->response["headers"]["location"];
}
throw new Exception("Error locating image");
}
/**
 * Get the URL to the full sized avatar
 *
 * @return string The URL to the image file
 */
protected function getBuild a Twitter OAuth applicationImageURL() {

    // get the regular sized avatar
    $url = $this->userdata->profile_image_url;

    // save the extension for later
    $ext = strrchr($url, '.");

    // strip the "_normal' suffix and add back the extension
    return substr($url, 0, strrpos($url, "_")) . $ext;
}
/**
 * Convert raw image data to a GD resource
 *
 * @param string $data Binary image data to parse
 * @return resource A GD image resource identifier
 */
protected function readImage($data) {

    // read in the original image
    $src = imagecreatefromstring($data);

    if(!$src) {
        throw new Exception("Error reading image");
    }

    // get the dimensions
    $width = imagesx($src);
    $height = imagesy($src);

    // create a blank true color image of the same size
    $img = imagecreatetruecolor($width, $height);

    // copy the original image to this new canvas
    imagecopy($img, $src, 0, 0, 0, 0, $width, $height);

    // discard the source image
    imagedestroy($src);

    return $img;
}
/**
 * Save a GD image resource to a PNG file
 *
 * @param resource $img GD image resource identifier
 * @param string $name Name of the image
 * @return string Path to the saved image
 */
protected function saveImage($img, $name) {
    $path = $this->path . "/' . $name . '.png';
    imagepng($img, $path);
    imagedestroy($img);
    return $path;
}
/**
 * Generate previews for each image filter
 *
 * @return array Associative array of image previews
 */
public function generatePreviews() {

    // we need valid user info to know whose avatar to handle
    if(!$this->isAuthed()) {
        throw new Exception("Requires oauth authorization");
    }
    $username = $this->userdata->screen_name;

    // cache the raw data to use
    $data = $this->download($this->getImageURL());

    // copy the original image
    $img = $this->readImage($data);
    $this->saveImage($img, $username . "_orig");

    // array to hold the list of previews
    $images = array();

    // loop through each filter to generate previews
    foreach($this->filters as $filter_name => $filter) {
        $img = $this->readImage($data);
        imagefilter($img, $filter);
        $images[$filter_name] = $this->saveImage($img, $username . "_' . $filter_name);
    }

    return $images;
}
/**
 * Get the path to a previously generated preview
 *
 * @param string $filter The image filter to get the preview for
 * @return string The path to the preview file or null if not found
 */
public function getPreview($filter = 'orig") {
    if(!$this->isAuthed()) {
        throw new Exception("Requires oauth authorization");
    }
    $path = $this->path . "/' . $this->userdata->screen_name . "_' . $filter . '.png';
    if(file_exists($path)) {
        return $path;
    }
    return null;
}
/**
* Process the user's full avatar using one of the filters
*
* @param string $filter The filter to apply to the image
* @return string Path to the output file
*/
protected function processImage($filter = 'grayscale") {
// make sure the filter exists
$filter = strtolower($filter);
if(!array_key_exists($filter, $this->filters)) {
throw new Exception("Unsupported image filter");
}
$username = $this->userdata->screen_name;
// get the full sized avatar
$data = $this->download($this->getBuild a Twitter OAuth applicationImageURL());
$img = $this->readImage($data);
// apply the filter to the image
imagefilter($img, $this->filters[$filter]);
// save the image and return the path
return $this->saveImage($img, $username . "_' . $filter . "_full");
}
/**
 * Update user's avatar with a filtered version
 *
 * @param string $filter The filter to use
 * @return bool Operation successful
 */
public function commitAvatar($filter) {
    if(!$this->isAuthed()) {
        throw new Exception("Requires oauth authorization");
    }

    // generate the image and get the path
    $path = $this->processImage($filter);
    if(file_exists($path)) {

        // send a multipart POST request with the image file data
        $this->tmhOAuth->request("POST", $this->tmhOAuth->url("1/account/update_profile_image"), array(
            // format: @local/path.png;type=mime/type;filename=file_name.png
            'image' => '@' . $path . ';type=image/png;filename=' . basename($path)
        ), true, true);

        return ($this->tmhOAuth->response["code"] == 200);
    }

    return false;
}
/**
 * Delete leftover image files
 */
public function cleanupFiles() {

    // file to track when we last checked
    $flag = $this->path . "/.last_check';

    $time = time();

    // have we checked within the last hour?
    if(!file_exists($flag) || $time - filemtime($flag) > 3600) {

        // get an array of PNG files in the directory
        $files = glob($this->path . "/*.png");

        // loop through files, deleting old files (12+ hours)
        foreach($files as $file) {
            if($time - filemtime($file) > 60*60*12) {
                unlink($file);
            }
        }

        // update the timestamp of our flag file
        touch($flag);
    }
}
}
// check our authentication status
if($ta->isAuthed()) {
}
// did the user request authorization?
elseif(isset($_POST["auth"])) {
// start authentication process
$ta->auth();
}
Copy after login
如果用户已通过身份验证,我们需要检查是否已选择某个选项,否则我们将生成预览:
// check our authentication status
if($ta->isAuthed()) {
// has the user selected an option?
if(isset($_POST["filter"])) {
}
// generate previews if the user has not chosen
else {
// $previews will be a list of images
$previews = $ta->generatePreviews();
}
}
Copy after login
如果选择了某个选项,我们需要获取要显示的旧图像和新图像的路径:
// has the user selected an option?
if(isset($_POST["filter"])) {
// get the image paths for display
$original = $ta->getPreview();
$newimage = $ta->getPreview($_POST["filter"]);
}
// has the user selected an option?
if(isset($_POST["filter"])) {
// is the user sure?
if(isset($_POST["confirm"])) {
// change the user's avatar
$ta->commitAvatar($_POST["filter"]);
// tweet if the user chose to
if(isset($_POST["tweet"])) {
$ta->sendTweet("I just updated my avatar using Avatar Effects...");
}
$success = true;
}
// get the image paths for display
$original = $ta->getPreview();
$newimage = $ta->getPreview($_POST["filter"]);
}
Copy after login
这是我们迄今为止所拥有的:
CONSUMER_KEY,
'consumer_secret' => CONSUMER_SECRET
);
// create a new TwitterAvatars object
$ta = new TwitterAvatars(new tmhOAuth($config));
    // check for stale files
    $ta->cleanupFiles();
// check our authentication status
if($ta->isAuthed()) {
        // has the user selected an option?
        if(isset($_POST["filter"])) {

            // is the user sure?
            if(isset($_POST["confirm"])) {

                // change the user's avatar
                $ta->commitAvatar($_POST["filter"]);

                // tweet if the user chose to
                if(isset($_POST["tweet"])) {
                    $ta->sendTweet("I just updated my avatar using Avatar Effects...");
                }

                $success = true;
            }

            // get the image paths for display
            $original = $ta->getPreview();
            $newimage = $ta->getPreview($_POST["filter"]);
        }
// generate previews if the user has not chosen
else {
// $previews will be a list of images
$previews = $ta->generatePreviews();
}
}
// did the user request authorization?
elseif(isset($_POST["auth"])) {
// start authentication process
$ta->auth();
}
} catch(Exception $e) {
// catch any errors that may occur
$error = $e;
}
?>
Copy after login
HTML
在 PHP 代码之后,我们将输出适当的 HTML,从这个模板开始,它设置标题和主标题:
Twitter Avatar Effects
Twitter Avatar Effects
Copy after login
这里是我们显示带有每个预览的图像输入的表单的地方:
Choose your weapon...
Select one of the images above to change your Twitter avatar.
The above is the detailed content of Build a Twitter OAuth application. For more information, please follow other related articles on the PHP Chinese website!
The content of this article is voluntarily contributed by netizens, and the copyright belongs to the original author. This site does not assume corresponding legal responsibility. If you find any content suspected of plagiarism or infringement, please contact [email protected]


 0
0 1
1 437
437


![[Web front-end] Node.js quick start](https://img.php.cn/upload/course/000/000/067/662b5d34ba7c0227.png)


