
 Backend Development
Python Tutorial
Tips | Write a table splitting and merging gadget yourself with 80 lines of code
Backend Development
Python Tutorial
Tips | Write a table splitting and merging gadget yourself with 80 lines of code
Tips | Write a table splitting and merging gadget yourself with 80 lines of code

Recently some new friends have seen the previous article "Comparing Python with VBA to implement excel table merging and splitting" Split ", I would like to ask if there is any free gadget that can split and merge tables. In fact, wps has these two functions, and the effect is very good. However, considering that everyone may not be used to wps, here we simply write a small tool to satisfy everyone.
Let’s take a look at the gadget operation process first!
The effects of merging and splitting are as follows:
Next, let’s try Try writing this tool yourself!
1. Preliminary preparation
Since we use python for tool writing, and ultimately need Packaged into an exe file for our use. In order to reduce the package size, we need to first create a virtual environment for backup.
In addition, the third-party library pandas is used for table splitting and merging operations. At the same time, we use pysimplegui for the gui, which is packaged into exe. The one is pyinstaller. After creating the virtual environment, let's install the third-party libraries we need to use one by one.
# 创建虚拟环境
conda create -n env_1 python=3.8.8

# 激活虚拟环境
conda  activate env_1

# 安装三个库 (pandas一些操作需要依赖openpyxl和xlrd,建议加上)
pip install pandas
pip install openpyxl
pip install xlrd
pip install pysimplegui
pip install pyinstaller
Regarding these three libraries, you can check the official documentation to learn more:
The early preparation tools are ready, and we begin to enter the tool writing stage.pandas : https://pandas.pydata. org/
##pysimplegui:https://pysimplegui.readthedocs.io/en/latest/
pyinstaller: http://www.pyinstaller.org/
2. 表格拆分
Python实现表格拆分的逻辑比较简单,就是利用pandas分组然后将每组的数据单独导出存表即可
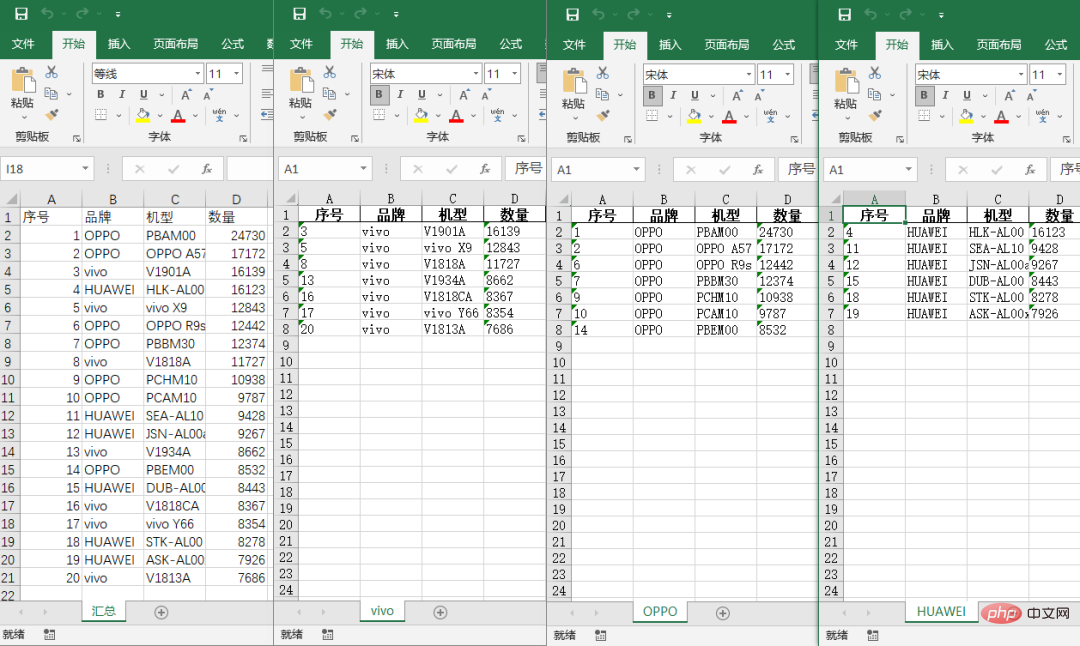
原表数据长这样:
# 拆分表格
def splitTable(df,_key):
    print('----------正在进行表格拆分----------')
    df = df.astype('str')
    # 按照字段_key进行分组
    grouped = df.groupby(by = _key)
    # 输出分组数据导出成单表
    for num , (i, data) in enumerate(grouped):
        data.to_excel(f'.\\{i}.xlsx',index = False,sheet_name = i)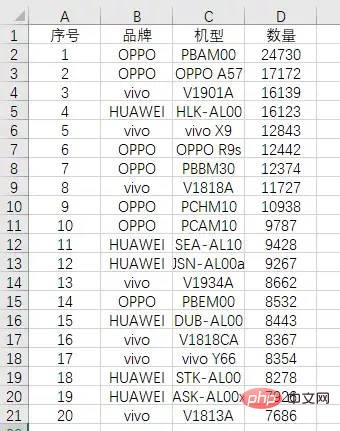
print(f'已经拆成{num+1}张表格...')导出结果如下:

3. 表格合并
Python实现表格合并的本质是 遍历全部表格数据,然后采用concat方法进行数据合并Pandas学习笔记02-数据合并。
因此,在这里我们主要用到两个库:os和pandas,其中os用于获取文件夹下全部满足要求的文件信息,pandas用于读取表格数据并进行concat。
# 合并表格
def concatTable(folder):
    print('----------正在进行表格合并----------')
    # 新建一个空列表,用于存储表格数据
    fileList = []
    # 把文件夹下表格数据放在一个列表里
    for fileName in os.walk(folder):
        for table in fileName[2]:
            path = fileName[0] + '\\' + table
            if os.path.splitext(path)[1] in ('.xlsx','.xls'):
                li = pd.read_excel(path)
                fileList.append(li)
                print(f'已读取{len(fileList)}个表格...')
            else:
                continue
    # 用concat方法合并表单数据
    result = pd.concat(fileList)
    # 导出数据
result.to_excel(r'.\合并后文件.xlsx',index=False,sheet_name='汇总')4. GUI设计
因为要支持表格拆分和合并,我们已经在2和3部分将这两个功能封装为函数了。
Regarding the functional part of the GUI, the following functions need to be supported.
For the table splitting part, function points:
Select file: <span style="font-size: 14px;">Text</span>、<span style="font-size: 14px;">InputText</span>、<span style="font-size: 14px;">FileBrowse</span>Split field selection after reading the file: <span style="font-size: 14px;">Text</span>、<span style="font-size: 14px;">Combo</span>Split: <span style="font-size: 14px;">Button</span>
选取文件夹: <span style="font-size: 14px;">Text</span>、<span style="font-size: 14px;">InputText</span>、<span style="font-size: 14px;">FolderBrowse</span>合并: <span style="font-size: 14px;">Button</span>
此外,我们还需要有用于展示 程序操作记录的输出框、工具操作说明文本以及关闭程序按钮。
基于以上需求,我们可以构建GUI布局如下:
# 布局设置
layout = [[sg.Text('选择待拆分的文件:',font=("微软雅黑", 12)),sg.InputText(key='file',size=(60,1),font=("微软雅黑", 10),enable_events=True) ,sg.FileBrowse('打开',file_types=(("Text Files", "*.xls*"),),font=("微软雅黑", 12))],
          [sg.Text('选择待拆分的字段:',font=("微软雅黑", 12)),sg.Combo('',tooltip='选择用于拆分的字段',font=("微软雅黑", 10), default_value='',auto_size_text=True,size=(15, 5),key='-keys-'),sg.Button('开始拆分',font=("微软雅黑", 12))],
          [sg.Text('选择待合并文件夹:',font=("微软雅黑", 12)),sg.InputText(key='Folder',size=(60,1),font=("微软雅黑", 10),enable_events=True) ,sg.FolderBrowse('打开文件夹',font=("微软雅黑", 12)),sg.Button('开始合并',font=("微软雅黑", 12))],
          [sg.Text('程序操作记录:',justification='center')],
          [sg.Output(size=(100, 10),font=("微软雅黑", 10))],
          [sg.Text('操作说明:',font=("微软雅黑", 12))],
          [sg.Text('表格拆分指引:选择文件—>选择用于拆分的字段—>开始拆分\n表格合并指引:选择需要合并的表格所在文件夹—>开始合并',font=("微软雅黑", 10)),sg.Text('',font=("微软雅黑", 12),size=(35, 1)),sg.Button('关闭程序',font=("微软雅黑", 12),button_color ='red')]
]由于我们在进行表格拆分时需要先选定文件及拆分字段,而拆分字段是在选定文件后读取到的文件数据的表头,所以需要在sg.InputText()中将参数enable_events设置为True,这样选定文件操作就是一个事件,可以触发某些操作。
接下来,我们编写循环事件功能如下:
# 事件循环
while True:
    event, values = window.read()
    if event in (None, '关闭程序'):
        break
    if event == 'file':
        fileName = values['file']
        if os.path.exists(fileName):
            df = pd.read_excel(fileName)
            keys = df.columns.to_list()
            window["-keys-"].Update(values = keys,font=("微软雅黑", 10),size=(15, 8))
        else:
            print('文件不存在\n请先选择正确文件')
    if event == '开始拆分':
        if values['-keys-']:
            _key = values['-keys-']
            splitTable(df,_key)
            print('----------拆分工作已经完成----------\n')
        else:
            print('字段未选择-请先选择字段\n或文件未选取-请先选择文件')
    if event == '开始合并':
        if values['Folder']:
            folder = values['Folder']
            concatTable(folder)
            print('----------合并工作已经完成----------\n')
        else:
            print('待合并文件所在文件夹未选择')

window.close()根据需求,我们将事件类型分为三种:
当我们选定待拆分文件后,先读取文件内容,然后获取文件数据的表头,从而刷新( window["-keys-"].Update)拆分字段的下拉框为表头内容;当我们点击开始拆分按钮时,需要判断拆分字段是否选取(默认为空),若有选定字段则进行拆分操作,否则会进行错误操作提示; 当我们点击开始合并按钮时,需要判断是否选定了文件夹,若是则调用合并数据函数进行合并操作,否则会进行错误操作提示。
5. 打包代码
这里采用的是pyinstaller进行程序代码打包,操作指令如下:
pyinstaller -F -w 表格拆分合并工具.py
部分参数含义:
-F 表示生成单个可执行文件
-w 表示去掉控制台窗口,这在GUI界面时非常有用
-p 表示你自己自定义需要加载的类路径,一般情况下用不到
-i 表示可执行文件的图标
The above is the detailed content of Tips | Write a table splitting and merging gadget yourself with 80 lines of code. For more information, please follow other related articles on the PHP Chinese website!

Hot AI Tools

Undresser.AI Undress
AI-powered app for creating realistic nude photos

AI Clothes Remover
Online AI tool for removing clothes from photos.

Undress AI Tool
Undress images for free

Clothoff.io
AI clothes remover

Video Face Swap
Swap faces in any video effortlessly with our completely free AI face swap tool!

Hot Article
Hot Tools

Notepad++7.3.1
Easy-to-use and free code editor

SublimeText3 Chinese version
Chinese version, very easy to use

Zend Studio 13.0.1
Powerful PHP integrated development environment

Dreamweaver CS6
Visual web development tools

SublimeText3 Mac version
God-level code editing software (SublimeText3)
Hot Topics
 1666
1666
 14
1426
52
1328
25
1273
29
1254
24
14
1426
52
1328
25
1273
29
1254
24

 PHP and Python: Different Paradigms Explained
Apr 18, 2025 am 12:26 AM
PHP and Python: Different Paradigms Explained
Apr 18, 2025 am 12:26 AM
PHP is mainly procedural programming, but also supports object-oriented programming (OOP); Python supports a variety of paradigms, including OOP, functional and procedural programming. PHP is suitable for web development, and Python is suitable for a variety of applications such as data analysis and machine learning.
 Choosing Between PHP and Python: A Guide
Apr 18, 2025 am 12:24 AM
Choosing Between PHP and Python: A Guide
Apr 18, 2025 am 12:24 AM
PHP is suitable for web development and rapid prototyping, and Python is suitable for data science and machine learning. 1.PHP is used for dynamic web development, with simple syntax and suitable for rapid development. 2. Python has concise syntax, is suitable for multiple fields, and has a strong library ecosystem.
 How to run sublime code python
Apr 16, 2025 am 08:48 AM
How to run sublime code python
Apr 16, 2025 am 08:48 AM
To run Python code in Sublime Text, you need to install the Python plug-in first, then create a .py file and write the code, and finally press Ctrl B to run the code, and the output will be displayed in the console.
 PHP and Python: A Deep Dive into Their History
Apr 18, 2025 am 12:25 AM
PHP and Python: A Deep Dive into Their History
Apr 18, 2025 am 12:25 AM
PHP originated in 1994 and was developed by RasmusLerdorf. It was originally used to track website visitors and gradually evolved into a server-side scripting language and was widely used in web development. Python was developed by Guidovan Rossum in the late 1980s and was first released in 1991. It emphasizes code readability and simplicity, and is suitable for scientific computing, data analysis and other fields.
 Python vs. JavaScript: The Learning Curve and Ease of Use
Apr 16, 2025 am 12:12 AM
Python vs. JavaScript: The Learning Curve and Ease of Use
Apr 16, 2025 am 12:12 AM
Python is more suitable for beginners, with a smooth learning curve and concise syntax; JavaScript is suitable for front-end development, with a steep learning curve and flexible syntax. 1. Python syntax is intuitive and suitable for data science and back-end development. 2. JavaScript is flexible and widely used in front-end and server-side programming.
 Golang vs. Python: Performance and Scalability
Apr 19, 2025 am 12:18 AM
Golang vs. Python: Performance and Scalability
Apr 19, 2025 am 12:18 AM
Golang is better than Python in terms of performance and scalability. 1) Golang's compilation-type characteristics and efficient concurrency model make it perform well in high concurrency scenarios. 2) Python, as an interpreted language, executes slowly, but can optimize performance through tools such as Cython.
 Where to write code in vscode
Apr 15, 2025 pm 09:54 PM
Where to write code in vscode
Apr 15, 2025 pm 09:54 PM
Writing code in Visual Studio Code (VSCode) is simple and easy to use. Just install VSCode, create a project, select a language, create a file, write code, save and run it. The advantages of VSCode include cross-platform, free and open source, powerful features, rich extensions, and lightweight and fast.
 How to run python with notepad
Apr 16, 2025 pm 07:33 PM
How to run python with notepad
Apr 16, 2025 pm 07:33 PM
Running Python code in Notepad requires the Python executable and NppExec plug-in to be installed. After installing Python and adding PATH to it, configure the command "python" and the parameter "{CURRENT_DIRECTORY}{FILE_NAME}" in the NppExec plug-in to run Python code in Notepad through the shortcut key "F6".
