

CentOS 7 system optimization script

1. Introduction
As an operation and maintenance person, we often deploy operating systems for various purposes. However, in these tasks, we will find that many tasks are actually repetitive labor, and the content of the operations is similar. Based on this type of work, In this case, we can make the same operation into a script for unified execution, and different things can be entered manually as variables. Can’t the time saved be used to do more meaningful things?Recently, I found a relatively easy-to-use shell source code based on the recommendation of fans. I adapted it based on this and shared it with everyone.
2. Menu
Main menu:

Secondary menu:
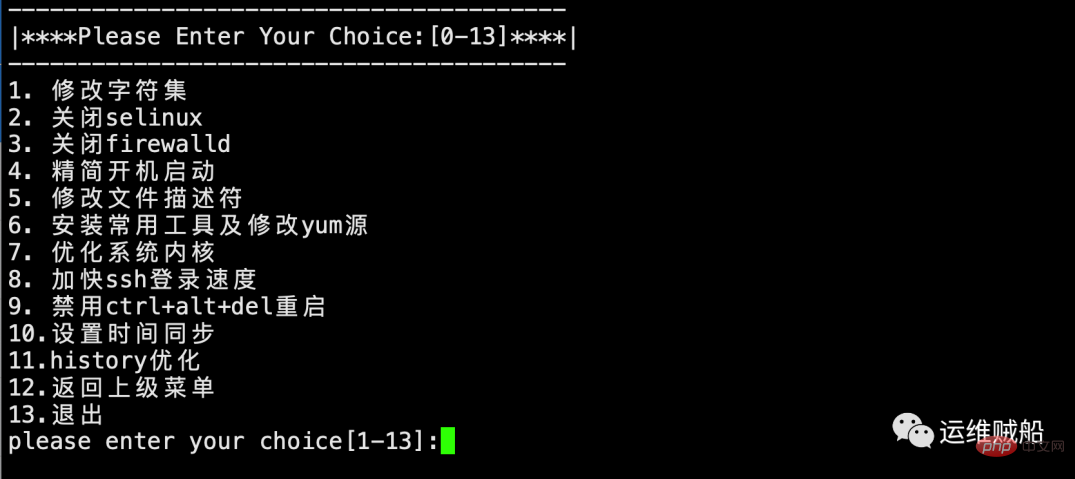
# Mainly realizes various optimizations of the system, such as commonly used functions such as modifying character sets, turning off selinux, turning off firewalls, installing commonly used tools, and accelerating SSH login. .
牛逼啊!接私活必备的 N 个开源项目!赶快收藏吧
3. Source code
#!/bin/sh
. /etc/rc.d/init.d/functions
export LANG=zh_CN.UTF-8
#一级菜单
menu1()
{
clear
cat <<eof
----------------------------------------
|**** 欢迎使用cetnos7.9优化脚本 ****|
|**** 博客地址: aaa.al ****|
----------------------------------------
1. 一键优化
2. 自定义优化
3. 退出
EOF
read -p "please enter your choice[1-3]:" num1
}
#二级菜单
menu2()
{
clear
cat <<eof
----------------------------------------
|****Please Enter Your Choice:[0-13]****|
----------------------------------------
1. 修改字符集
2. 关闭selinux
3. 关闭firewalld
4. 精简开机启动
5. 修改文件描述符
6. 安装常用工具及修改yum源
7. 优化系统内核
8. 加快ssh登录速度
9. 禁用ctrl+alt+del重启
10.设置时间同步
11.history优化
12.返回上级菜单
13.退出
EOF
read -p "please enter your choice[1-13]:" num2
}
#1.修改字符集
localeset()
{
echo "========================修改字符集========================="
cat > /etc/locale.conf <<eof
LANG="zh_CN.UTF-8"
#LANG="en_US.UTF-8"
SYSFONT="latarcyrheb-sun16"
EOF
source /etc/locale.conf
echo "#cat /etc/locale.conf"
cat /etc/locale.conf
action "完成修改字符集" /bin/true
echo "==========================================================="
sleep 2
}
#2.关闭selinux
selinuxset()
{
selinux_status=`grep "SELINUX=disabled" /etc/sysconfig/selinux | wc -l`
echo "========================禁用SELINUX========================"
if [ $selinux_status -eq 0 ];then
sed -i "s#SELINUX=enforcing#SELINUX=disabled#g" /etc/sysconfig/selinux
setenforce 0
echo '#grep SELINUX=disabled /etc/sysconfig/selinux'
grep SELINUX=disabled /etc/sysconfig/selinux
echo '#getenforce'
getenforce
else
echo 'SELINUX已处于关闭状态'
echo '#grep SELINUX=disabled /etc/sysconfig/selinux'
grep SELINUX=disabled /etc/sysconfig/selinux
echo '#getenforce'
getenforce
fi
action "完成禁用SELINUX" /bin/true
echo "==========================================================="
sleep 2
}
#3.关闭firewalld
firewalldset()
{
echo "=======================禁用firewalld========================"
systemctl stop firewalld.service &> /dev/null
echo '#firewall-cmd --state'
firewall-cmd --state
systemctl disable firewalld.service &> /dev/null
echo '#systemctl list-unit-files | grep firewalld'
systemctl list-unit-files | grep firewalld
action "完成禁用firewalld,生产环境下建议启用!" /bin/true
echo "==========================================================="
sleep 5
}
#4.精简开机启动
chkset()
{
echo "=======================精简开机启动========================"
systemctl disable auditd.service
systemctl disable postfix.service
systemctl disable dbus-org.freedesktop.NetworkManager.service
echo '#systemctl list-unit-files | grep -E "auditd|postfix|dbus-org\.freedesktop\.NetworkManager"'
systemctl list-unit-files | grep -E "auditd|postfix|dbus-org\.freedesktop\.NetworkManager"
action "完成精简开机启动" /bin/true
echo "==========================================================="
sleep 2
}
#5.修改文件描述符
limitset()
{
echo "======================修改文件描述符======================="
echo '* - nofile 65535'>/etc/security/limits.conf
ulimit -SHn 65535
echo "#cat /etc/security/limits.conf"
cat /etc/security/limits.conf
echo "#ulimit -Sn ; ulimit -Hn"
ulimit -Sn ; ulimit -Hn
action "完成修改文件描述符" /bin/true
echo "==========================================================="
sleep 2
}
#6.安装常用工具及修改yum源
yumset()
{
echo "=================安装常用工具及修改yum源==================="
yum install wget -y &> /dev/null
if [ $? -eq 0 ];then
cd /etc/yum.repos.d/
\cp CentOS-Base.repo CentOS-Base.repo.$(date +%F)
ping -c 1 mirrors.aliyun.com &> /dev/null
if [ $? -eq 0 ];then
wget -O /etc/yum.repos.d/CentOS-Base.repo http://mirrors.aliyun.com/repo/Centos-7.repo &> /dev/null
yum clean all &> /dev/null
yum makecache &> /dev/null
else
echo "无法连接网络"
exit $?
fi
else
echo "wget安装失败"
exit $?
fi
yum -y install ntpdate lsof net-tools telnet vim lrzsz tree nmap nc sysstat &> /dev/null
action "完成安装常用工具及修改yum源" /bin/true
echo "==========================================================="
sleep 2
}
#7. 优化系统内核 #另外,搜索公众号技术社区后台回复“壁纸”,获取一份惊喜礼包。kernelset()
{
echo "======================优化系统内核========================="
chk_nf=`cat /etc/sysctl.conf | grep conntrack |wc -l`
if [ $chk_nf -eq 0 ];then
cat >>/etc/sysctl.conf<<eof
net.ipv4.tcp_fin_timeout = 2
net.ipv4.tcp_tw_reuse = 1
net.ipv4.tcp_tw_recycle = 1
net.ipv4.tcp_syncookies = 1
net.ipv4.tcp_keepalive_time = 600
net.ipv4.ip_local_port_range = 4000 65000
net.ipv4.tcp_max_syn_backlog = 16384
net.ipv4.tcp_max_tw_buckets = 36000
net.ipv4.route.gc_timeout = 100
net.ipv4.tcp_syn_retries = 1
net.ipv4.tcp_synack_retries = 0
net.core.somaxconn = 16384
net.core.netdev_max_backlog = 16384
net.ipv4.tcp_max_orphans = 16384
net.netfilter.nf_conntrack_max = 25000000
net.netfilter.nf_conntrack_tcp_timeout_established = 180
net.netfilter.nf_conntrack_tcp_timeout_time_wait = 120
net.netfilter.nf_conntrack_tcp_timeout_close_wait = 60
net.netfilter.nf_conntrack_tcp_timeout_fin_wait = 120
EOF
sysctl -p
else
echo "优化项已存在。"
fi
action "内核调优完成" /bin/true
echo "==========================================================="
sleep 2
}
#8.加快ssh登录速度
sshset()
{
echo "======================加快ssh登录速度======================"
sed -i 's#^GSSAPIAuthentication yes$#GSSAPIAuthentication no#g' /etc/ssh/sshd_config
sed -i 's/#UseDNS yes/UseDNS no/g' /etc/ssh/sshd_config
systemctl restart sshd.service
echo "#grep GSSAPIAuthentication /etc/ssh/sshd_config"
grep GSSAPIAuthentication /etc/ssh/sshd_config
echo "#grep UseDNS /etc/ssh/sshd_config"
grep UseDNS /etc/ssh/sshd_config
action "完成加快ssh登录速度" /bin/true
echo "==========================================================="
sleep 2
}
#9. 禁用ctrl+alt+del重启
restartset()
{
echo "===================禁用ctrl+alt+del重启===================="
rm -rf /usr/lib/systemd/system/ctrl-alt-del.target
action "完成禁用ctrl+alt+del重启" /bin/true
echo "==========================================================="
sleep 2
}
#10. 设置时间同步
ntpdateset()
{
echo "=======================设置时间同步========================"
yum -y install ntpdate &> /dev/null
if [ $? -eq 0 ];then
/usr/sbin/ntpdate time.windows.com
echo "*/5 * * * * /usr/sbin/ntpdate ntp.aliyun.com &>/dev/null" >> /var/spool/cron/root
else
echo "ntpdate安装失败"
exit $?
fi
action "完成设置时间同步" /bin/true
echo "==========================================================="
sleep 2
}
#11. history优化
historyset()
{
echo "========================history优化========================"
chk_his=`cat /etc/profile | grep HISTTIMEFORMAT |wc -l`
if [ $chk_his -eq 0 ];then
cat >> /etc/profile <<'EOF'
#设置history格式
export HISTTIMEFORMAT="[%Y-%m-%d %H:%M:%S] [`whoami`] [`who am i|awk '{print $NF}'|sed -r 's#[()]##g'`]: "
#记录shell执行的每一条命令
export PROMPT_COMMAND='\
if [ -z "$OLD_PWD" ];then
export OLD_PWD=$PWD;
fi;
if [ ! -z "$LAST_CMD" ] && [ "$(history 1)" != "$LAST_CMD" ]; then
logger -t `whoami`_shell_dir "[$OLD_PWD]$(history 1)";
fi;
export LAST_CMD="$(history 1)";
export OLD_PWD=$PWD;'
EOF
source /etc/profile
else
echo "优化项已存在。"
fi
action "完成history优化" /bin/true
echo "==========================================================="
sleep 2
}
#控制函数
main()
{
menu1
case $num1 in
1)
localeset
selinuxset
firewalldset
chkset
limitset
yumset
kernelset
sshset
restartset
ntpdateset
historyset
;;
2)
menu2
case $num2 in
1)
localeset
;;
2)
selinuxset
;;
3)
firewalldset
;;
4)
chkset
;;
5)
limitset
;;
6)
yumset
;;
7)
kernelset
;;
8)
sshset
;;
9)
restartset
;;
10)
ntpdateset
;;
11)
historyset
;;
12)
main
;;
13)
exit
;;
*)
echo 'Please select a number from [1-13].'
;;
esac
;;
3)
exit
;;
*)
echo 'Err:Please select a number from [1-3].'
sleep 3
main
;;
esac
}
main $*Save it as init.sh, then grant execution permission and execute it.
chmod +x init.sh && ./init.sh
If it is troublesome to copy and paste back and forth like this, you can also execute it through my one-click command, which can also achieve the above effect:
bash -c "$(curl -L s.aaa.al/init.sh)"
Finally, if you have any functions you want to implement, It can also be modified and implemented based on the original script.
The above is the detailed content of CentOS 7 system optimization script. For more information, please follow other related articles on the PHP Chinese website!

Hot AI Tools

Undresser.AI Undress
AI-powered app for creating realistic nude photos

AI Clothes Remover
Online AI tool for removing clothes from photos.

Undress AI Tool
Undress images for free

Clothoff.io
AI clothes remover

Video Face Swap
Swap faces in any video effortlessly with our completely free AI face swap tool!

Hot Article
Hot Tools

Notepad++7.3.1
Easy-to-use and free code editor

SublimeText3 Chinese version
Chinese version, very easy to use

Zend Studio 13.0.1
Powerful PHP integrated development environment

Dreamweaver CS6
Visual web development tools

SublimeText3 Mac version
God-level code editing software (SublimeText3)
Hot Topics
 1655
1655
 14
1413
52
1306
25
1252
29
1226
24
14
1413
52
1306
25
1252
29
1226
24

 What are the backup methods for GitLab on CentOS
Apr 14, 2025 pm 05:33 PM
What are the backup methods for GitLab on CentOS
Apr 14, 2025 pm 05:33 PM
Backup and Recovery Policy of GitLab under CentOS System In order to ensure data security and recoverability, GitLab on CentOS provides a variety of backup methods. This article will introduce several common backup methods, configuration parameters and recovery processes in detail to help you establish a complete GitLab backup and recovery strategy. 1. Manual backup Use the gitlab-rakegitlab:backup:create command to execute manual backup. This command backs up key information such as GitLab repository, database, users, user groups, keys, and permissions. The default backup file is stored in the /var/opt/gitlab/backups directory. You can modify /etc/gitlab
 Centos shutdown command line
Apr 14, 2025 pm 09:12 PM
Centos shutdown command line
Apr 14, 2025 pm 09:12 PM
The CentOS shutdown command is shutdown, and the syntax is shutdown [Options] Time [Information]. Options include: -h Stop the system immediately; -P Turn off the power after shutdown; -r restart; -t Waiting time. Times can be specified as immediate (now), minutes ( minutes), or a specific time (hh:mm). Added information can be displayed in system messages.
 How to optimize CentOS HDFS configuration
Apr 14, 2025 pm 07:15 PM
How to optimize CentOS HDFS configuration
Apr 14, 2025 pm 07:15 PM
Improve HDFS performance on CentOS: A comprehensive optimization guide to optimize HDFS (Hadoop distributed file system) on CentOS requires comprehensive consideration of hardware, system configuration and network settings. This article provides a series of optimization strategies to help you improve HDFS performance. 1. Hardware upgrade and selection resource expansion: Increase the CPU, memory and storage capacity of the server as much as possible. High-performance hardware: adopts high-performance network cards and switches to improve network throughput. 2. System configuration fine-tuning kernel parameter adjustment: Modify /etc/sysctl.conf file to optimize kernel parameters such as TCP connection number, file handle number and memory management. For example, adjust TCP connection status and buffer size
 Difference between centos and ubuntu
Apr 14, 2025 pm 09:09 PM
Difference between centos and ubuntu
Apr 14, 2025 pm 09:09 PM
The key differences between CentOS and Ubuntu are: origin (CentOS originates from Red Hat, for enterprises; Ubuntu originates from Debian, for individuals), package management (CentOS uses yum, focusing on stability; Ubuntu uses apt, for high update frequency), support cycle (CentOS provides 10 years of support, Ubuntu provides 5 years of LTS support), community support (CentOS focuses on stability, Ubuntu provides a wide range of tutorials and documents), uses (CentOS is biased towards servers, Ubuntu is suitable for servers and desktops), other differences include installation simplicity (CentOS is thin)
 Centos configuration IP address
Apr 14, 2025 pm 09:06 PM
Centos configuration IP address
Apr 14, 2025 pm 09:06 PM
Steps to configure IP address in CentOS: View the current network configuration: ip addr Edit the network configuration file: sudo vi /etc/sysconfig/network-scripts/ifcfg-eth0 Change IP address: Edit IPADDR= Line changes the subnet mask and gateway (optional): Edit NETMASK= and GATEWAY= Lines Restart the network service: sudo systemctl restart network verification IP address: ip addr
 What are the common misunderstandings in CentOS HDFS configuration?
Apr 14, 2025 pm 07:12 PM
What are the common misunderstandings in CentOS HDFS configuration?
Apr 14, 2025 pm 07:12 PM
Common problems and solutions for Hadoop Distributed File System (HDFS) configuration under CentOS When building a HadoopHDFS cluster on CentOS, some common misconfigurations may lead to performance degradation, data loss and even the cluster cannot start. This article summarizes these common problems and their solutions to help you avoid these pitfalls and ensure the stability and efficient operation of your HDFS cluster. Rack-aware configuration error: Problem: Rack-aware information is not configured correctly, resulting in uneven distribution of data block replicas and increasing network load. Solution: Double check the rack-aware configuration in the hdfs-site.xml file and use hdfsdfsadmin-printTopo
 What steps are required to configure CentOS in HDFS
Apr 14, 2025 pm 06:42 PM
What steps are required to configure CentOS in HDFS
Apr 14, 2025 pm 06:42 PM
Building a Hadoop Distributed File System (HDFS) on a CentOS system requires multiple steps. This article provides a brief configuration guide. 1. Prepare to install JDK in the early stage: Install JavaDevelopmentKit (JDK) on all nodes, and the version must be compatible with Hadoop. The installation package can be downloaded from the Oracle official website. Environment variable configuration: Edit /etc/profile file, set Java and Hadoop environment variables, so that the system can find the installation path of JDK and Hadoop. 2. Security configuration: SSH password-free login to generate SSH key: Use the ssh-keygen command on each node
 How to install mysql in centos7
Apr 14, 2025 pm 08:30 PM
How to install mysql in centos7
Apr 14, 2025 pm 08:30 PM
The key to installing MySQL elegantly is to add the official MySQL repository. The specific steps are as follows: Download the MySQL official GPG key to prevent phishing attacks. Add MySQL repository file: rpm -Uvh https://dev.mysql.com/get/mysql80-community-release-el7-3.noarch.rpm Update yum repository cache: yum update installation MySQL: yum install mysql-server startup MySQL service: systemctl start mysqld set up booting
