

How to use Scrapy to build an efficient crawler program

How to use Scrapy to build an efficient crawler program
With the advent of the information age, the amount of data on the Internet continues to increase, and the demand for obtaining large amounts of data is also increasing. And crawlers have become one of the best solutions to this need. As an excellent Python crawler framework, Scrapy is efficient, stable and easy to use, and is widely used in various fields. This article will introduce how to use Scrapy to build an efficient crawler program and give code examples.
- The basic structure of the crawler program
Scrapy's crawler program mainly consists of the following components:
- Crawler program: defined How to crawl pages, parse data from them, follow links, etc.
- Project pipeline: Responsible for processing the data extracted from the page by the crawler program and performing subsequent processing, such as storing it in a database or exporting it to a file.
- Downloader middleware: Responsible for processing sending requests and obtaining page content. It can perform operations such as User-Agent settings and proxy IP switching.
- Scheduler: Responsible for managing all requests to be fetched and scheduling them according to certain strategies.
- Downloader: Responsible for downloading the requested page content and returning it to the crawler program.
- Writing a crawler program
In Scrapy, we need to create a new crawler project to write our crawler program. Execute the following command in the command line:
scrapy startproject myspider
This will create a project folder named "myspider" and contain some default files and folders. We can enter the folder and create a new crawler:
cd myspider
scrapy genspider example example.com
This will create a crawler named "example" to crawl data from the "example.com" website. We can write specific crawler logic in the generated "example_spider.py" file.
Here is a simple example for crawling news headlines and links on a website.
import scrapy

class ExampleSpider(scrapy.Spider):
    name = 'example'
    allowed_domains = ['example.com']
    start_urls = ['http://www.example.com/news']

    def parse(self, response):
        for news in response.xpath('//div[@class="news-item"]'):
            yield {
                'title': news.xpath('.//h2/text()').get(),
                'link': news.xpath('.//a/@href').get(),
            }
        next_page = response.xpath('//a[@class="next-page"]/@href').get()
        if next_page:
yield response.follow(next_page, self.parse)In the above code, we define a crawler class named "ExampleSpider", which contains three attributes: name represents the name of the crawler, allowed_domains represents the domain name that is allowed to crawl the website, and start_urls represents the starting point URL. Then we rewrote the parse method, which parses the web page content, extracts news titles and links, and returns the results using yield.
- Configuring the project pipeline
In Scrapy, we can pipeline the crawled data through the project pipeline. Data can be stored in a database, written to a file, or otherwise processed later.
Open the "settings.py" file in the project folder, find the ITEM_PIPELINES configuration item in it, and uncomment it. Then add the following code:
ITEM_PIPELINES = {
    'myspider.pipelines.MyPipeline': 300,
}This will enable the custom pipeline class "my spider.pipelines.MyPipeline" and specify a priority (the lower the number, the higher the priority).
Next, we need to create a pipeline class to process the data. Create a file named "pipelines.py" in the project folder and add the following code:
import json

class MyPipeline:

    def open_spider(self, spider):
        self.file = open('news.json', 'w')

    def close_spider(self, spider):
        self.file.close()

    def process_item(self, item, spider):
        line = json.dumps(dict(item)) + "
"
        self.file.write(line)
return itemIn this example, we define a pipeline class named "MyPipeline" which contains three Methods: open_spider, close_spider and process_item. In the open_spider method, we open a file to store the data. In the close_spider method, we close the file. In the process_item method, we convert the data into JSON format and write it to the file.
- Run the crawler program
After completing the writing of the crawler program and project pipeline, we can execute the following command on the command line to run the crawler program:
scrapy crawl example
This will launch the crawler named "example" and start crawling data. The crawled data will be processed as we defined it in the pipeline class.
The above is the basic process and sample code for using Scrapy to build an efficient crawler program. Of course, Scrapy also offers many other features and options that can be adjusted and extended according to specific needs. I hope this article can help readers better understand and use Scrapy and build efficient crawler programs.
The above is the detailed content of How to use Scrapy to build an efficient crawler program. For more information, please follow other related articles on the PHP Chinese website!

Hot AI Tools

Undresser.AI Undress
AI-powered app for creating realistic nude photos

AI Clothes Remover
Online AI tool for removing clothes from photos.

Undress AI Tool
Undress images for free

Clothoff.io
AI clothes remover

Video Face Swap
Swap faces in any video effortlessly with our completely free AI face swap tool!

Hot Article
Hot Tools

Notepad++7.3.1
Easy-to-use and free code editor

SublimeText3 Chinese version
Chinese version, very easy to use

Zend Studio 13.0.1
Powerful PHP integrated development environment

Dreamweaver CS6
Visual web development tools

SublimeText3 Mac version
God-level code editing software (SublimeText3)
Hot Topics
 1664
1664
 14
1421
52
1315
25
1266
29
1239
24
14
1421
52
1315
25
1266
29
1239
24

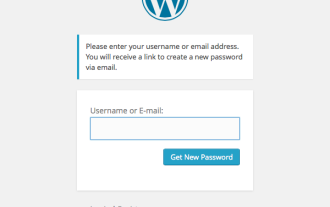 Building a Custom WordPress User Flow, Part Three: Password Reset
Sep 03, 2023 pm 11:05 PM
Building a Custom WordPress User Flow, Part Three: Password Reset
Sep 03, 2023 pm 11:05 PM
In the first two tutorials in this series, we built custom pages for logging in and registering new users. Now, there's only one part of the login flow left to explore and replace: What happens if a user forgets their password and wants to reset their WordPress password? In this tutorial, we'll tackle the last step and complete the personalized login plugin we've built throughout the series. The password reset feature in WordPress more or less follows the standard method on websites today: the user initiates a reset by entering their username or email address and requesting WordPress to reset their password. Create a temporary password reset token and store it in user data. A link containing this token will be sent to the user's email address. User clicks on the link. In the heavy
 ChatGPT Java: How to build an intelligent music recommendation system
Oct 27, 2023 pm 01:55 PM
ChatGPT Java: How to build an intelligent music recommendation system
Oct 27, 2023 pm 01:55 PM
ChatGPTJava: How to build an intelligent music recommendation system, specific code examples are needed. Introduction: With the rapid development of the Internet, music has become an indispensable part of people's daily lives. As music platforms continue to emerge, users often face a common problem: how to find music that suits their tastes? In order to solve this problem, the intelligent music recommendation system came into being. This article will introduce how to use ChatGPTJava to build an intelligent music recommendation system and provide specific code examples. No.
 Smooth build: How to correctly configure the Maven image address
Feb 20, 2024 pm 08:48 PM
Smooth build: How to correctly configure the Maven image address
Feb 20, 2024 pm 08:48 PM
Smooth build: How to correctly configure the Maven image address When using Maven to build a project, it is very important to configure the correct image address. Properly configuring the mirror address can speed up project construction and avoid problems such as network delays. This article will introduce how to correctly configure the Maven mirror address and give specific code examples. Why do you need to configure the Maven image address? Maven is a project management tool that can automatically build projects, manage dependencies, generate reports, etc. When building a project in Maven, usually
 Optimize the Maven project packaging process and improve development efficiency
Feb 24, 2024 pm 02:15 PM
Optimize the Maven project packaging process and improve development efficiency
Feb 24, 2024 pm 02:15 PM
Maven project packaging step guide: Optimize the build process and improve development efficiency. As software development projects become more and more complex, the efficiency and speed of project construction have become important links in the development process that cannot be ignored. As a popular project management tool, Maven plays a key role in project construction. This guide will explore how to improve development efficiency by optimizing the packaging steps of Maven projects and provide specific code examples. 1. Confirm the project structure. Before starting to optimize the Maven project packaging step, you first need to confirm
 Build an online calculator using JavaScript
Aug 09, 2023 pm 03:46 PM
Build an online calculator using JavaScript
Aug 09, 2023 pm 03:46 PM
Building online calculators with JavaScript As the Internet develops, more and more tools and applications begin to appear online. Among them, calculator is one of the most widely used tools. This article explains how to build a simple online calculator using JavaScript and provides code examples. Before we get started, we need to know some basic HTML and CSS knowledge. The calculator interface can be built using HTML table elements and then styled using CSS. Here is a basic
 Build browser-based applications with Golang
Apr 08, 2024 am 09:24 AM
Build browser-based applications with Golang
Apr 08, 2024 am 09:24 AM
Build browser-based applications with Golang Golang combines with JavaScript to build dynamic front-end experiences. Install Golang: Visit https://golang.org/doc/install. Set up a Golang project: Create a file called main.go. Using GorillaWebToolkit: Add GorillaWebToolkit code to handle HTTP requests. Create HTML template: Create index.html in the templates subdirectory, which is the main template.
 How to build an intelligent voice assistant using Python
Sep 09, 2023 pm 04:04 PM
How to build an intelligent voice assistant using Python
Sep 09, 2023 pm 04:04 PM
How to use Python to build an intelligent voice assistant Introduction: In the era of rapid development of modern technology, people's demand for intelligent assistants is getting higher and higher. As one of the forms, smart voice assistants have been widely used in various devices such as mobile phones, computers, and smart speakers. This article will introduce how to use the Python programming language to build a simple intelligent voice assistant to help you implement your own personalized intelligent assistant from scratch. Preparation Before starting to build a voice assistant, we first need to prepare some necessary tools
 Maven project packaging step practice: successfully build a reliable software delivery process
Feb 20, 2024 am 08:35 AM
Maven project packaging step practice: successfully build a reliable software delivery process
Feb 20, 2024 am 08:35 AM
Title: Maven Project Packaging Steps in Practice: Successful Building a Reliable Software Delivery Process Requires Specific Code Examples As software development projects continue to increase in size and complexity, building a reliable software delivery process becomes critical. As a popular project management tool, Maven plays a vital role in realizing project construction, management and deployment. This article will introduce how to implement project packaging through Maven, and give specific code examples to help readers better understand the Maven project packaging steps, thereby establishing a
