

Linux disk partitioning and mounting

Linux disk partitioning and mounting
Linux partitioning
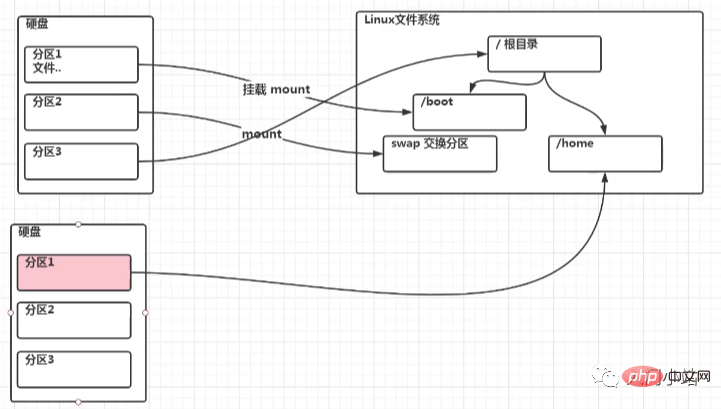
1. For Linux, wulun has several partitions and which directories are assigned to them. In the final analysis, it has only one root directory, an independent and unique file structure. Each partition in Linux is used to form part of the entire file system. 2.Linux adopts a processing method called "loading", and its entire file system contains a complete set of files and directories, and associate a partition with a directory. This means that a partition to be loaded will obtain its storage space in a directory.
##1. Linux hard disks are divided into IDE hard disks and SCSI hard disks. Currently, they are basically SCSI hard disks 2. For IDE hard disk, the drive identifier is "hdx~", where "hd" indicates the type of device where the partition is located, This refers to the IDE hard drive. "x" is the disk number (a is the basic disk, b is the basic slave disk, c is the auxiliary master disk, d is the auxiliary slave disk), "~" represents the partition, and the first four partitions are represented by numbers 1 to 4. They are Primary partition or extended partition, starting from 5, is a logical partition. For example, hda3 represents the third primary partition or extended partition on the first IDE hard disk, and hdb2 represents the second primary partition or extended partition on the second IDE hard disk. 3. For SCSI hard disk, it is marked as "sdx~", and the SCSI hard disk is "sd" to represent the type of device where the partition is located, and the rest is the same as the IDE hard disk (x can be abcd corresponding to the 1st, 2nd, 3rd, and 4th hard disk respectively).
View all device mounting status
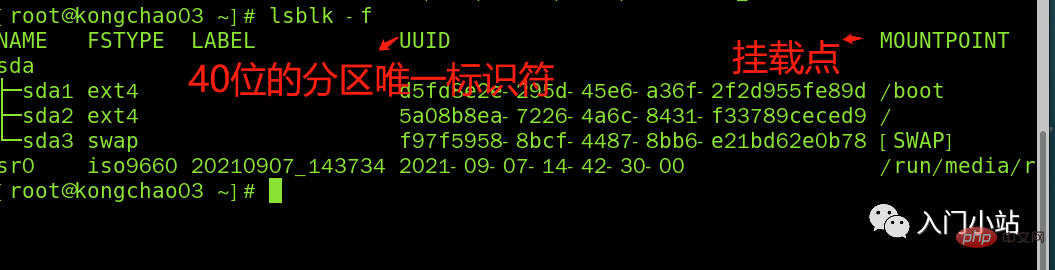
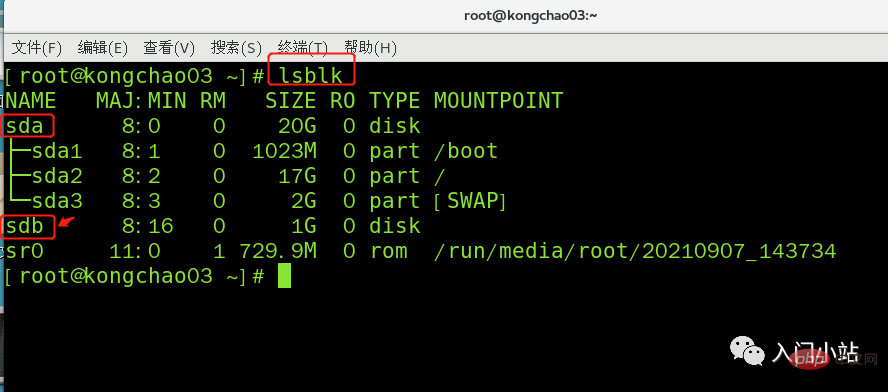
Command: lsblk or lsblk -f
[root@kongchao03 ~]# lsblkNAME MAJ:MIN RM SIZE RO TYPE MOUNTPOINTsda 8:0 0 20G 0 disk ├─sda1 8:1 0 1023M 0 part /boot├─sda2 8:2 0 17G 0 part /└─sda3 8:3 0 2G 0 part [SWAP]sr0 11:0 1 729.9M 0 rom /run/media/root/20210907_143734[root@kongchao03 ~]#
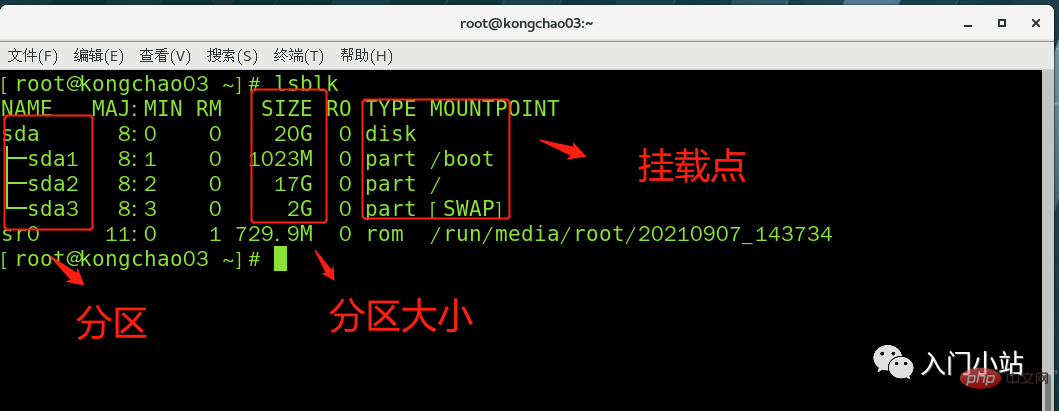
##Here sda1, 2, and 3 respectively represent the The first partition and the second partition of a hard disk...
Mounting case
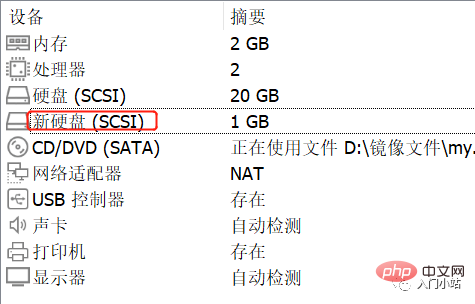
Step 1: Create a new hard disk
Operation Step 2: Virtual machine hard disk partition
Partition instructions: fdisk /dev/sdb
m Display command list p Display disk partitions the same as fdisk -l n Add new partition d Delete partition w Write and exit
Instructions: Enter n after starting partition, new Add a partition, then select p, and the partition type is primary partition.两次回车默认剩余全部空间,最后输入 w 写入分区并退出,若不保存退出输入 q
[root@kongchao03 ~]# fdisk /dev/sdb欢迎使用 fdisk (util-linux 2.23.2)。 > 更改将停留在内存中,直到您决定将更改写入磁盘。使用写入命令前请三思。 > Device does not contain a recognized partition table>> 使用磁盘标识符 0xdf03b737 创建新的 DOS 磁盘标签。 命令(输入 m 获取帮助):m 命令操作 a toggle a bootable flag b edit bsd disklabel c toggle the dos compatibility flag d delete a partition g create a new empty GPT partition table G create an IRIX (SGI) partition table l list known partition types m print this menu n add a new partition o create a new empty DOS partition table p print the partition table q quit without saving changes s create a new empty Sun disklabel t change a partition's system id u change display/entry units v verify the partition table w write table to disk and exit x extra functionality (experts only)命令(输入 m 获取帮助):nPartition type: p primary (0 primary, 0 extended, 4 free) e extendedSelect (default p): p分区号 (1-4,默认 1):1起始 扇区 (2048-2097151,默认为 2048):将使用默认值 2048Last 扇区, +扇区 or +size{K,M,G} (2048-2097151,默认为 2097151):将使用默认值 2097151分区 1 已设置为 Linux 类型,大小设为 1023 MiB命令(输入 m 获取帮助):wThe partition table has been altered!Calling ioctl() to re-read partition table.正在同步磁盘。[root@kongchao03 ~]#
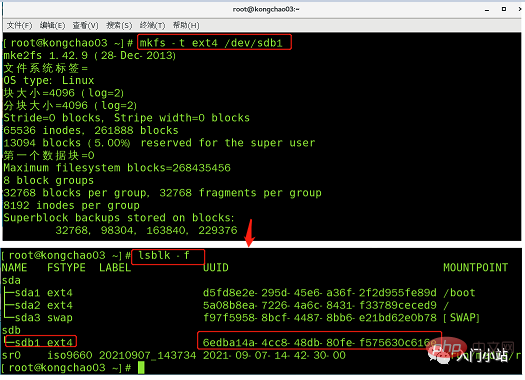
步骤 3:虚拟机硬盘分区格式化
格式化指令:mkfs -t ext4 /dev/sdb1
mkfs -t ext4 /dev/sdb1lsblk -f
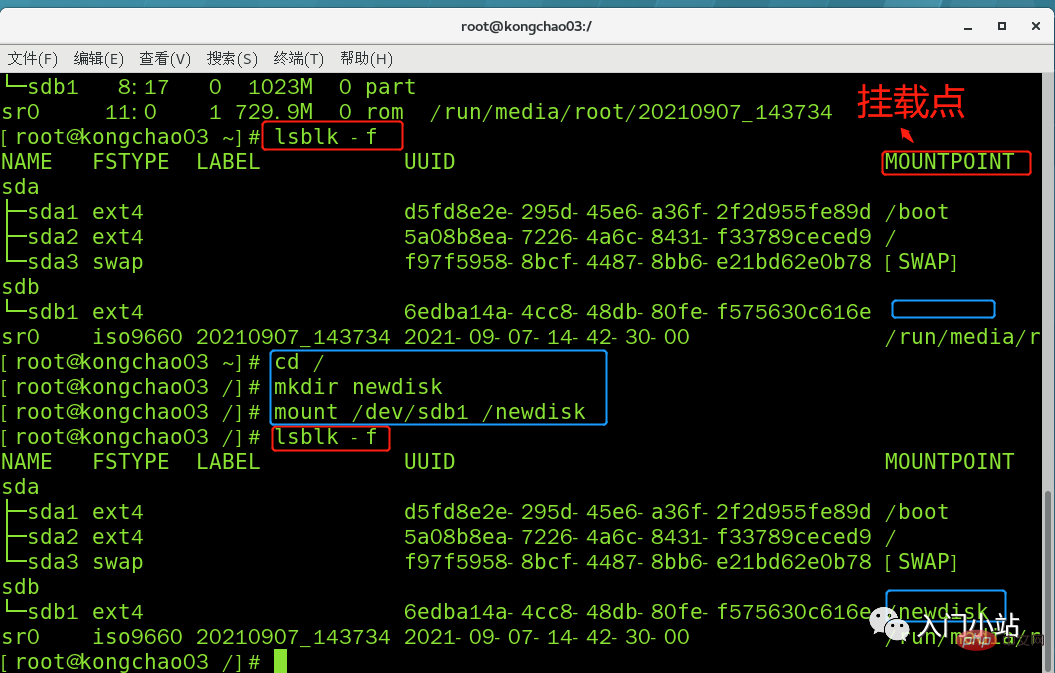
步骤 4:将磁盘挂载到根目录下 newdisk 目录下
也可以到其他目录下挂载:将一个分区与一个目录联系起来,
mount 挂载
牛逼啊!接私活必备的 N 个开源项目!赶快收藏
挂载语法:mount 设备名称 挂载目录 (挂载目录是任意的)
[root@kongchao03 ~]# cd /
[root@kongchao03 /]# mkdir newdisk
[root@kongchao03 /]# mount /dev/sdb1 /newdisk
[root@kongchao03 /]# lsblk -f
cd 进入挂载点,在其中创建文件,实则是在分区上新建了一个文件
linux 根下的存放只是目录,真正存放数据还是在硬盘中的分区
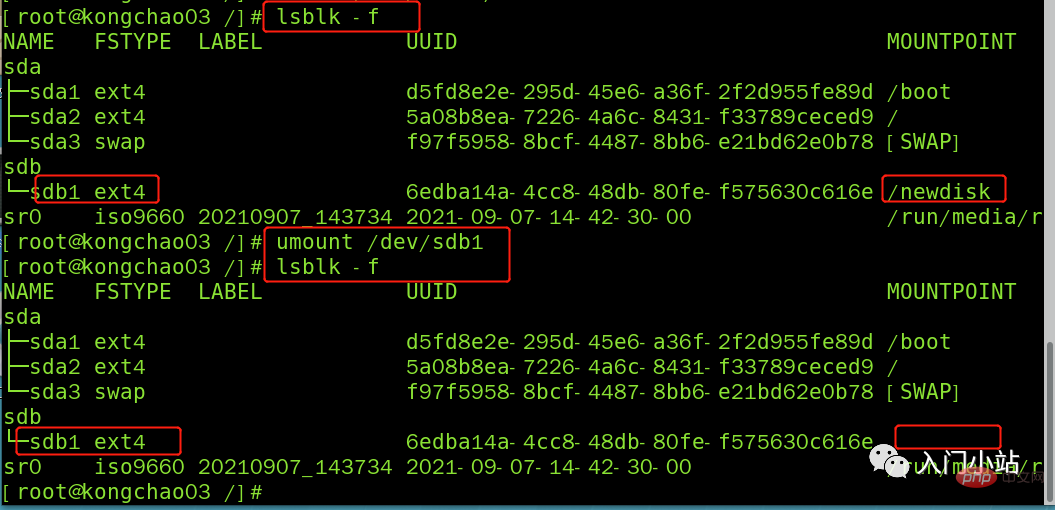
umount 取消挂载
umount /dev/sdb1

lsblk -f
步骤 5:实现永久挂载(即重启不消失)
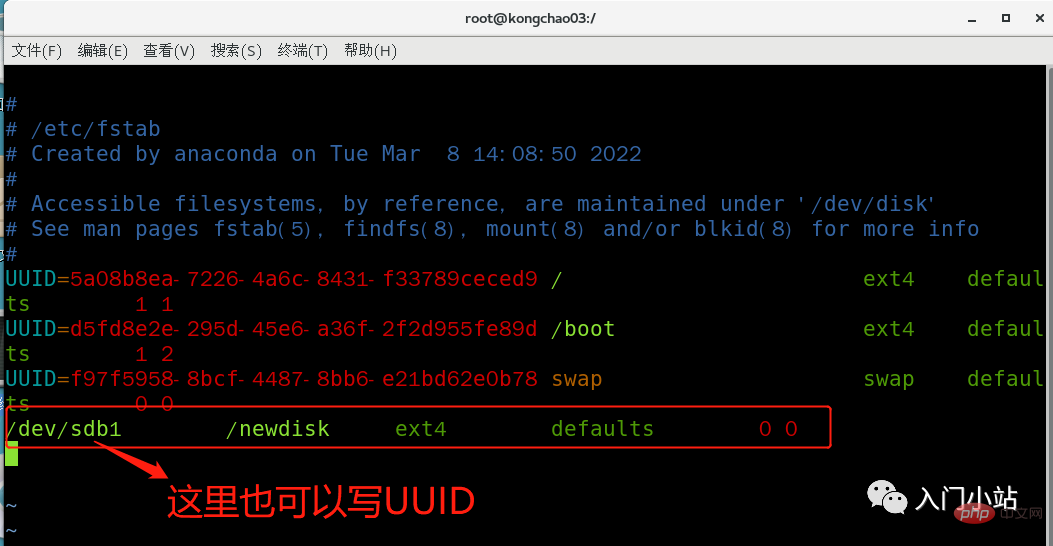
永久挂载:通过修改/etc/fstab 实现挂载
添加完成后执行mount -a 或 reboot 即可生效
[root@kongchao03 /]# vim /etc/fstab
[root@kongchao03 /]# mount -a
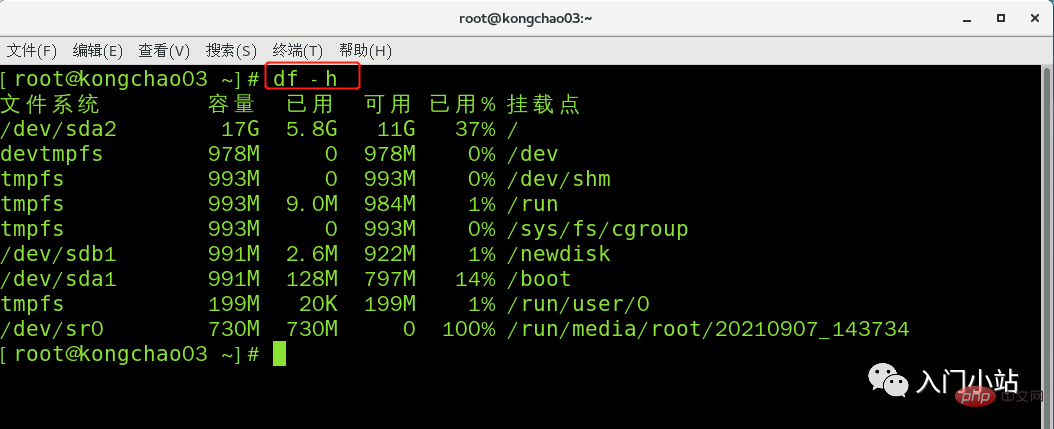
df -h 查询磁盘使用情况
[root@kongchao03 ~]# df -h
文件系统        容量  已用  可用 已用% 挂载点
/dev/sda2        17G  5.8G   11G   37% /
devtmpfs        978M     0  978M    0% /dev
tmpfs           993M     0  993M    0% /dev/shm
tmpfs           993M  9.0M  984M    1% /run
tmpfs           993M     0  993M    0% /sys/fs/cgroup
/dev/sdb1       991M  2.6M  922M    1% /newdisk
/dev/sda1       991M  128M  797M   14% /boot
tmpfs           199M   20K  199M    1% /run/user/0
/dev/sr0        730M  730M     0  100% /run/media/root/20210907_143734
[root@kongchao03 ~]#
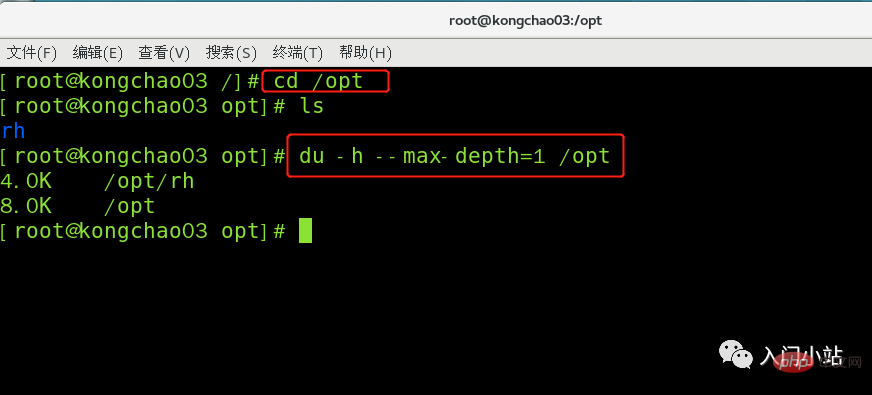
Command: du [parameter] / directory (query the disk usage of the specified directory, the default is the current directory)
| ##Including files | |
参数可以联合使用示例:查询 / opt 目录的磁盘占用情况,深度为 1
[root@kongchao03 /]# cd /opt
[root@kongchao03 opt]# ls
rh
[root@kongchao03 opt]# du -h --max-depth=1 /opt
4.0K /opt/rh
8.0K /opt
[root@kongchao03 opt]#
[root@kongchao03 opt]# du -hac --max-depth=1 /opt
4.0K /opt/rh
8.0K /opt
8.0K 总用量

The above is the detailed content of Linux disk partitioning and mounting. For more information, please follow other related articles on the PHP Chinese website!

Hot AI Tools

Undresser.AI Undress
AI-powered app for creating realistic nude photos

AI Clothes Remover
Online AI tool for removing clothes from photos.

Undress AI Tool
Undress images for free

Clothoff.io
AI clothes remover

Video Face Swap
Swap faces in any video effortlessly with our completely free AI face swap tool!

Hot Article
Hot Tools

Notepad++7.3.1
Easy-to-use and free code editor

SublimeText3 Chinese version
Chinese version, very easy to use

Zend Studio 13.0.1
Powerful PHP integrated development environment

Dreamweaver CS6
Visual web development tools

SublimeText3 Mac version
God-level code editing software (SublimeText3)
Hot Topics
 1655
1655
 14
1414
52
1307
25
1253
29
1227
24
14
1414
52
1307
25
1253
29
1227
24

 Linux Architecture: Unveiling the 5 Basic Components
Apr 20, 2025 am 12:04 AM
Linux Architecture: Unveiling the 5 Basic Components
Apr 20, 2025 am 12:04 AM
The five basic components of the Linux system are: 1. Kernel, 2. System library, 3. System utilities, 4. Graphical user interface, 5. Applications. The kernel manages hardware resources, the system library provides precompiled functions, system utilities are used for system management, the GUI provides visual interaction, and applications use these components to implement functions.
 vscode terminal usage tutorial
Apr 15, 2025 pm 10:09 PM
vscode terminal usage tutorial
Apr 15, 2025 pm 10:09 PM
vscode built-in terminal is a development tool that allows running commands and scripts within the editor to simplify the development process. How to use vscode terminal: Open the terminal with the shortcut key (Ctrl/Cmd). Enter a command or run the script. Use hotkeys (such as Ctrl L to clear the terminal). Change the working directory (such as the cd command). Advanced features include debug mode, automatic code snippet completion, and interactive command history.
 How to check the warehouse address of git
Apr 17, 2025 pm 01:54 PM
How to check the warehouse address of git
Apr 17, 2025 pm 01:54 PM
To view the Git repository address, perform the following steps: 1. Open the command line and navigate to the repository directory; 2. Run the "git remote -v" command; 3. View the repository name in the output and its corresponding address.
 Where to write code in vscode
Apr 15, 2025 pm 09:54 PM
Where to write code in vscode
Apr 15, 2025 pm 09:54 PM
Writing code in Visual Studio Code (VSCode) is simple and easy to use. Just install VSCode, create a project, select a language, create a file, write code, save and run it. The advantages of VSCode include cross-platform, free and open source, powerful features, rich extensions, and lightweight and fast.
 How to run java code in notepad
Apr 16, 2025 pm 07:39 PM
How to run java code in notepad
Apr 16, 2025 pm 07:39 PM
Although Notepad cannot run Java code directly, it can be achieved by using other tools: using the command line compiler (javac) to generate a bytecode file (filename.class). Use the Java interpreter (java) to interpret bytecode, execute the code, and output the result.
 What is the main purpose of Linux?
Apr 16, 2025 am 12:19 AM
What is the main purpose of Linux?
Apr 16, 2025 am 12:19 AM
The main uses of Linux include: 1. Server operating system, 2. Embedded system, 3. Desktop operating system, 4. Development and testing environment. Linux excels in these areas, providing stability, security and efficient development tools.
 vscode Previous Next Shortcut Key
Apr 15, 2025 pm 10:51 PM
vscode Previous Next Shortcut Key
Apr 15, 2025 pm 10:51 PM
VS Code One-step/Next step shortcut key usage: One-step (backward): Windows/Linux: Ctrl ←; macOS: Cmd ←Next step (forward): Windows/Linux: Ctrl →; macOS: Cmd →
 vscode terminal command cannot be used
Apr 15, 2025 pm 10:03 PM
vscode terminal command cannot be used
Apr 15, 2025 pm 10:03 PM
Causes and solutions for the VS Code terminal commands not available: The necessary tools are not installed (Windows: WSL; macOS: Xcode command line tools) Path configuration is wrong (add executable files to PATH environment variables) Permission issues (run VS Code as administrator) Firewall or proxy restrictions (check settings, unrestrictions) Terminal settings are incorrect (enable use of external terminals) VS Code installation is corrupt (reinstall or update) Terminal configuration is incompatible (try different terminal types or commands) Specific environment variables are missing (set necessary environment variables)
