

Linux驱动 | debugfs接口创建
点击上方“嵌入式Linux充电站”,选择“置顶/星标公众号”

上篇介绍了procfs接口的创建,今天再介绍一种debugfs接口的创建。
实现效果
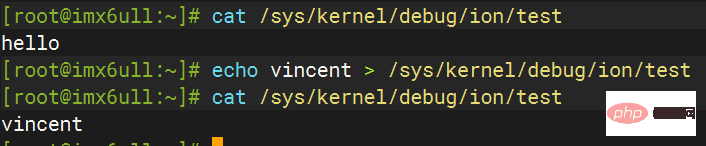
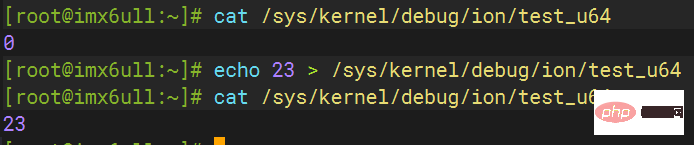
在/sys/kernel/debug/目录下创建一个ion/test文件,通过cat、echo的方式进行读写操作:
前期准备
内核配置打开debugfs:
CONFIG_DEBUG_FS=y
挂载debugfs文件系统:
mount -t debugfs none /sys/kernel/debug
代码实现
读写变量:
#include <linux/debugfs.h>
#include <linux/module.h>
#include <linux/types.h>

static struct dentry *ion_dir;
static u64 test_u64 = 0;

static int __init debugfs_init(void)
{

    //创建一个/sys/kernel/debug/ion目录
    ion_dir = debugfs_create_dir("ion", NULL);
    if (!ion_dir) {
        printk("ion_dir is null\n");
        return -1;
    }

    /* 创建/sys/kernel/debug/ion/test_u64文件 */
    debugfs_create_u64("test_u64", 0644,
                        ion_dir, &test_u64);

    return 0;
}

static void __exit debugfs_exit(void)
{
    debugfs_remove_recursive(ion_dir);
}

module_init(debugfs_init);
module_exit(debugfs_exit);
MODULE_LICENSE("GPL");运行结果:
读写字符串:
#include <linux/debugfs.h>
#include <linux/module.h>
#include <linux/fs.h>
#include <linux/uaccess.h>
#include <linux/errno.h>
#include <linux/dcache.h>
#include <linux/types.h>

static char ion_buf[512] = "hello\n";
static struct dentry *ion_dir;

static int ion_open(struct inode *inode, struct file *filp)
{
    //printk("ion open\n");
    return 0;
}

ssize_t ion_read(struct file *filp, char __user *buf, size_t count, loff_t *offp)
{
    int retval = 0;
    if ((*offp + count) > 512)
        count = 512 - *offp;

    if (copy_to_user(buf, ion_buf+*offp, count)) {
        printk("copy to user failed, count:%ld\n", count);
        retval = -EFAULT;
        goto out;
    }
    *offp += count;
    retval = count;
out:
    return retval;
}

ssize_t ion_write(struct file *filp, const char __user *buff, size_t count, loff_t *offp)
{
    int retval;

    if (*offp > 512)
        return 0;

    if (*offp + count > 512)
        count = 512 - *offp;

    if (copy_from_user(ion_buf+*offp, buff, count)) {
        printk("copy from user failed, count:%ld\n", count);
        retval = -EFAULT;
        goto out;
    }
    *offp += count;
    retval = count;
out:
    return retval;
}

struct file_operations my_fops = {
    .owner = THIS_MODULE,
    .read = ion_read,
    .write = ion_write,
    .open = ion_open,
};

static int __init debugfs_init(void)
{
    printk("INIT MODULE\n");

    //创建一个/sys/kernel/debug/ion目录
    ion_dir = debugfs_create_dir("ion", NULL);
    if (!ion_dir) {
        printk("ion_dir is null\n");
        return -1;
    }

    /* 创建/sys/kernel/debug/ion/test文件 */
    struct dentry *filent = debugfs_create_file("test", 0644, ion_dir, NULL, &my_fops);
    if (!filent) {
        printk("test file is null\n");
        return -1;
    }

    return 0;
}

static void __exit debugfs_exit(void)
{
    debugfs_remove_recursive(ion_dir);
}

module_init(debugfs_init);
module_exit(debugfs_exit);
MODULE_LICENSE("GPL");运行结果:
函数接口说明
创建目录、文件函数:
/* 创建目录 */
struct dentry *debugfs_create_dir(const char *name, struct dentry *parent);

/*创建节点 */
struct dentry *debugfs_create_file(const char *name, umode_t mode,
                                   struct dentry *parent, void *data,
const struct file_operations *fops);name:要创建的/sys/kernel/debug下的目录名
parent:父目录,用struct dentry结构体表示。如果直接在/sys/kernel/debug/下创建文件,则为NULL
创建不同大小的文件:
//创建十进制的无符号文件
void debugfs_create_u8(const char *name, umode_t mode,
                       struct dentry *parent, u8 *value);
void debugfs_create_u16(const char *name, umode_t mode,
                        struct dentry *parent, u16 *value);
void debugfs_create_u32(const char *name, umode_t mode,
                        struct dentry *parent, u32 *value);
void debugfs_create_u64(const char *name, umode_t mode,
                        struct dentry *parent, u64 *value);
//创建十六进制的无符号文件
void debugfs_create_x8(const char *name, umode_t mode,
                       struct dentry *parent, u8 *value);
void debugfs_create_x16(const char *name, umode_t mode,
                        struct dentry *parent, u16 *value);
void debugfs_create_x32(const char *name, umode_t mode,
                        struct dentry *parent, u32 *value);
void debugfs_create_x64(const char *name, umode_t mode,
struct dentry *parent, u64 *value);更详细的debugfs用法请参考官方文档:Documentation/filesystems/debugfs.txt
The above is the detailed content of Linux驱动 | debugfs接口创建. For more information, please follow other related articles on the PHP Chinese website!

Hot AI Tools

Undresser.AI Undress
AI-powered app for creating realistic nude photos

AI Clothes Remover
Online AI tool for removing clothes from photos.

Undress AI Tool
Undress images for free

Clothoff.io
AI clothes remover

Video Face Swap
Swap faces in any video effortlessly with our completely free AI face swap tool!

Hot Article
Hot Tools

Notepad++7.3.1
Easy-to-use and free code editor

SublimeText3 Chinese version
Chinese version, very easy to use

Zend Studio 13.0.1
Powerful PHP integrated development environment

Dreamweaver CS6
Visual web development tools

SublimeText3 Mac version
God-level code editing software (SublimeText3)
Hot Topics
 1655
1655
 14
1414
52
1307
25
1253
29
1227
24
14
1414
52
1307
25
1253
29
1227
24

 Linux Architecture: Unveiling the 5 Basic Components
Apr 20, 2025 am 12:04 AM
Linux Architecture: Unveiling the 5 Basic Components
Apr 20, 2025 am 12:04 AM
The five basic components of the Linux system are: 1. Kernel, 2. System library, 3. System utilities, 4. Graphical user interface, 5. Applications. The kernel manages hardware resources, the system library provides precompiled functions, system utilities are used for system management, the GUI provides visual interaction, and applications use these components to implement functions.
 vscode terminal usage tutorial
Apr 15, 2025 pm 10:09 PM
vscode terminal usage tutorial
Apr 15, 2025 pm 10:09 PM
vscode built-in terminal is a development tool that allows running commands and scripts within the editor to simplify the development process. How to use vscode terminal: Open the terminal with the shortcut key (Ctrl/Cmd). Enter a command or run the script. Use hotkeys (such as Ctrl L to clear the terminal). Change the working directory (such as the cd command). Advanced features include debug mode, automatic code snippet completion, and interactive command history.
 How to check the warehouse address of git
Apr 17, 2025 pm 01:54 PM
How to check the warehouse address of git
Apr 17, 2025 pm 01:54 PM
To view the Git repository address, perform the following steps: 1. Open the command line and navigate to the repository directory; 2. Run the "git remote -v" command; 3. View the repository name in the output and its corresponding address.
 Where to write code in vscode
Apr 15, 2025 pm 09:54 PM
Where to write code in vscode
Apr 15, 2025 pm 09:54 PM
Writing code in Visual Studio Code (VSCode) is simple and easy to use. Just install VSCode, create a project, select a language, create a file, write code, save and run it. The advantages of VSCode include cross-platform, free and open source, powerful features, rich extensions, and lightweight and fast.
 How to run java code in notepad
Apr 16, 2025 pm 07:39 PM
How to run java code in notepad
Apr 16, 2025 pm 07:39 PM
Although Notepad cannot run Java code directly, it can be achieved by using other tools: using the command line compiler (javac) to generate a bytecode file (filename.class). Use the Java interpreter (java) to interpret bytecode, execute the code, and output the result.
 What is the main purpose of Linux?
Apr 16, 2025 am 12:19 AM
What is the main purpose of Linux?
Apr 16, 2025 am 12:19 AM
The main uses of Linux include: 1. Server operating system, 2. Embedded system, 3. Desktop operating system, 4. Development and testing environment. Linux excels in these areas, providing stability, security and efficient development tools.
 vscode Previous Next Shortcut Key
Apr 15, 2025 pm 10:51 PM
vscode Previous Next Shortcut Key
Apr 15, 2025 pm 10:51 PM
VS Code One-step/Next step shortcut key usage: One-step (backward): Windows/Linux: Ctrl ←; macOS: Cmd ←Next step (forward): Windows/Linux: Ctrl →; macOS: Cmd →
 vscode terminal command cannot be used
Apr 15, 2025 pm 10:03 PM
vscode terminal command cannot be used
Apr 15, 2025 pm 10:03 PM
Causes and solutions for the VS Code terminal commands not available: The necessary tools are not installed (Windows: WSL; macOS: Xcode command line tools) Path configuration is wrong (add executable files to PATH environment variables) Permission issues (run VS Code as administrator) Firewall or proxy restrictions (check settings, unrestrictions) Terminal settings are incorrect (enable use of external terminals) VS Code installation is corrupt (reinstall or update) Terminal configuration is incompatible (try different terminal types or commands) Specific environment variables are missing (set necessary environment variables)
