
 Operation and Maintenance
Linux Operation and Maintenance
Realize LED driver under Linux without typing a line of code!
Operation and Maintenance
Linux Operation and Maintenance
Realize LED driver under Linux without typing a line of code!
Realize LED driver under Linux without typing a line of code!
Preface
If you want to implement a device driver, you don’t need to write a single line of driver code. This sounds like Isn't it a fantasy?
But this is not impossible, because kernel developers all over the world are very enthusiastic. As long as they can write drivers, they have basically written them.
Today, we stand on the shoulders of giants and use drivers that have been written by kernel developers to achieve the functions we want. This article discusses LED drivers.
LED driver
We take the onboard LED of the imx6ull pro development board as an example. It has an onboard Controllable Led2, the schematic diagram is as follows:
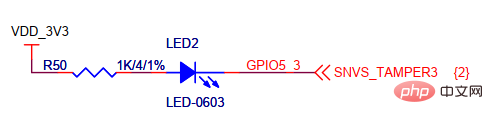
LED2 has a pull-up resistor, and the other pin is connected to GPIO5_3, so GPIO5_3Output low level to light up the LED. Here's how to control this LED.
Kernel configuration:
 Device Drivers  --->
  [*] LED Support  --->
   <*>   LED Class Support
   <*>   LED Support for GPIO connected LEDs
   [*]   LED Trigger support  --->
Our LED driver is based on GPIO, so we need to turn on the support of the kernel LED driver.
The kernel has two corresponding drivers, namely GPIO driver and LED driver. The GPIO-based LED driver calls the functions exported by the GPIO driver. .
Please refer to: drivers/leds/leds-gpio.c for the LED driver implementation code. It implements a leds class to control LEDs through the sysfs interface.
设备树:
leds{
 compatible = "gpio-leds";

        led2{
            label = "led2";
            gpios = <&gpio5 3 GPIO_ACTIVE_LOW>;//GPIO_ACTIVE_LOW,代表低电平点亮LED
            default-state = "on";
        };
}在设备树中创建一个名为leds的节点,compatible为"gpio-leds",这样可以匹配到leds-gpio.c的驱动。
然后创建一个子节点,名为led2。需要填三个属性:label、gpios和default-state。
label:lable是出现在sys目录下的名字,即生成/sys/class/leds/led2
gpios: The first two values specify the GPIO to which the LED is connected. The third value can be filled in GPIO_ACTIVE_HIGH or GPIO_ACTIVE_LOW. GPIO_ACTIVE_HIGH means high level lights up the LED, GPIO_ACTIVE_LOW means low level lights up the LED.
Note here that the third parameter of the gpios attribute represents whether the gpio needs a high level or a low level to light up the LED. Pay attention to whether it is lighting the LED, please take a closer look
default-state: on means that the default LED is on, off means that the default LED is off
Note again here that when default-state is on , in fact, the level output by gpio is the level specified in the gpios attribute when the LED is turned on
After the device tree is configured, compile and replace the dtb, and then restart the development board. You can see the /sys/class/leds/led2 directory:

/sys/class/leds/led2/目录下有一个brightnes文件,可以通过echo cat的方式查看和修改LED的亮度。因为LED连接在GPIO上,所以亮度只有0和1,在本文示例的led2中,0表示点亮,1表示熄灭。
点亮LED:
echo 0 > /sys/class/leds/led2/brightness
熄灭LED:
echo 1 > /sys/class/leds/led2/brightness
应用层控制
除了可以在shell中通过echo、cat的方式控制Led,我们也可以在写一个应用层程序来操作/sys/class/leds/下的节点,应用层代码:
#include <stdio.h>
#include <stdlib.h>
#include <unistd.h>
#include <errno.h>
#include <fcntl.h>
#include <string.h>

#include <sys/stat.h>
#include <sys/types.h>

#define LED_DEV_PATH "/sys/class/leds/led%d/brightness"
#define ON
#define OFF

int fs4412_set_led(unsigned int lednum, unsigned int mode)
{
 int fd;
    int ret;
    char devpath[128];
    char *on = "1\n";
    char *off = "0\n";
    char *m = NULL;

    snprintf(devpath, sizeof(devpath), LED_DEV_PATH, lednum);
    fd = open(devpath, O_WRONLY);
    if (fd == -1) {
  perror("fsled->open");
        return -1;
 }

    if (mode == ON)
         m = on;
    else
         m = off;

    ret = write(fd, m, strlen(m));
    if (ret == -1) {
  perror("fsled->wrtie");
        close(fd);
        return -1;
    }

    close(fd);
    return 0;

}

int main(int argc, char *argv[])
{
 unsigned int lednum = 2;

    while(1){
  fs4412_set_led(lednum, on);
        usleep(500000);
        fs4412_set_led(lednum, OFF);
  usleep(500000);

        lednum++;
        if (lednum > 5)
             lednum = 2;
 }

 return 0;
}上述应用层代码执行后,led2会闪烁。
The above is the detailed content of Realize LED driver under Linux without typing a line of code!. For more information, please follow other related articles on the PHP Chinese website!

Hot AI Tools

Undresser.AI Undress
AI-powered app for creating realistic nude photos

AI Clothes Remover
Online AI tool for removing clothes from photos.

Undress AI Tool
Undress images for free

Clothoff.io
AI clothes remover

Video Face Swap
Swap faces in any video effortlessly with our completely free AI face swap tool!

Hot Article
Hot Tools

Notepad++7.3.1
Easy-to-use and free code editor

SublimeText3 Chinese version
Chinese version, very easy to use

Zend Studio 13.0.1
Powerful PHP integrated development environment

Dreamweaver CS6
Visual web development tools

SublimeText3 Mac version
God-level code editing software (SublimeText3)
Hot Topics
 1664
1664
 14
1423
52
1317
25
1268
29
1248
24
14
1423
52
1317
25
1268
29
1248
24

 Linux Architecture: Unveiling the 5 Basic Components
Apr 20, 2025 am 12:04 AM
Linux Architecture: Unveiling the 5 Basic Components
Apr 20, 2025 am 12:04 AM
The five basic components of the Linux system are: 1. Kernel, 2. System library, 3. System utilities, 4. Graphical user interface, 5. Applications. The kernel manages hardware resources, the system library provides precompiled functions, system utilities are used for system management, the GUI provides visual interaction, and applications use these components to implement functions.
 How to check the warehouse address of git
Apr 17, 2025 pm 01:54 PM
How to check the warehouse address of git
Apr 17, 2025 pm 01:54 PM
To view the Git repository address, perform the following steps: 1. Open the command line and navigate to the repository directory; 2. Run the "git remote -v" command; 3. View the repository name in the output and its corresponding address.
 vscode Previous Next Shortcut Key
Apr 15, 2025 pm 10:51 PM
vscode Previous Next Shortcut Key
Apr 15, 2025 pm 10:51 PM
VS Code One-step/Next step shortcut key usage: One-step (backward): Windows/Linux: Ctrl ←; macOS: Cmd ←Next step (forward): Windows/Linux: Ctrl →; macOS: Cmd →
 How to run sublime after writing the code
Apr 16, 2025 am 08:51 AM
How to run sublime after writing the code
Apr 16, 2025 am 08:51 AM
There are six ways to run code in Sublime: through hotkeys, menus, build systems, command lines, set default build systems, and custom build commands, and run individual files/projects by right-clicking on projects/files. The build system availability depends on the installation of Sublime Text.
 How to run java code in notepad
Apr 16, 2025 pm 07:39 PM
How to run java code in notepad
Apr 16, 2025 pm 07:39 PM
Although Notepad cannot run Java code directly, it can be achieved by using other tools: using the command line compiler (javac) to generate a bytecode file (filename.class). Use the Java interpreter (java) to interpret bytecode, execute the code, and output the result.
 What is the main purpose of Linux?
Apr 16, 2025 am 12:19 AM
What is the main purpose of Linux?
Apr 16, 2025 am 12:19 AM
The main uses of Linux include: 1. Server operating system, 2. Embedded system, 3. Desktop operating system, 4. Development and testing environment. Linux excels in these areas, providing stability, security and efficient development tools.
 laravel installation code
Apr 18, 2025 pm 12:30 PM
laravel installation code
Apr 18, 2025 pm 12:30 PM
To install Laravel, follow these steps in sequence: Install Composer (for macOS/Linux and Windows) Install Laravel Installer Create a new project Start Service Access Application (URL: http://127.0.0.1:8000) Set up the database connection (if required)
 git software installation
Apr 17, 2025 am 11:57 AM
git software installation
Apr 17, 2025 am 11:57 AM
Installing Git software includes the following steps: Download the installation package and run the installation package to verify the installation configuration Git installation Git Bash (Windows only)
