

How to partition the new computer win10 with only one c drive

How to partition a new computer win10 that only has one c drive? Many friends must have encountered this problem, because there is only one C drive in the new computer Win10, which is not conducive to our daily computer management, so we need to partition the disk, then there is only one C drive in the new computer Win10 The question of how to partition, because some novices don’t know how to partition win10, so next I will teach you how to partition your new computer win10.

How to partition a new computer win10 with only one c drive:
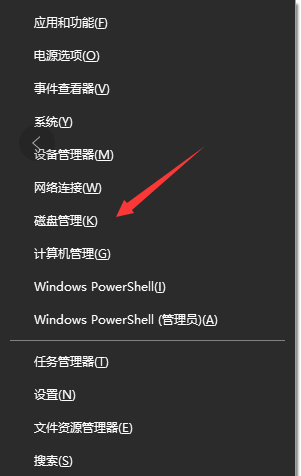
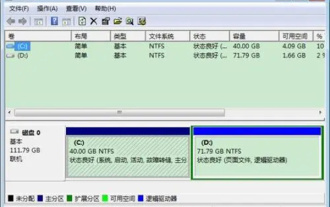
1. Press the WIN Select "Disk Management".
2. After opening the disk management, right-click the C drive on the disk graphic below and select "Compress Volume." (The editor's partition has been done, the following Just follow the steps)
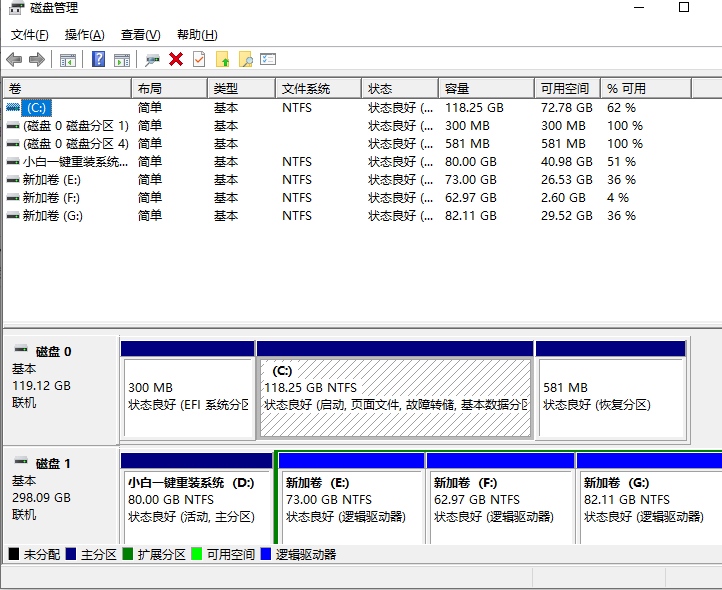
3. Then fill in the space you want to divide in the "Enter compressible capacity". For example, your C drive has 400G. After dividing 300G, fill in 300000MB and click Compress.
4. After the compression is completed, an unallocated partition will appear. Right-click the unallocated partition, select "New Simple Volume", and then follow the wizard. , if the unallocated partition has 300G at this time.
If we want to divide it into two disks, then when creating the first simple volume, do not divide all the capacity. If 150G is allocated, fill in 150000MB , and then the next step
5. After completing the creation of the volume, you will now have an extra disk. Next, we will create a simple volume for the unallocated partition, and finally we will create a C drive It is divided into three disks: C D E.
The above is the entire content of how to partition the new computer win10 that the editor brought only has one c drive. I hope it can help.
The above is the detailed content of How to partition the new computer win10 with only one c drive. For more information, please follow other related articles on the PHP Chinese website!

Hot AI Tools

Undresser.AI Undress
AI-powered app for creating realistic nude photos

AI Clothes Remover
Online AI tool for removing clothes from photos.

Undress AI Tool
Undress images for free

Clothoff.io
AI clothes remover

Video Face Swap
Swap faces in any video effortlessly with our completely free AI face swap tool!

Hot Article
Hot Tools

Notepad++7.3.1
Easy-to-use and free code editor

SublimeText3 Chinese version
Chinese version, very easy to use

Zend Studio 13.0.1
Powerful PHP integrated development environment

Dreamweaver CS6
Visual web development tools

SublimeText3 Mac version
God-level code editing software (SublimeText3)
Hot Topics
 1666
1666
 14
1425
52
1327
25
1273
29
1252
24
14
1425
52
1327
25
1273
29
1252
24

 Solve the problem that the reserved partition of win11 system cannot be updated
Dec 26, 2023 pm 12:41 PM
Solve the problem that the reserved partition of win11 system cannot be updated
Dec 26, 2023 pm 12:41 PM
After updating win11, some users encountered the problem that the partition reserved by the system cannot be updated, resulting in the inability to download more new software. So today I brought you the solution to the partition reserved by the system cannot be updated by win11. Come and download it together. Try it. What to do if win11 cannot update the partition reserved by the system: 1. First, right-click the start menu button below. 2. Then right-click the menu and click Run. 3. During operation, enter: diskmgmt.msc and press Enter. 4. You can then enter the system disk and check the EFI system partition to see if the space is less than 300M. 5. If it is too small, you can download a tool to change the system reserved partition to larger than 300MB. 450M is recommended.
![[Linux system] fdisk related partition commands.](https://img.php.cn/upload/article/000/887/227/170833682614236.jpg?x-oss-process=image/resize,m_fill,h_207,w_330) [Linux system] fdisk related partition commands.
Feb 19, 2024 pm 06:00 PM
[Linux system] fdisk related partition commands.
Feb 19, 2024 pm 06:00 PM
fdisk is a commonly used Linux command line tool used to create, manage and modify disk partitions. The following are some commonly used fdisk commands: Display disk partition information: fdisk-l This command will display the partition information of all disks in the system. Select the disk you want to operate: fdisk/dev/sdX Replace /dev/sdX with the actual disk device name you want to operate, such as /dev/sda. Create new partition:nThis will guide you to create a new partition. Follow the prompts to enter the partition type, starting sector, size and other information. Delete Partition:d This will guide you to select the partition you want to delete. Follow the prompts to select the partition number to be deleted. Modify Partition Type: This will guide you to select the partition you want to modify the type of. According to mention
 Solution to the problem of unable to partition after win10 installation
Jan 02, 2024 am 09:17 AM
Solution to the problem of unable to partition after win10 installation
Jan 02, 2024 am 09:17 AM
When we reinstalled the win10 operating system, when it came to the disk partitioning step, we found that the system prompted that a new partition could not be created and the existing partition could not be found. In this case, I think you can try to reformat the entire hard disk and reinstall the system to partition, or reinstall the system through software, etc. Let’s see how the editor did it for the specific content~ I hope it can help you. What to do if you cannot create a new partition after installing win10. Method 1: Format the entire hard disk and repartition it or try plugging and unplugging the USB flash drive several times and refreshing it. If there is no important data on your hard disk, when it comes to the partitioning step, delete all the data on the hard disk. Partitions are deleted. Reformat the entire hard drive, then repartition it, and then install it normally. Method 2: P
 Where is win7 disk management?
Feb 29, 2024 pm 02:22 PM
Where is win7 disk management?
Feb 29, 2024 pm 02:22 PM
Many users must have found that their memory is a bit too much and is almost full, so they want to know where the disk management is performed, so let's take a look at where the disk management is in the win7 system. Where is win7 disk management? 1. Click the windoes button, find "Control Panel" and click it. 2. The next step will be to find and click on the “Administrative Tools” option. 3. Here, you need to double-click and enable the "Computer Management" function, which will display a comprehensive management window. 4. Next, please click on the "Storage" category item listed on the left side of the window. 5. Then click "Disk Management" further, so that subsequent operations can be carried out smoothly.
 Detailed explanation of how to set up Linux Opt partition
Mar 20, 2024 am 11:30 AM
Detailed explanation of how to set up Linux Opt partition
Mar 20, 2024 am 11:30 AM
How to set up the Linux Opt partition and code examples In Linux systems, the Opt partition is usually used to store optional software packages and application data. Properly setting the Opt partition can effectively manage system resources and avoid problems such as insufficient disk space. This article will detail how to set up a LinuxOpt partition and provide specific code examples. 1. Determine the partition space size. First, we need to determine the space size required for the Opt partition. It is generally recommended to set the size of the Opt partition to 5%-1 of the total system space.
 6 Ways to Turn on Disk Management on Windows 11
May 02, 2023 pm 04:25 PM
6 Ways to Turn on Disk Management on Windows 11
May 02, 2023 pm 04:25 PM
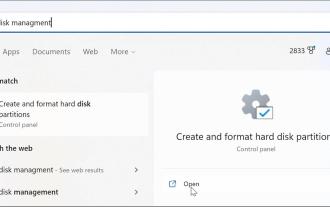
Need to quickly partition a new drive or change a drive letter on Windows 11? You need to use disk management. Here's how to launch it on a Windows 11 PC. If you want to create and resize partitions, initialize hard drives, change drive letters, etc. on Windows 11, you need to use the Disk Management tool. You can use this tool in a variety of ways, as well as open it. If you want to speed up your workflow, here are six different ways to turn on Disk Management in Windows 11. 1. Search for Disk Management To avoid clicking through menus, you can search for Disk Management and open it directly. To open Disk Management using the search bar in the Start menu, use the following steps: Click Start
 Deepin Linux hard disk partitioning and installation tutorial: step by step to achieve efficient system deployment
Feb 10, 2024 pm 07:06 PM
Deepin Linux hard disk partitioning and installation tutorial: step by step to achieve efficient system deployment
Feb 10, 2024 pm 07:06 PM
Before installing Deepin Linux, we need to partition the hard disk. Hard disk partitioning is the process of dividing a physical hard disk into multiple logical areas. Each area can be used and managed independently. The correct partitioning method can improve the performance and performance of the system. Stability, so this step is very important. This article will provide you with detailed and in-depth Linux hard disk partitioning and installation tutorials. Preparation 1. Make sure you have backed up important data, as the partitioning process will erase all data on the hard drive. 2. Prepare a Deepin Linux installation media, such as a USB flash drive or CD. Hard disk partition 1. Boot into the BIOS settings and set the boot media as the preferred boot device. 2. Restart the computer and boot from the boot media to enter the system installation interface. 3.Select
![System Reserved Partition Not Showing in Disk Management [Quick Recovery]](https://img.php.cn/upload/article/000/465/014/168376632735495.jpg?x-oss-process=image/resize,m_fill,h_207,w_330) System Reserved Partition Not Showing in Disk Management [Quick Recovery]
May 11, 2023 am 08:52 AM
System Reserved Partition Not Showing in Disk Management [Quick Recovery]
May 11, 2023 am 08:52 AM
Is the system reserved partition not showing up in Disk Management on Windows 10/11 devices? The System Reserved Partition, or SRP, is a small partition on your hard drive that stores Windows startup information. If the files are deleted in some way, operating system startup problems may occur. Usually, this problem occurs if the partition size is less than 600MB. The system reserved partition is available in Disk Management because Windows does not assign a drive letter to it. Therefore, unlike other drives, it will not be visible in File Explorer. Things can get serious if you delete the system reserved partition from Disk Management. If this happens, users may be unable to update Windows to