

Detailed explanation of how to set up win10 file sharing

Some friends want to set up file sharing for their win10 system, so that they can obtain some shared files on the company's computers, but they have not done it before and don't know how to set up file sharing on win10. The editor below will teach you how to set up win10 file sharing.
Step 1: Enable network discovery
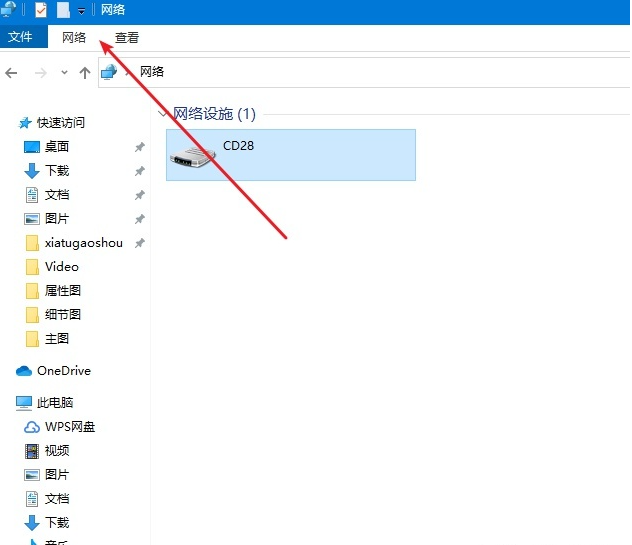
1. Open "File Explorer (This PC)" on the desktop. Click on top - Network.
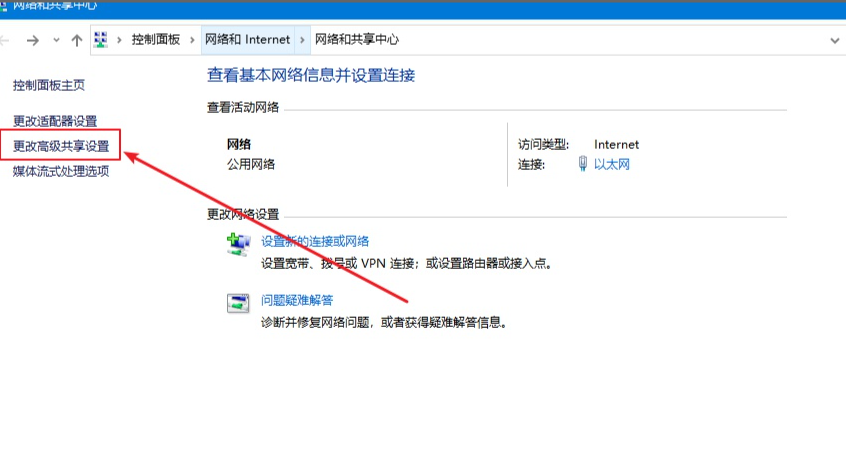
#2. Click below to change advanced sharing settings.
3. Click on All Networks.
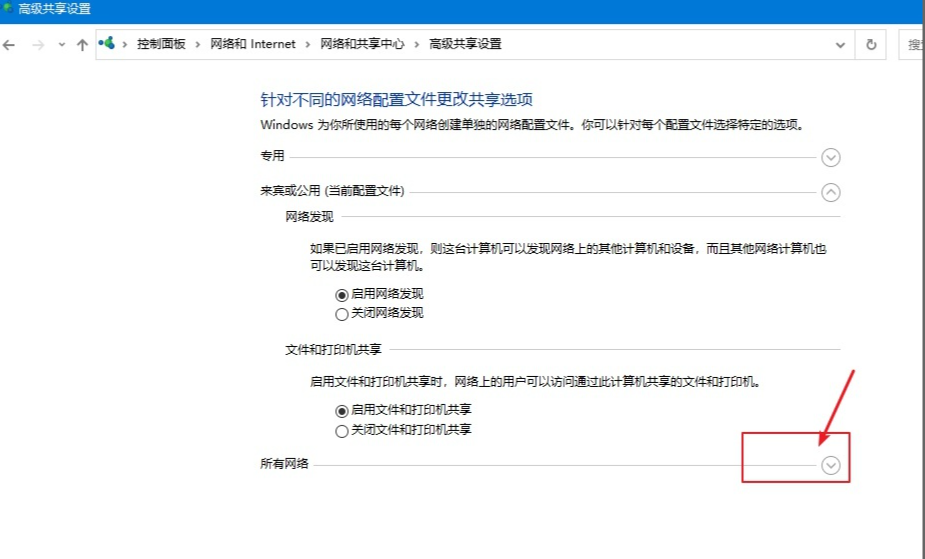
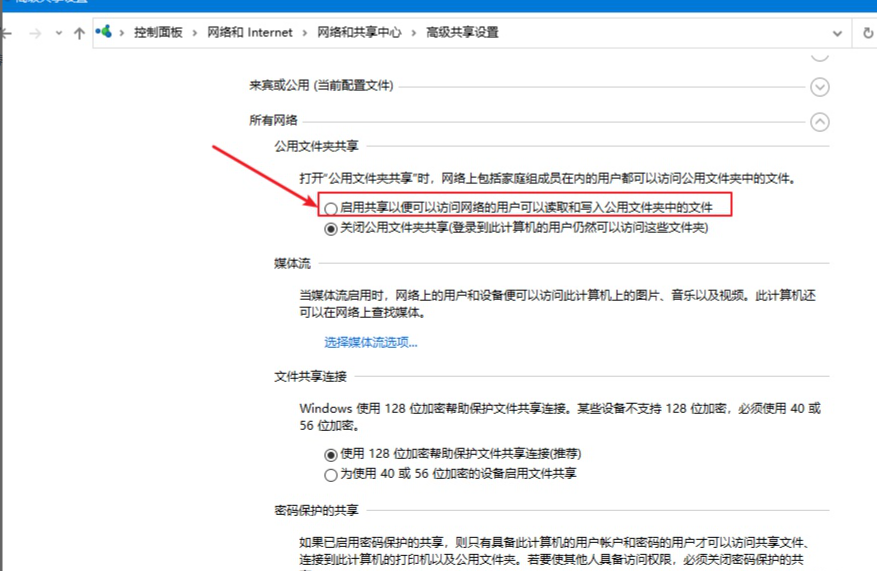
#4. Enable sharing so that you can access the network.
Step 2: Turn on guest mode
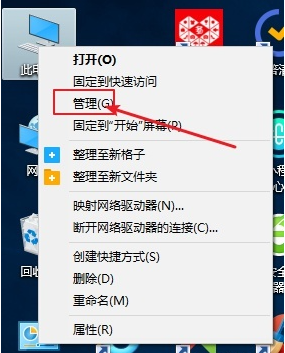
1. Right-click the computer and select Manage.
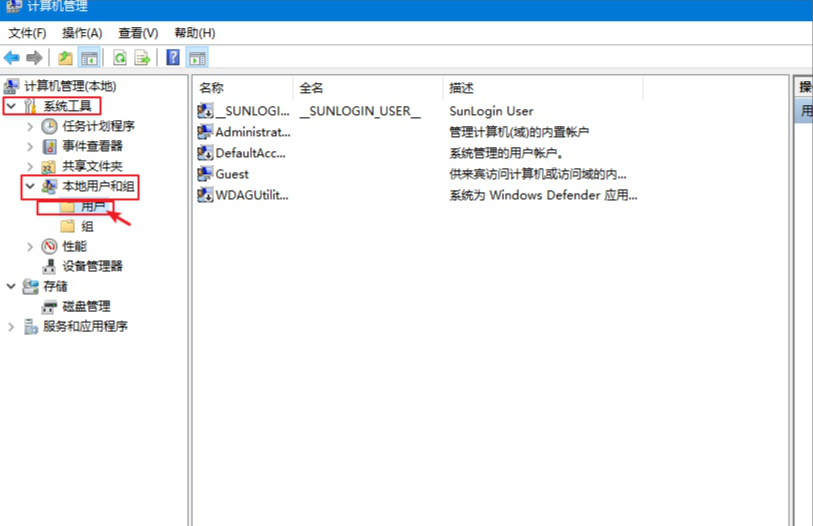
2. Open Computer Management, expand System Tools-->Local Users and Groups-->Users.
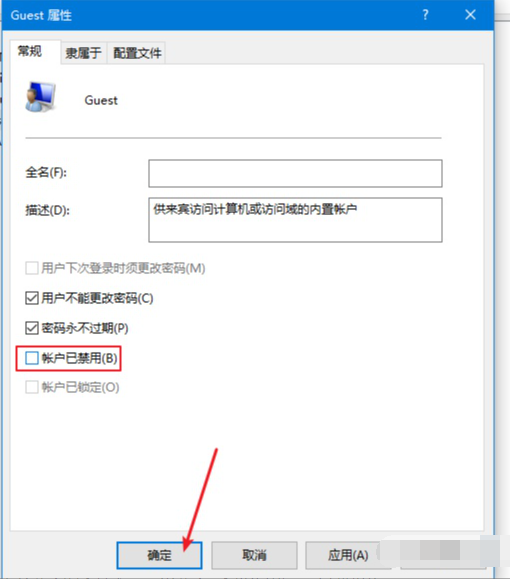
3. You can see all users on the right side. Generally, they have a Guest account. If not, please add one. We right-click the Guest and click Properties, and then change "Account is disabled" "Uncheck it and click OK. At the same time, you can set a login password.
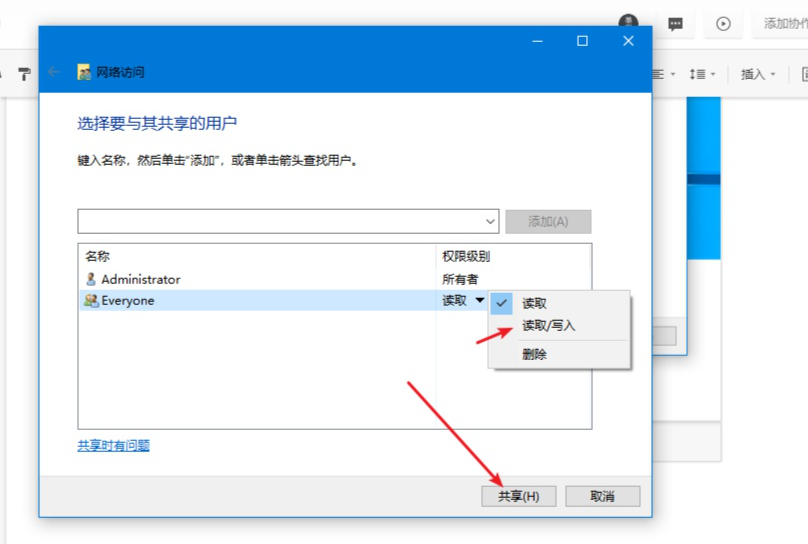
Step Three: Shared Folder
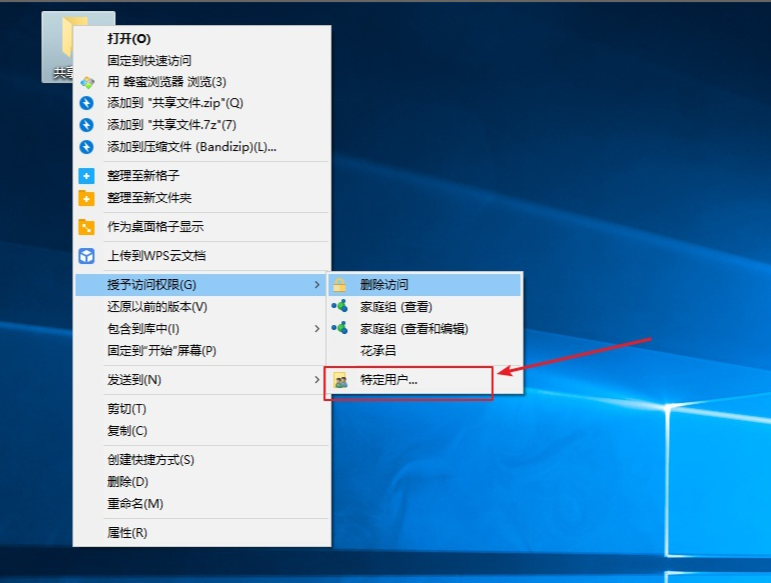
1. Right-click the folder that needs to be shared, click Share-->Specific User, as shown below As shown:
2. When the search box appears, click the drop-down icon, select Everyone, and then click Add, as shown below:

The above is the detailed content of Detailed explanation of how to set up win10 file sharing. For more information, please follow other related articles on the PHP Chinese website!

Hot AI Tools

Undresser.AI Undress
AI-powered app for creating realistic nude photos

AI Clothes Remover
Online AI tool for removing clothes from photos.

Undress AI Tool
Undress images for free

Clothoff.io
AI clothes remover

Video Face Swap
Swap faces in any video effortlessly with our completely free AI face swap tool!

Hot Article
Hot Tools

Notepad++7.3.1
Easy-to-use and free code editor

SublimeText3 Chinese version
Chinese version, very easy to use

Zend Studio 13.0.1
Powerful PHP integrated development environment

Dreamweaver CS6
Visual web development tools

SublimeText3 Mac version
God-level code editing software (SublimeText3)
Hot Topics


 Win11 computer automatic startup setting guide
Jan 15, 2024 pm 06:36 PM
Win11 computer automatic startup setting guide
Jan 15, 2024 pm 06:36 PM
We can save the time we spend every day by setting the system to automatically start up, which is very suitable for use in the office. However, many users do not know how to set up automatic startup on win11. In fact, you only need to create a scheduled task. , let’s take a look with the editor below. How to set the computer to automatically start up win11: 1. First, right-click and select "This PC" and click "Manage" 2. Then find "Task Scheduler" in the system tools 3. Then click "Create Basic Task" on the right 4. In the name Enter "Auto power on" 5, and then select the frequency of automatic power on. 6. Then set the specific time we need to automatically boot. 7. Then check "Start Program" as shown in the figure. 8. In a program or script
 Set up Win11 workgroup control?
Jul 01, 2023 am 09:57 AM
Set up Win11 workgroup control?
Jul 01, 2023 am 09:57 AM
How to set up a Win11 workgroup? Workgroup is the most common, simplest and most common resource management mode, which is to put different computers into different groups according to their functions to facilitate management. Recently, some users have asked how to set up a Win11 workgroup? Many friends don’t know how to operate in detail. The editor has compiled the steps to set up a Win11 workgroup below. If you are interested, follow the editor and take a look below! Win11 workgroup setting steps 1. Right-click this computer on the desktop, and select Properties in the menu item that opens; 2. Windows settings window, click on the domain or workgroup under the relevant link on the right; 3. System properties window, computer name option card, click To use the wizard to join the computer to a domain or job
 PHP and FTP: realizing file sharing among multiple departments in website development
Jul 28, 2023 pm 01:01 PM
PHP and FTP: realizing file sharing among multiple departments in website development
Jul 28, 2023 pm 01:01 PM
PHP and FTP: Achieve file sharing among multiple departments in website development. With the development of the Internet, more and more companies are beginning to use website platforms for information release and business promotion. However, the problem that arises is how to achieve file sharing and collaboration among multiple departments. In this case, PHP and FTP become one of the most commonly used solutions. This article will introduce how to use PHP and FTP to achieve file sharing among multiple departments in website development. 1. Introduction to FTP FTP (FileTransferPr
 Fix file sharing not working in MacOS Ventura
Apr 13, 2023 am 11:34 AM
Fix file sharing not working in MacOS Ventura
Apr 13, 2023 am 11:34 AM
Fix SMB file sharing not working in MacOS Ventura Open the System Settings app on your Mac from the Apple menu Go to General, then Sharing Find the switch for File Sharing and turn it off Restart your Mac by going to the Apple menu and selecting Restart. After restarting, return to the Sharing System Settings panel and reset "File Sharing" to the on position. Resume file sharing as usual and it should work as expected if MacOS Ventura Mac File sharing with another Mac or device suddenly stops working again and you may need to repeat the process after a few days or randomly.
 How to implement LAN file sharing communication through PHP and SMB protocol
Jul 30, 2023 pm 01:57 PM
How to implement LAN file sharing communication through PHP and SMB protocol
Jul 30, 2023 pm 01:57 PM
How to realize LAN file sharing communication through PHP and SMB protocol. In daily office, file sharing is a very common and important operation. File sharing through LAN can facilitate the transmission and sharing of files. Among them, the SMB (Server Message Block) protocol is a commonly used file sharing protocol. PHP is a powerful development language that can achieve LAN file sharing communication through combination with the SMB protocol. This article will introduce how to use PHP and SMB protocol to implement
 How to fix file sharing not working issue in Windows 11/10?
Apr 21, 2023 pm 07:37 PM
How to fix file sharing not working issue in Windows 11/10?
Apr 21, 2023 pm 07:37 PM
<p>File sharing functionality between Windows devices on the same network has never been truly smooth or bug-free. However, with every iteration of Windows, this cool feature has been greatly improved, making it easier for users to use it. Despite this, users are still complaining that the file sharing feature is not working properly. If you are facing the same type of issue on your system, don't worry. Just implement these fixes one by one and you can share your files in no time. </p><h2>Fix 1 – Automated FDRP Service</h2><p&
 Detailed steps to turn off automatic updates in Win10
Jan 03, 2024 pm 04:14 PM
Detailed steps to turn off automatic updates in Win10
Jan 03, 2024 pm 04:14 PM
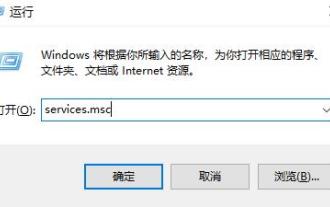
The win10 system is still being updated continuously. Some netizens feel that their current computers are in very good condition and therefore do not want to upgrade. It may be because they don’t know how to set win10 to never update, so we have brought a tutorial for you to learn together. How to set win10 to never update: 1. First press the shortcut key "win+r" to open Run and enter "services.msc". 2. Then find “windowsupdate” below. 3. Right-click the option and click "Properties" below. 4. Select "Disabled" as the startup type and click "Stop". 5. Finally, click "Apply" and "OK" in sequence.
 How to set low power automatic shutdown in Win7
Jul 13, 2023 am 10:37 AM
How to set low power automatic shutdown in Win7
Jul 13, 2023 am 10:37 AM
Windows7 is an operating system developed by Microsoft, and its core version number is WindowsNT6.1. Many friends are forced to turn off their computers every time. They don’t know that Win7 system can set low-power automatic shutdown. Here is how to set low-power automatic shutdown in Win7 system. How to set low-power automatic shutdown in Win7: 1. First, click the Start button in the lower left corner of the desktop and select Control Panel. Then change the check method of the control panel to large icons, find the power option, and click to open; 2. Click to change the plan settings displayed by the current battery indicator, and then change the advanced power settings; 3. Find the battery-related settings and set Low Power Set the operation to Shut Down, and finally click OK to complete the operation.