
 Operation and Maintenance
Linux Operation and Maintenance
How to configure a cluster file system on Linux
Operation and Maintenance
Linux Operation and Maintenance
How to configure a cluster file system on Linux
How to configure a cluster file system on Linux

How to configure a cluster file system on Linux
Introduction:
In the modern technology era, it is becoming more and more important to achieve high availability and high performance file systems on Linux servers by configuring a cluster file system. The more important it is. The cluster file system can provide support for multiple hosts to share the file system, so that multiple hosts can read and write files at the same time. This article will introduce how to configure a basic cluster file system on Linux and provide corresponding code examples.
Part One: Overview
A cluster file system is basically a distributed file system running on multiple hosts simultaneously. It achieves shared and redundant storage of data by connecting multiple storage nodes to a shared storage device. Before setting up the cluster file system, we need to ensure that all nodes can share storage devices and have the same network connection.
Part 2: Install and configure the file system
-
Installing dependent software packages
On the Linux system, we need to install some dependent software packages to support the cluster Normal operation of the file system. For example, on Ubuntu you can use the following command to install the required packages:sudo apt-get install pacemaker corosync ocfs2-tools
Copy after login Configure Network Connection
In order for multiple hosts to communicate with each other, we need to configure the network connection. You can configure the parameters of a network connection by editing the network configuration file. For example, on Ubuntu you can edit the/etc/network/interfacesfile:sudo vi /etc/network/interfaces
Copy after loginand add the following:
auto eth0
iface eth0 inet static
 address 192.168.1.10
 netmask 255.255.255.0
 gateway 192.168.1.1
Copy after loginConfiguring Cluster Software
Before configuring the cluster software, we need to create a shared storage device. Shared storage can be created using technologies like iSCSI. First, we need to install the iSCSI software package:sudo apt-get install tgt
Copy after loginThen, configure the shared storage device according to the needs of the server. For example, on Ubuntu you can use the following command to create an iSCSI device:
sudo tgtadm --lld iscsi --op new --mode target --tid 1 -T iqn.2021-01.com.example:storage
sudo tgtadm --lld iscsi --op new --mode logicalunit --tid 1 --lun 1 -b /dev/sdb
Copy after loginConfigure cluster
Install and configure cluster software, such as pacemaker and corosync, on all nodes. You can install it using the following command:sudo apt-get install pacemaker corosync
Copy after loginThen, edit the
/etc/corosync/corosync.conffile to configure the cluster parameters:sudo vi /etc/corosync/corosync.conf
Copy after loginFor example, the following is an example Configuration file:
totem {
 version: 2
 secauth: on
 cluster_name: mycluster
 transport: udpu
}

nodelist {
 node {
     name: node1
     ring0_addr: 10.0.0.1
 }
 node {
     name: node2
     ring0_addr: 10.0.0.2
 }
 node {
     name: node3
     ring0_addr: 10.0.0.3
 }
}

quorum {
 provider: corosync_votequorum
 two_node: 1
}

logging {
 to_logfile: yes
 logfile: /var/log/corosync.log
 to_syslog: yes
}
Copy after login
Part Three: Testing and Troubleshooting
Start the cluster software
Start the cluster software on each node :sudo service corosync start sudo service pacemaker start
Copy after loginConfigure cluster resources
Configure cluster resources by using cluster management tools, such as crmsh or pcs. The following is an example command to use pcs to configure cluster resources:sudo pcs resource create fs ocf:heartbeat:Filesystem device="/dev/sdb" directory="/mnt" fstype="ocfs2" cluster_options="noatime" op start timeout="90s" op stop timeout="100s" op monitor interval="10s"
Copy after loginTest the cluster file system
Mount the cluster file system on a node and perform read and write operations:sudo mount /dev/sdb /mnt
Copy after login
Conclusion:
Through the introduction of this article, we learned how to configure a basic cluster file system on Linux. In a real production environment, you may need more complex configurations to achieve more advanced functionality and performance. However, this basic configuration can help you get started with a clustered file system and provide you with a platform for learning and experimentation.
References:
- Ubuntu official documentation: https://help.ubuntu.com/
- Linux Cluster HOWTO: http://linux-ha. org/
- Corosync official documentation: https://corosync.github.io/corosync/
Code sample:
#!/bin/bash

# Set up network interfaces
echo "auto eth0" >> /etc/network/interfaces
echo "iface eth0 inet static" >> /etc/network/interfaces
echo "address 192.168.1.10" >> /etc/network/interfaces
echo "netmask 255.255.255.0" >> /etc/network/interfaces
echo "gateway 192.168.1.1" >> /etc/network/interfaces

# Install required packages
apt-get update
apt-get install -y pacemaker corosync ocfs2-tools

# Create iSCSI storage device
tgtadm --lld iscsi --op new --mode target --tid 1 -T iqn.2021-01.com.example:storage
tgtadm --lld iscsi --op new --mode logicalunit --tid 1 --lun 1 -b /dev/sdb

# Install and configure cluster software
apt-get install -y pacemaker corosync
cat << EOF > /etc/corosync/corosync.conf
totem {
    version: 2
    secauth: on
    cluster_name: mycluster
    transport: udpu
}

nodelist {
    node {
        name: node1
        ring0_addr: 10.0.0.1
    }
    node {
        name: node2
        ring0_addr: 10.0.0.2
    }
    node {
        name: node3
        ring0_adddr: 10.0.0.3
    }
}

quorum {
    provider: corosync_votequorum
    two_node: 1
}

logging {
    to_logfile: yes
    logfile: /var/log/corosync.log
    to_syslog: yes
}
EOF

# Start cluster software
service corosync start
service pacemaker start

# Configure cluster resource
pcs resource create fs ocf:heartbeat:Filesystem device="/dev/sdb" directory="/mnt" fstype="ocfs2" cluster_options="noatime" op start timeout="90s" op stop timeout="100s" op monitor interval="10s"

# Mount cluster filesystem
mount /dev/sdb /mntThis article introduces how to Configure the cluster file system and provide corresponding code examples. By following the steps in this article, you can implement a highly available, high-performance file system on your Linux server. Hope this article can be helpful to you.
The above is the detailed content of How to configure a cluster file system on Linux. For more information, please follow other related articles on the PHP Chinese website!

Hot AI Tools

Undresser.AI Undress
AI-powered app for creating realistic nude photos

AI Clothes Remover
Online AI tool for removing clothes from photos.

Undress AI Tool
Undress images for free

Clothoff.io
AI clothes remover

Video Face Swap
Swap faces in any video effortlessly with our completely free AI face swap tool!

Hot Article
Hot Tools

Notepad++7.3.1
Easy-to-use and free code editor

SublimeText3 Chinese version
Chinese version, very easy to use

Zend Studio 13.0.1
Powerful PHP integrated development environment

Dreamweaver CS6
Visual web development tools

SublimeText3 Mac version
God-level code editing software (SublimeText3)
Hot Topics
 1657
1657
 14
1415
52
1309
25
1257
29
1230
24
14
1415
52
1309
25
1257
29
1230
24

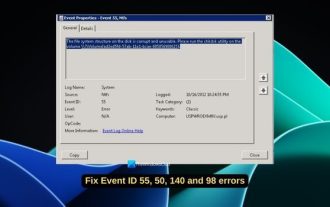 Fix event ID 55, 50, 98, 140 disk error in event viewer
Mar 19, 2024 am 09:43 AM
Fix event ID 55, 50, 98, 140 disk error in event viewer
Mar 19, 2024 am 09:43 AM
If you find event ID 55, 50, 140 or 98 in the Event Viewer of Windows 11/10, or encounter an error that the disk file system structure is damaged and cannot be used, please follow the guide below to resolve the issue. What does Event 55, File system structure on disk corrupted and unusable mean? At session 55, the file system structure on the Ntfs disk is corrupted and unusable. Please run the chkMSK utility on the volume. When NTFS is unable to write data to the transaction log, an error with event ID 55 is triggered, which will cause NTFS to fail to complete the operation unable to write the transaction data. This error usually occurs when the file system is corrupted, possibly due to the presence of bad sectors on the disk or the file system's inadequacy of the disk subsystem.
 How to deal with file system crash problems in Linux systems
Jun 29, 2023 pm 04:05 PM
How to deal with file system crash problems in Linux systems
Jun 29, 2023 pm 04:05 PM
How to deal with file system crash problems in Linux systems Introduction: With the continuous development of computer technology, the stability and reliability of the operating system are becoming more and more important. However, although Linux systems are widely regarded as a stable and reliable operating system, there is still the possibility of file system corruption. A file system crash may lead to serious consequences such as data loss and system abnormalities. Therefore, this article will introduce how to deal with file system crash problems in Linux systems to help users better protect their data and systems.
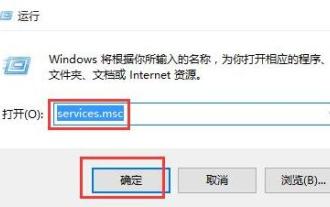 How to handle file system error 2147416359 in WIN10
Mar 27, 2024 am 11:31 AM
How to handle file system error 2147416359 in WIN10
Mar 27, 2024 am 11:31 AM
1. Press win+r to enter the run window, enter [services.msc] and press Enter. 2. In the service window, find [windows license manager service] and double-click to open it. 3. In the interface, change the startup type to [Automatic], and then click [Apply → OK]. 4. Complete the above settings and restart the computer.
 The Difference: NTFS vs. FAT32
Feb 18, 2024 pm 10:18 PM
The Difference: NTFS vs. FAT32
Feb 18, 2024 pm 10:18 PM
NTFS and FAT32 are two common file systems used to organize and manage data on your computer's hard drive. While they all share some common functions and features, there are also some important differences in many ways. This article will explore several key differences between NTFS and FAT32. Functions and performance: NTFS (New Technology File System) is a newer file system in Microsoft Windows operating system. It has many advanced functions, such as data compression, file encryption,
 A complete list of Linux system commands.
Feb 19, 2024 pm 10:54 PM
A complete list of Linux system commands.
Feb 19, 2024 pm 10:54 PM
The following is a list of common Linux system commands (arranged in alphabetical order): alias: set command alias awk: text processing tool, used to extract and manipulate text data cat: connect files and print to standard output cd: change the current working directory chmod: Modify the permissions of a file or directory chown: Modify the owner and group of a file or directory chroot: Change the root file system directory cp: Copy a file or directory cron: A scheduled task management tool curl: A command line tool for downloading or uploading files cut :Extract text data by columns date:Display or set the system date and time dd:Copy and convert files df:Display the disk usage of the file system diff:Compare files or destinations
 fstab(File System Table)
Feb 19, 2024 pm 06:30 PM
fstab(File System Table)
Feb 19, 2024 pm 06:30 PM
fstab (FileSystemTable) is a configuration file in the Linux system, used to define the rules for mounting file systems when the system starts. The fstab file is located in the /etc directory and can be created manually or modified by an editor. Each line specifies a file system to be mounted. Each line has six fields, and their meanings are as follows: The file system device file or UUID can be used to specify the device of the file system to be mounted. The UUID is a unique identifier. The UUID of the device can be obtained through the blkid command. 2. Mount point: Specify the directory to which the file system is to be mounted, which can be an absolute path (such as /mnt/data) or a relative path (such as ../data). 3. File system class
 Common performance problems and solutions for Linux file systems
Jun 30, 2023 am 08:03 AM
Common performance problems and solutions for Linux file systems
Jun 30, 2023 am 08:03 AM
As a common operating system, Linux is widely used in servers, embedded devices and personal computers. However, when using a Linux system, we may encounter some file system performance problems, such as slow response speed, slow file reading and writing, etc. This article will introduce some common file system performance problems and provide corresponding solutions. Disk Fragmentation Disk fragmentation is a common file system performance problem. When files in the file system are frequently created, modified, and deleted, the files on the disk will be scattered.
 In-depth understanding of Linux's standard file system (Ext2/Ext3/Ext4)
Dec 31, 2023 pm 10:18 PM
In-depth understanding of Linux's standard file system (Ext2/Ext3/Ext4)
Dec 31, 2023 pm 10:18 PM
The full name of Ext is Linux extended file system, extfs, which is the Linux extended file system. Ext2 represents the second generation file extension system, Ext3/Ext4 and so on. They are all upgraded versions of Ext2, but they add the log function and are backward compatible with each other. So Ext2 is called an indexed file system, and Ext3/Ext4 is called a journaled file system. Note: Linux supports many file systems, including Network File System (NFS) and Windows’ Fat file system. View the file systems supported by Linux: ls-l/lib/modules/$(uname-r)/kernel/fs view
