

How to install KVM on Rocky Linux 9 / AlmaLinux 9


KVM is a kernel virtual machine Kernel Virtualization Machine
Like most virtualization platforms, it combines hardware resources (such as CPU, memory, storage, network, graphics, etc. ) and assign them to clients that run independently of the host.
Prerequisites
- Pre-installed Rocky Linux 9/AlmaLinux 9
- sudo user with administrator rights
- Internet connection
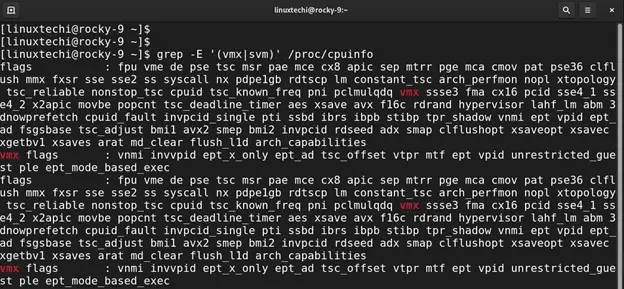
1. Verify whether hardware virtualization is enabled
First, you need to verify whether the virtualization function is enabled on your system. On most modern systems, this feature is enabled in the BIOS. But to be sure, you can verify that virtualization is enabled as shown in the picture.
This command detects the presence of VMX (Virtual Machine Extension), which is a CPU flag for Intel hardware virtualization, or SVM, which is a flag for AMD hardware virtualization.
$ cat /proc/cpuinfo | egrep "vmx|svm"
From the following output, you can see that our system has Intel hardware virtualization enabled:
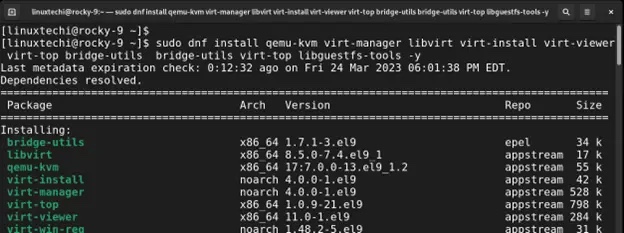
2. On Rocky Linux 9 / AlmaLinux 9 Install KVM
After ensuring that virtualization is enabled, the next step is to install KVM and management tools. To do this, run the following dnf command.
$ sudo dnf install qemu-kvm virt-manager libvirt virt-install virt-viewer virt-top bridge-utilsbridge-utils virt-top libguestfs-tools -y
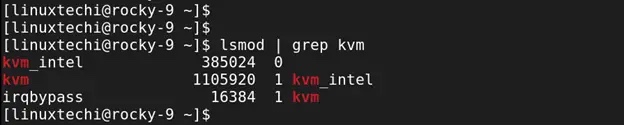
After the installation is complete, run the following command to check whether the required KVM modules are loaded.
$ lsmod | grep kvm
You should get the following output to confirm that the necessary modules have been loaded:
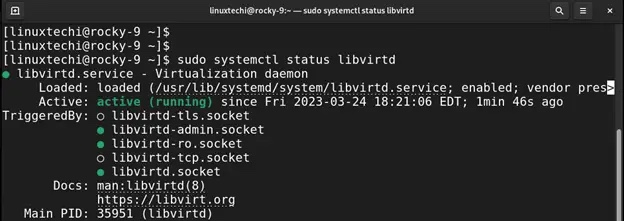
3. Start and enable the libvirtd daemon
Below In one step, be sure to start the libvirtd daemon. This is a server-side daemon component that can run and manage tasks on virtualized guests. It is used for the management of virtualization technologies such as Xen, KVM, ESXi, etc.
To start the libvirtd daemon, run the following command:
$ sudo systemctl start libvirtd
Be sure to enable the service to start on boot:
$ sudo systemctl enable --now libvirtd
Verify that the libvirtd daemon is running, As shown below:
$ sudo systemctl status libvirtd
4. Set up the bridge interface
So far, we have installed KVM and all management tools. In fact, we can Proceed to start the virtual machine. However, it would be great if we could access the VM from outside the hypervisor network. To do this we need to create a bridge interface.
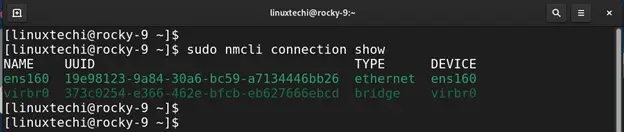
First, determine the network interfaces on the system.
$ sudo nmcli connection show
From the output, ens160 is the active network interface, be sure to pay attention to the interface in your case as you will be using it along the way.
To start creating the bridge, first, delete the connection with its UUID using the following syntax:
$ sudo nmcli connection delete UUID
In our example, the command will be:
$ sudo nmcli connection delete 19e98123-9a84-30a6-bc59-a7134446bb26
You will receive confirmation that the connection was successfully deleted.

Before proceeding, it is a good idea to have the following details ready:
- 网桥名称 – 新网桥的首选名称(例如
br1) - 设备名称 – 这是你的网络接口的名称。它将作为网桥的从属设备(例如,
ens160) - IP 地址/子网 – 桥接网络的 IP 地址和子网(例如
192.168.2.50/24)。请注意,这应该与你的网络子网和 IP 地址相对应。 - 网关 – 你网络的默认网关地址(例如
192.168.2.1) - DNS1 和 DNS2 – 首选 DNS 地址(例如
8.8.8.8和8.8.4.4)
继续,使用以下语法创建一个新的桥接接口。
$ sudo nmcli connection add type bridge autoconnect yes con-name BRIDGE NAME ifname BRIDGE NAME
在我们的例子中,br1 是首选的网桥接口名称。因此,命令将如图所示:
$ sudo nmcli connection add type bridge autoconnect yes con-name br1 ifname br1

在接下来的步骤中,你将通过指定 IP 子网、网关和 DNS 值来修改网桥。
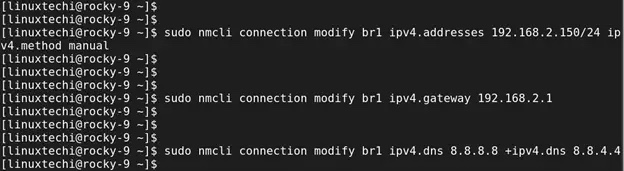
首先使用以下语法指定 IP 子网:
$ sudo nmcli connection modify BRIDGE NAME ipv4.addresses IP ADDRESS/SUBNET ipv4.method manual
根据我们的设置,命令将是:
$ sudo nmcli connection modify br1 ipv4.addresses 192.168.2.150/24 ipv4.method manual
接下来,使用以下语法指定网关地址:
$ sudo nmcli connection modify BRIDGE NAME ipv4.gateway GATEWAY
根据我们的网络,该命令采用以下格式:
$ sudo nmcli connection modify br1 ipv4.gateway 192.168.2.1
DNS 地址的语法如下:
$ sudo nmcli connection modify BRIDGE NAME ipv4.dns DNS1 +ipv4.dns DNS2
该命令采用以下格式:
$ sudo nmcli connection modify br1 ipv4.dns 8.8.8.8 +ipv4.dns 8.8.4.4
此后,使用以下命令添加网桥从属设备:
$ sudo nmcli connection add type bridge-slave autoconnect yes con-name DEVICE NAME ifname DEVICE NAME master BRIDGE NAME
使用我们的值,命令如图所示:
$ sudo nmcli connection add type bridge-slave autoconnect yes con-name ens160 ifname ens160 master br1
你将收到以下确认信息,表明已成功添加网桥从属设备。请记住,桥接从属设备是你的网络接口或适配器。

要确认网桥已创建,请运行以下命令:
$ sudo nmcli connection show
从输出中,你可以看到列出了网桥接口。

激要活它,请运行以下命令:
$ sudo nmcli connection up br1

此外,你可以使用 ip addr 命令验证:
$ ip addr | grep br1

最后,编辑网桥配置文件。
$ sudo vi /etc/qemu-kvm/bridge.conf
添加以下行:
allow all
然后重新启动虚拟化守护进程以应用更改
$ sudo systemctl restart libvirtd
5、创建虚拟机
安装 KVM 并配置桥接连接后,现在让我们创建一个虚拟机。在运行命令时,为登录用户授予必要的所有权,以避免切换到 root 用户。
$ sudo chown -R $USER:libvirt /var/lib/libvirt/
在命令行上,我们将使用以下语法使用 Ubuntu 20.04 ISO 镜像创建虚拟机。
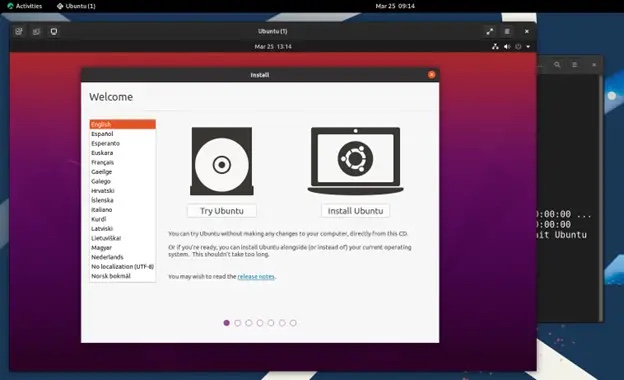
$ virt-install \--name Ubuntu \--ram 2048 \--vcpus 2 \--disk path=/var/lib/libvirt/images/ubuntu-20.04.img,size=15 \--os-variant ubuntu20.04 \--network bridge=br1,model=virtio \--graphics vnc,listen=0.0.0.0 \--console pty,target_type=serial \--cdrom /home/linuxtechi/Downloads/ubuntu-20.04.4-desktop-amd64.iso
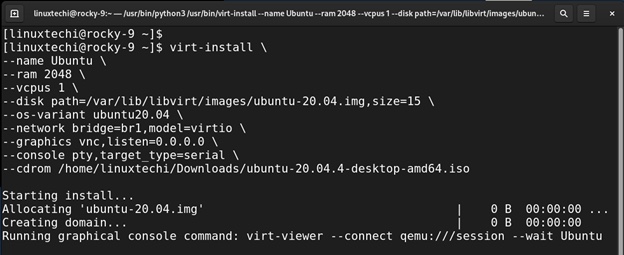
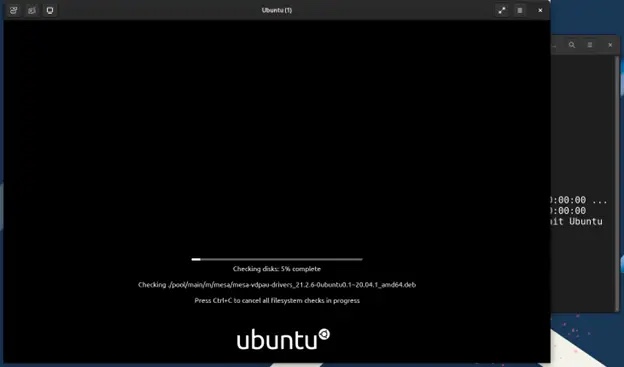
执行该命令后,将启动图形屏幕会话,并开始安装客户操作系统。
Summary
This concludes our article on how to install KVM on Rocky Linux 9 / AlmaLinux 9, your feedback is more than welcome.
The above is the detailed content of How to install KVM on Rocky Linux 9 / AlmaLinux 9. For more information, please follow other related articles on the PHP Chinese website!

Hot AI Tools

Undresser.AI Undress
AI-powered app for creating realistic nude photos

AI Clothes Remover
Online AI tool for removing clothes from photos.

Undress AI Tool
Undress images for free

Clothoff.io
AI clothes remover

Video Face Swap
Swap faces in any video effortlessly with our completely free AI face swap tool!

Hot Article
Hot Tools

Notepad++7.3.1
Easy-to-use and free code editor

SublimeText3 Chinese version
Chinese version, very easy to use

Zend Studio 13.0.1
Powerful PHP integrated development environment

Dreamweaver CS6
Visual web development tools

SublimeText3 Mac version
God-level code editing software (SublimeText3)
Hot Topics
 1655
1655
 14
1413
52
1306
25
1252
29
1226
24
14
1413
52
1306
25
1252
29
1226
24

 Linux Architecture: Unveiling the 5 Basic Components
Apr 20, 2025 am 12:04 AM
Linux Architecture: Unveiling the 5 Basic Components
Apr 20, 2025 am 12:04 AM
The five basic components of the Linux system are: 1. Kernel, 2. System library, 3. System utilities, 4. Graphical user interface, 5. Applications. The kernel manages hardware resources, the system library provides precompiled functions, system utilities are used for system management, the GUI provides visual interaction, and applications use these components to implement functions.
 vscode terminal usage tutorial
Apr 15, 2025 pm 10:09 PM
vscode terminal usage tutorial
Apr 15, 2025 pm 10:09 PM
vscode built-in terminal is a development tool that allows running commands and scripts within the editor to simplify the development process. How to use vscode terminal: Open the terminal with the shortcut key (Ctrl/Cmd). Enter a command or run the script. Use hotkeys (such as Ctrl L to clear the terminal). Change the working directory (such as the cd command). Advanced features include debug mode, automatic code snippet completion, and interactive command history.
 How to check the warehouse address of git
Apr 17, 2025 pm 01:54 PM
How to check the warehouse address of git
Apr 17, 2025 pm 01:54 PM
To view the Git repository address, perform the following steps: 1. Open the command line and navigate to the repository directory; 2. Run the "git remote -v" command; 3. View the repository name in the output and its corresponding address.
 Where to write code in vscode
Apr 15, 2025 pm 09:54 PM
Where to write code in vscode
Apr 15, 2025 pm 09:54 PM
Writing code in Visual Studio Code (VSCode) is simple and easy to use. Just install VSCode, create a project, select a language, create a file, write code, save and run it. The advantages of VSCode include cross-platform, free and open source, powerful features, rich extensions, and lightweight and fast.
 How to run java code in notepad
Apr 16, 2025 pm 07:39 PM
How to run java code in notepad
Apr 16, 2025 pm 07:39 PM
Although Notepad cannot run Java code directly, it can be achieved by using other tools: using the command line compiler (javac) to generate a bytecode file (filename.class). Use the Java interpreter (java) to interpret bytecode, execute the code, and output the result.
 What is the main purpose of Linux?
Apr 16, 2025 am 12:19 AM
What is the main purpose of Linux?
Apr 16, 2025 am 12:19 AM
The main uses of Linux include: 1. Server operating system, 2. Embedded system, 3. Desktop operating system, 4. Development and testing environment. Linux excels in these areas, providing stability, security and efficient development tools.
 vscode terminal command cannot be used
Apr 15, 2025 pm 10:03 PM
vscode terminal command cannot be used
Apr 15, 2025 pm 10:03 PM
Causes and solutions for the VS Code terminal commands not available: The necessary tools are not installed (Windows: WSL; macOS: Xcode command line tools) Path configuration is wrong (add executable files to PATH environment variables) Permission issues (run VS Code as administrator) Firewall or proxy restrictions (check settings, unrestrictions) Terminal settings are incorrect (enable use of external terminals) VS Code installation is corrupt (reinstall or update) Terminal configuration is incompatible (try different terminal types or commands) Specific environment variables are missing (set necessary environment variables)
 vscode Previous Next Shortcut Key
Apr 15, 2025 pm 10:51 PM
vscode Previous Next Shortcut Key
Apr 15, 2025 pm 10:51 PM
VS Code One-step/Next step shortcut key usage: One-step (backward): Windows/Linux: Ctrl ←; macOS: Cmd ←Next step (forward): Windows/Linux: Ctrl →; macOS: Cmd →
