

Nginx+IIS simple deployment example analysis

Introduction to nginx:
nginx ("engine x") is a high-performance http and reverse proxy server, as well as an imap/pop3/smtp proxy server. nginx was developed by igor sysoev for rambler.ru, the second most visited site in Russia, where it has been running for over four years. igor releases the source code under a BSD-like license. In the four years since its release, nginx has become known for its stability, rich feature set, sample configuration files, and low system resource consumption. At present, nginx has been deployed on major domestic portal websites, such as Sina, NetEase, Tencent, etc.; several important domestic video sharing websites have also deployed nginx, such as Liufangfang, Ku6, etc. It has recently been discovered that nginx technology is becoming increasingly popular in China, and more and more websites are beginning to deploy nginx. This is all mentioned online.
nginx installation
nginx is a lightweight web server/reverse proxy server and email (imap/pop3) proxy server, and is installed on a bsd Published under -like license. It was developed by Russian programmer igor sysoev and is used by Rambler (Russian: рамблер), a large Russian portal website and search engine. Its characteristics are that it occupies less memory and has strong concurrency capabilities. In fact, nginx’s concurrency capabilities do perform better among web servers of the same type. Users of nginx websites in mainland China include: Baidu, Sina, NetEase, Tencent, etc.
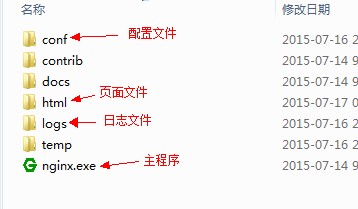
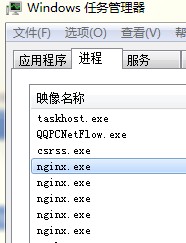
The latest version of nginx is 1.9.3. The one I downloaded is the window version. Generally, the actual scenario is to install it under the Linux system. Since the Linux system is currently being explored, I will not introduce it here. Official download address:. After the download is completed, unzip and run nginx.exe to start nginx. After starting, you will see nginx in the process.
To achieve load balancing, you need to modify the configuration information of conf/nginx.conf. After modifying the configuration information, restart the nginx service. This can be achieved through the nginx -s reload command. . Here we use a batch process provided by ants to operate.
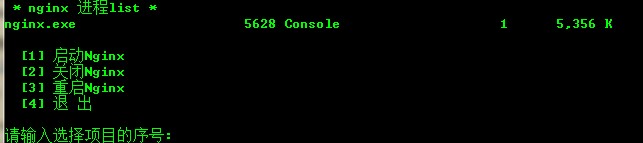
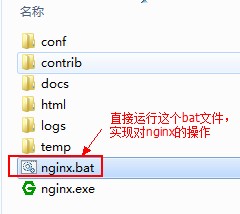
Put the nginx.bat file in the same folder as nginx.exe and run it directly. All files used in this article will be provided at the end of the article.
Site construction and configuration
1. Build two iis sites
There is only a simple index page under the site, which is used to output current server information. Since I don't have two machines, I deployed both sites to this machine and bound ports 8082 and 9000 respectively.
protected void page_load(object sender, eventargs e)
  {
   label0.text = "请求开始时间:"+datetime.now.tostring("yyyy-mm-dd hh:mm:ss");
   label1.text = "服务器名称:" + server.machinename;//服务器名称
   label2.text = "服务器ip地址:" + request.servervariables["local_addr"];//服务器ip地址
   label3.text = "http访问端口:" + request.servervariables["server_port"];//http访问端口"
   label4.text = ".net解释引擎版本:" + ".net clr" + environment.version.major + "." + environment.version.minor + "." + environment.version.build + "." + environment.version.revision;//.net解释引擎版本
   label5.text = "服务器操作系统版本:" + environment.osversion.tostring();//服务器操作系统版本
   label6.text = "服务器iis版本:" + request.servervariables["server_software"];//服务器iis版本
   label7.text = "服务器域名:" + request.servervariables["server_name"];//服务器域名
   label8.text = "虚拟目录的绝对路径:" + request.servervariables["appl_rhysical_path"];//虚拟目录的绝对路径
   label9.text = "执行文件的绝对路径:" + request.servervariables["path_translated"];//执行文件的绝对路径
   label10.text = "虚拟目录session总数:" + session.contents.count.tostring();//虚拟目录session总数
   label11.text = "虚拟目录application总数:" + application.contents.count.tostring();//虚拟目录application总数
   label12.text = "域名主机:" + request.servervariables["http_host"];//域名主机
   label13.text = "服务器区域语言:" + request.servervariables["http_accept_language"];//服务器区域语言
   label14.text = "用户信息:" + request.servervariables["http_user_agent"];
   label14.text = "cpu个数:" + environment.getenvironmentvariable("number_of_processors");//cpu个数
   label15.text = "cpu类型:" + environment.getenvironmentvariable("processor_identifier");//cpu类型
   label16.text = "请求来源地址:" + request.headers["x-real-ip"];
}2. Modify the nginx configuration information
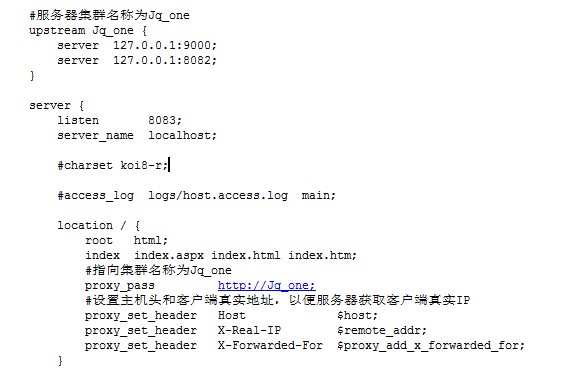
Modify the nginx listening port and modify the listen node value under the http server. Since the local port 80 is already occupied, I changed it To listen on port 8083.
listen 8083;
Add upstream (server cluster) under the http node. The server setting is the information of the cluster server. I have built two sites here and configured them. received two pieces of information.
#服务器集群名称为jq_one
upstream jq_one {
  server 127.0.0.1:9000;
  server 127.0.0.1:8082;
}Find the location node under the http node and modify it
location / {
root html;
index index.aspx index.html index.htm; #修改主页为index.aspx
#其中jq_one对应着upstream设置的集群名称
proxy_pass http://jq_one;
#设置主机头和客户端真实地址,以便服务器获取客户端真实ip
proxy_set_header host $host;
proxy_set_header x-real-ip $remote_addr;
proxy_set_header x-forwarded-for $proxy_add_x_forwarded_for;
}After modifying the configuration file, remember to restart the nginx service. The final complete configuration file information is as follows
3. Running results
Visit http://127.0.0.1:8083/index.aspx, visit several times, and focus on the parts marked in red.
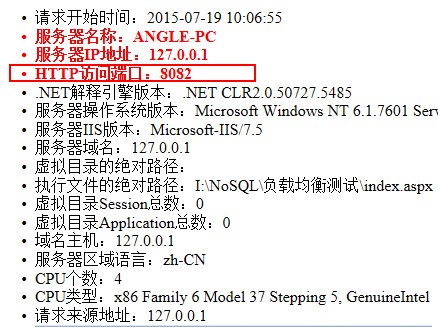
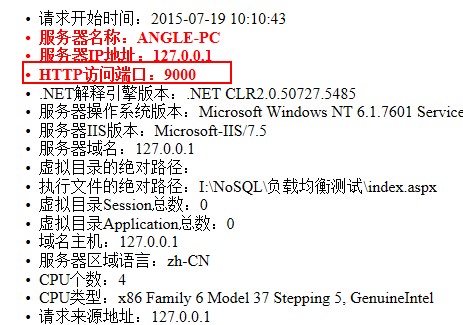
As you can see, our request is distributed to the 8082 site and the 9000 site, and the first time is the 8082 site and the second time is 9000. Such a result proves that our load balancing setup was successful. Try to close 9000 of the sites, and then refresh the page and find that the output http port is always 8082, which means that one of the sites is down. As long as there is still a good site, ours can still serve.
Problem Analysis
Although we have built a load balancing site, there are still the following problems.
1. If the site uses session and the requests are evenly distributed to the two sites, then there must be a session sharing problem. How to solve it?
Use the database to save session information and use nginx to allocate requests from the same IP to the fixed server. Modify as follows. ip_hash will calculate the hash value corresponding to the ip, and then assign it to the fixed server
upstream jq_one{
server 127.0.0.1:8082;
server 127.0.0.1:9000;
ip_hash;
}
Build a redis server, and read the session from the redis server. Later articles will introduce the use of distributed cache redis
2.管理员更新站点文件,该怎么操作,现在还只有两台服务器,可以手工将文件更新到两台服务器,如果是10台呢,那么手工操作必然是不可行的
多服务器站点更新可以使用goodsync 文件同步程序,会自动检测文件的修改新增,然后同步到其它服务器上。在linux下可以使用rsync
3.站点中的文件上传功能会将文件分配到不同的服务器,文件共享问题如何解决。
使用文件服务器将所有文件存储到该服务器上,文件操作读取写入都在该服务器上。这里同样会存在一个问题,文件服务器存在读写上限。
4.负载的服务器配置不一样,有的高有的低可不可以让配置高的服务器处理请求多一些
这里讲一下,负载均衡有好几种算法 轮转法,散列法,最少连接法,最低缺失法,最快响应法,加权法。我们这里可以使用加权法来分配请求。
upstream jq_one{
server 127.0.0.1:8082 weight=4;
server 127.0.0.1:9000 weight=1;
}
通过weight设置每台服务器分配请求站的权重,值越高分配的越多。
5.由于请求是经过nginx转发过来的,可以在代码里面获取到用户请求的实际ip地址吗?
答案是肯定的,在localtion节点设置如下请求头信息
#设置主机头和客户端真实地址,以便服务器获取客户端真实ip
proxy_set_header host $host;
proxy_set_header x-real-ip $remote_addr;
proxy_set_header x-forwarded-for $proxy_add_x_forwarded_for;
代码里面通过request.headers["x-real-ip"],就能获取到真实ip
The above is the detailed content of Nginx+IIS simple deployment example analysis. For more information, please follow other related articles on the PHP Chinese website!

Hot AI Tools

Undresser.AI Undress
AI-powered app for creating realistic nude photos

AI Clothes Remover
Online AI tool for removing clothes from photos.

Undress AI Tool
Undress images for free

Clothoff.io
AI clothes remover

Video Face Swap
Swap faces in any video effortlessly with our completely free AI face swap tool!

Hot Article
Hot Tools

Notepad++7.3.1
Easy-to-use and free code editor

SublimeText3 Chinese version
Chinese version, very easy to use

Zend Studio 13.0.1
Powerful PHP integrated development environment

Dreamweaver CS6
Visual web development tools

SublimeText3 Mac version
God-level code editing software (SublimeText3)
Hot Topics
 1664
1664
 14
1421
52
1315
25
1266
29
1239
24
14
1421
52
1315
25
1266
29
1239
24

 How to configure nginx in Windows
Apr 14, 2025 pm 12:57 PM
How to configure nginx in Windows
Apr 14, 2025 pm 12:57 PM
How to configure Nginx in Windows? Install Nginx and create a virtual host configuration. Modify the main configuration file and include the virtual host configuration. Start or reload Nginx. Test the configuration and view the website. Selectively enable SSL and configure SSL certificates. Selectively set the firewall to allow port 80 and 443 traffic.
 How to start containers by docker
Apr 15, 2025 pm 12:27 PM
How to start containers by docker
Apr 15, 2025 pm 12:27 PM
Docker container startup steps: Pull the container image: Run "docker pull [mirror name]". Create a container: Use "docker create [options] [mirror name] [commands and parameters]". Start the container: Execute "docker start [Container name or ID]". Check container status: Verify that the container is running with "docker ps".
 How to check the name of the docker container
Apr 15, 2025 pm 12:21 PM
How to check the name of the docker container
Apr 15, 2025 pm 12:21 PM
You can query the Docker container name by following the steps: List all containers (docker ps). Filter the container list (using the grep command). Gets the container name (located in the "NAMES" column).
 How to check whether nginx is started
Apr 14, 2025 pm 01:03 PM
How to check whether nginx is started
Apr 14, 2025 pm 01:03 PM
How to confirm whether Nginx is started: 1. Use the command line: systemctl status nginx (Linux/Unix), netstat -ano | findstr 80 (Windows); 2. Check whether port 80 is open; 3. Check the Nginx startup message in the system log; 4. Use third-party tools, such as Nagios, Zabbix, and Icinga.
 How to create containers for docker
Apr 15, 2025 pm 12:18 PM
How to create containers for docker
Apr 15, 2025 pm 12:18 PM
Create a container in Docker: 1. Pull the image: docker pull [mirror name] 2. Create a container: docker run [Options] [mirror name] [Command] 3. Start the container: docker start [Container name]
 How to check nginx version
Apr 14, 2025 am 11:57 AM
How to check nginx version
Apr 14, 2025 am 11:57 AM
The methods that can query the Nginx version are: use the nginx -v command; view the version directive in the nginx.conf file; open the Nginx error page and view the page title.
 How to configure cloud server domain name in nginx
Apr 14, 2025 pm 12:18 PM
How to configure cloud server domain name in nginx
Apr 14, 2025 pm 12:18 PM
How to configure an Nginx domain name on a cloud server: Create an A record pointing to the public IP address of the cloud server. Add virtual host blocks in the Nginx configuration file, specifying the listening port, domain name, and website root directory. Restart Nginx to apply the changes. Access the domain name test configuration. Other notes: Install the SSL certificate to enable HTTPS, ensure that the firewall allows port 80 traffic, and wait for DNS resolution to take effect.
 What to do if nginx server is hung
Apr 14, 2025 am 11:42 AM
What to do if nginx server is hung
Apr 14, 2025 am 11:42 AM
When the Nginx server goes down, you can perform the following troubleshooting steps: Check that the nginx process is running. View the error log for error messages. Check the syntax of nginx configuration. Make sure nginx has the permissions you need to access the file. Check file descriptor to open limits. Confirm that nginx is listening on the correct port. Add firewall rules to allow nginx traffic. Check reverse proxy settings, including backend server availability. For further assistance, please contact technical support.
