

How SpringBoot integrates RabbitMQ

1. Introduction to RabbitMQ
RabbitMQ is a type of message middleware that implements AMQP (Advanced Message Queuing Protocol). It originally originated from the financial system and is used to store and forward messages in distributed systems. It performs well in terms of usability, scalability, and high availability. RabbitMQ is mainly implemented to achieve two-way decoupling between systems. When the producer generates a large amount of data and the consumer cannot consume it quickly, an intermediate layer is needed. Save this data.
AMQP, Advanced Message Queuing Protocol, is an open standard for application layer protocols and is designed for message-oriented middleware. The main purpose of message middleware is to decouple components so that message senders and receivers do not interfere with each other and are independent of each other. Therefore, the sender does not need to know the existence of the user, and vice versa. The salient features of AMQP include message orientation, queuing, routing (including point-to-point and publish/subscribe), reliability and security.
RabbitMQ is an open source AMQP implementation. The server is written in Erlang language and supports a variety of clients, such as: Python, Ruby, .NET, Java, JMS, C, PHP, ActionScript, XMPP, STOMP, etc. , supports AJAX. This technology demonstrates good ease of use, scalability, and high availability in storing and forwarding messages in distributed systems.
2. Related concepts
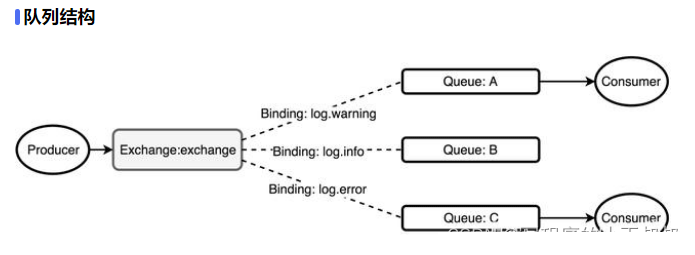
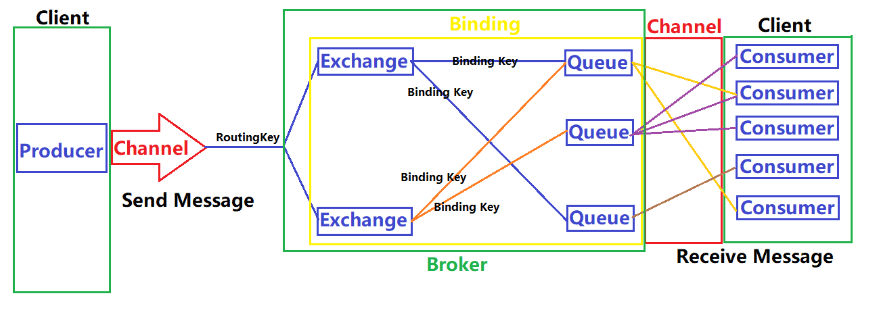
Usually when we talk about queue services, there are three concepts: message sender, queue, message receiver, RabbitMQ is here On top of the basic concept, an additional layer of abstraction is added, and an exchange is added between the message sender and the queue. In this way, the message sender and the queue are not directly connected, and instead the message sender delivers the message to the queue. Exchange, the exchanger sends the message to the queue according to the scheduling policy
The P on the left represents the producer, which is the program that sends messages to RabbitMQ.
The middle is RabbitMQ, which includes switches and queues.
The C on the right represents the consumer, which is the program that gets messages from RabbitMQ.
There are four important concepts, namely: virtual host, switch, queue, and binding.
Virtual host: A virtual host holds a set of switches, queues and bindings. Why do you need multiple virtual hosts? It's very simple. In RabbitMQ, users can only control permissions at the granularity of the virtual host. Therefore, if you need to prohibit group A from accessing group B's switches/queues/bindings, you must create a virtual host for A and B respectively. Every RabbitMQ server has a default virtual host "/".
Switch: Exchange is used to forward messages, but it does not store them. If there is no Queue bind to Exchange, it will directly discard the messages sent by the Producer. information.
Binding: That is, the switch needs to be bound to the queue. As shown in the figure above, it is a many-to-many relationship.
<dependency>
<groupId>org.springframework.boot</groupId>
<artifactId>spring-boot-starter-amqp</artifactId>
</dependency>
Configure the installation address, port and account information of rabbitmq.
spring.application.name=spirng-boot-rabbitmq
spring.rabbitmq.host=192.168.0.86
spring.rabbitmq.port=5672
spring.rabbitmq.username=admin
spring.rabbitmq.password=123456
@Configuration
public class RabbitConfig {
@Bean
public Queue Queue() {
return new Queue("hello");
}
}
Copy after login
4.Sender@Configuration
public class RabbitConfig {
@Bean
public Queue Queue() {
return new Queue("hello");
}
}rabbitTemplate是springboot 提供的默认实现
public class HelloSender {
@Autowired
private AmqpTemplate rabbitTemplate;
public void send() {
String context = "hello " + new Date();
System.out.println("Sender : " + context);
this.rabbitTemplate.convertAndSend("hello", context);
}
}Copy after login
5.ReceiverrabbitTemplate是springboot 提供的默认实现
public class HelloSender {
@Autowired
private AmqpTemplate rabbitTemplate;
public void send() {
String context = "hello " + new Date();
System.out.println("Sender : " + context);
this.rabbitTemplate.convertAndSend("hello", context);
}
}@Component
@RabbitListener(queues = "hello")
public class HelloReceiver {
@RabbitHandler
public void process(String hello) {
System.out.println("Receiver : " + hello);
}
}Copy after login
6.Test@Component
@RabbitListener(queues = "hello")
public class HelloReceiver {
@RabbitHandler
public void process(String hello) {
System.out.println("Receiver : " + hello);
}
}@RunWith(SpringRunner.class)
@SpringBootTest
public class RabbitMqHelloTest {
@Autowired
private HelloSender helloSender;
@Test
public void hello() throws Exception {
helloSender.send();
}
}Copy after login
@RunWith(SpringRunner.class)
@SpringBootTest
public class RabbitMqHelloTest {
@Autowired
private HelloSender helloSender;
@Test
public void hello() throws Exception {
helloSender.send();
}
}Note:The queue names of the sender and the receiver must be consistent, otherwise they cannot receive
Many-to-many use
One sender, N receivers or What happens with N senders and N receivers?One-to-many sending
A small modification was made to the above code. The receiving end registered two Receivers, Receiver1 and Receiver2, and the sending end added parameter counting. The receiving end prints the parameters received. The following is the test code, which sends a hundred messages to observe the execution effect of the two receiving ends.@Test
public void oneToMany() throws Exception {
for (int i=0;i<100;i++){
neoSender.send(i);
}
}The results are as follows:
Receiver 1: spirng boot neo queue ****** 11Receiver 2: spirng boot neo queue ****** 12
Receiver 2: spirng boot neo queue ****** 14
Receiver 1: spirng boot neo queue ****** 13
Receiver 2: spirng boot neo queue ****** 15
Receiver 1: spirng boot neo queue ****** 16
Receiver 1: spirng boot neo queue ****** 18
Receiver 2: spirng boot neo queue ****** 17
Receiver 2: spirng boot neo queue ***** * 19
Receiver 1: spirng boot neo queue ****** 20
根据返回结果得到以下结论
一个发送者,N个接受者,经过测试会均匀的将消息发送到N个接收者中
多对多发送
复制了一份发送者,加入标记,在一百个循环中相互交替发送
@Test
public void manyToMany() throws Exception {
for (int i=0;i<100;i++){
neoSender.send(i);
neoSender2.send(i);
}
}结果如下:
Receiver 1: spirng boot neo queue ****** 20
Receiver 2: spirng boot neo queue ****** 20
Receiver 1: spirng boot neo queue ****** 21
Receiver 2: spirng boot neo queue ****** 21
Receiver 1: spirng boot neo queue ****** 22
Receiver 2: spirng boot neo queue ****** 22
Receiver 1: spirng boot neo queue ****** 23
Receiver 2: spirng boot neo queue ****** 23
Receiver 1: spirng boot neo queue ****** 24
Receiver 2: spirng boot neo queue ****** 24
Receiver 1: spirng boot neo queue ****** 25
Receiver 2: spirng boot neo queue ****** 25
结论:和一对多一样,接收端仍然会均匀接收到消息.
四、高级使用
//对象的支持
//springboot以及完美的支持对象的发送和接收,不需要格外的配置。
//发送者
public void send(User user) {
System.out.println("Sender object: " + user.toString());
this.rabbitTemplate.convertAndSend("object", user);
}
...
//接受者
@RabbitHandler
public void process(User user) {
System.out.println("Receiver object : " + user);
}结果如下:
Sender object: User{name='neo', pass='123456'}
Receiver object : User{name='neo', pass='123456'}
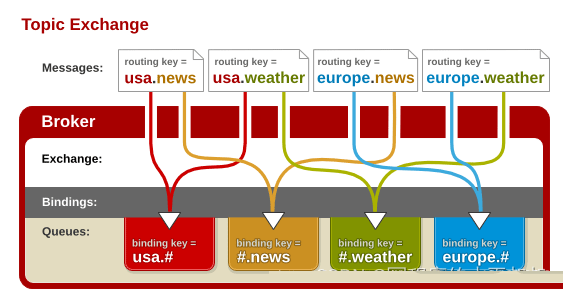
1.Topic Exchange
在RabbitMQ中,Topic是最灵活的一种方式,它允许根据routing_key随意绑定到不同的队列
首先对topic规则配置,这里使用两个队列来测试
@Configuration
public class TopicRabbitConfig {

final static String message = "topic.message";
final static String messages = "topic.messages";

@Bean
public Queue queueMessage() {
return new Queue(TopicRabbitConfig.message);
}

@Bean
public Queue queueMessages() {
return new Queue(TopicRabbitConfig.messages);
}

@Bean
TopicExchange exchange() {
return new TopicExchange("exchange");
}

@Bean
Binding bindingExchangeMessage(Queue queueMessage, TopicExchange exchange) {
return BindingBuilder.bind(queueMessage).to(exchange).with("topic.message");
}

@Bean
Binding bindingExchangeMessages(Queue queueMessages, TopicExchange exchange) {
return BindingBuilder.bind(queueMessages).to(exchange).with("topic.#");
}
}使用queueMessages同时匹配两个队列,queueMessage只匹配"topic.message"队列
public void send1() {
String context = "hi, i am message 1";
System.out.println("Sender : " + context);
this.rabbitTemplate.convertAndSend("exchange", "topic.message", context);
}

public void send2() {
String context = "hi, i am messages 2";
System.out.println("Sender : " + context);
this.rabbitTemplate.convertAndSend("exchange", "topic.messages", context);
}发送send1会匹配到topic.#和topic.message 两个Receiver都可以收到消息,发送send2只有topic.#可以匹配所有只有Receiver2监听到消息
2.Fanout Exchange
Fanout 就是我们熟悉的广播模式或者订阅模式,给Fanout交换机发送消息,绑定了这个交换机的所有队列都收到这个消息。
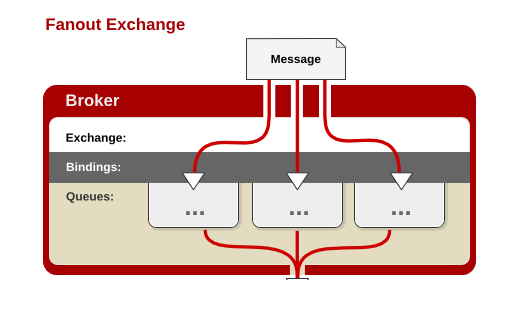
Fanout 相关配置:
@Configuration
public class FanoutRabbitConfig {

@Bean
public Queue AMessage() {
return new Queue("fanout.A");
}

@Bean
public Queue BMessage() {
return new Queue("fanout.B");
}

@Bean
public Queue CMessage() {
return new Queue("fanout.C");
}
@Bean
FanoutExchange fanoutExchange() {
return new FanoutExchange("fanoutExchange");
}
@Bean
Binding bindingExchangeA(Queue AMessage,FanoutExchange fanoutExchange) {
return BindingBuilder.bind(AMessage).to(fanoutExchange);
}
@Bean
Binding bindingExchangeB(Queue BMessage, FanoutExchange fanoutExchange) {
return BindingBuilder.bind(BMessage).to(fanoutExchange);
}
@Bean
Binding bindingExchangeC(Queue CMessage, FanoutExchange fanoutExchange) {
return BindingBuilder.bind(CMessage).to(fanoutExchange);
}
}这里使用了A、B、C三个队列绑定到Fanout交换机上面,发送端的routing_key写任何字符都会被忽略:
public void send() {
String context = "hi, fanout msg ";
System.out.println("Sender : " + context);
this.rabbitTemplate.convertAndSend("fanoutExchange","", context);
}结果如下:
Sender : hi, fanout msg
...
fanout Receiver B: hi, fanout msg
fanout Receiver A : hi, fanout msg
fanout Receiver C: hi, fanout msg
结果说明,绑定到fanout交换机上面的队列都收到了消息.
The above is the detailed content of How SpringBoot integrates RabbitMQ. For more information, please follow other related articles on the PHP Chinese website!

Hot AI Tools

Undresser.AI Undress
AI-powered app for creating realistic nude photos

AI Clothes Remover
Online AI tool for removing clothes from photos.

Undress AI Tool
Undress images for free

Clothoff.io
AI clothes remover

Video Face Swap
Swap faces in any video effortlessly with our completely free AI face swap tool!

Hot Article
Hot Tools

Notepad++7.3.1
Easy-to-use and free code editor

SublimeText3 Chinese version
Chinese version, very easy to use

Zend Studio 13.0.1
Powerful PHP integrated development environment

Dreamweaver CS6
Visual web development tools

SublimeText3 Mac version
God-level code editing software (SublimeText3)
Hot Topics
 1664
1664
 14
1422
52
1316
25
1267
29
1239
24
14
1422
52
1316
25
1267
29
1239
24

 How to build a reliable messaging app with React and RabbitMQ
Sep 28, 2023 pm 08:24 PM
How to build a reliable messaging app with React and RabbitMQ
Sep 28, 2023 pm 08:24 PM
How to build a reliable messaging application with React and RabbitMQ Introduction: Modern applications need to support reliable messaging to achieve features such as real-time updates and data synchronization. React is a popular JavaScript library for building user interfaces, while RabbitMQ is a reliable messaging middleware. This article will introduce how to combine React and RabbitMQ to build a reliable messaging application, and provide specific code examples. RabbitMQ overview:
 How to use RabbitMQ to implement distributed message processing in PHP
Jul 18, 2023 am 11:00 AM
How to use RabbitMQ to implement distributed message processing in PHP
Jul 18, 2023 am 11:00 AM
How to use RabbitMQ to implement distributed message processing in PHP Introduction: In large-scale application development, distributed systems have become a common requirement. Distributed message processing is a pattern that improves the efficiency and reliability of the system by distributing tasks to multiple processing nodes. RabbitMQ is an open source, reliable message queuing system that uses the AMQP protocol to implement message delivery and processing. In this article we will cover how to use RabbitMQ in PHP for distribution
 Comparison and difference analysis between SpringBoot and SpringMVC
Dec 29, 2023 am 11:02 AM
Comparison and difference analysis between SpringBoot and SpringMVC
Dec 29, 2023 am 11:02 AM
SpringBoot and SpringMVC are both commonly used frameworks in Java development, but there are some obvious differences between them. This article will explore the features and uses of these two frameworks and compare their differences. First, let's learn about SpringBoot. SpringBoot was developed by the Pivotal team to simplify the creation and deployment of applications based on the Spring framework. It provides a fast, lightweight way to build stand-alone, executable
 Using RabbitMQ in Go: A Complete Guide
Jun 19, 2023 am 08:10 AM
Using RabbitMQ in Go: A Complete Guide
Jun 19, 2023 am 08:10 AM
As modern applications increase in complexity, messaging has become a powerful tool. In this area, RabbitMQ has become a very popular message broker that can be used to deliver messages between different applications. In this article, we will explore how to use RabbitMQ in Go language. This guide will cover the following: Introduction to RabbitMQ RabbitMQ Installation RabbitMQ Basic Concepts Getting Started with RabbitMQ in Go RabbitMQ and Go
 SpringBoot+Dubbo+Nacos development practical tutorial
Aug 15, 2023 pm 04:49 PM
SpringBoot+Dubbo+Nacos development practical tutorial
Aug 15, 2023 pm 04:49 PM
This article will write a detailed example to talk about the actual development of dubbo+nacos+Spring Boot. This article will not cover too much theoretical knowledge, but will write the simplest example to illustrate how dubbo can be integrated with nacos to quickly build a development environment.
 Application practice of go-zero and RabbitMQ
Jun 23, 2023 pm 12:54 PM
Application practice of go-zero and RabbitMQ
Jun 23, 2023 pm 12:54 PM
Now more and more companies are beginning to adopt the microservice architecture model, and in this architecture, message queues have become an important communication method, among which RabbitMQ is widely used. In the Go language, go-zero is a framework that has emerged in recent years. It provides many practical tools and methods to allow developers to use message queues more easily. Below we will introduce go-zero based on practical applications. And the usage and application practice of RabbitMQ. 1.RabbitMQ OverviewRabbit
 Solution for real-time data synchronization between Golang and RabbitMQ
Sep 27, 2023 pm 10:41 PM
Solution for real-time data synchronization between Golang and RabbitMQ
Sep 27, 2023 pm 10:41 PM
Introduction to the solution for real-time data synchronization between Golang and RabbitMQ: In today's era, with the popularity of the Internet and the explosive growth of data volume, real-time data synchronization has become more and more important. In order to solve the problems of asynchronous data transmission and data synchronization, many companies have begun to use message queues to achieve real-time synchronization of data. This article will introduce a real-time data synchronization solution based on Golang and RabbitMQ, and provide specific code examples. 1. What is RabbitMQ? Rabbi
 Swoole and RabbitMQ integration practice: building a high-availability message queue system
Jun 14, 2023 pm 12:56 PM
Swoole and RabbitMQ integration practice: building a high-availability message queue system
Jun 14, 2023 pm 12:56 PM
With the advent of the Internet era, message queue systems have become more and more important. It enables asynchronous operations between different applications, reduces coupling, and improves scalability, thereby improving the performance and user experience of the entire system. In the message queuing system, RabbitMQ is a powerful open source message queuing software. It supports a variety of message protocols and is widely used in financial transactions, e-commerce, online games and other fields. In practical applications, it is often necessary to integrate RabbitMQ with other systems. This article will introduce how to use sw
