

How to configure nginx page cache

nginx page cache
1. Instruction description
proxy_cache_path
Syntax: proxy_cache_path path [levels=number] keys_zone=zone_name:zone_size [inactive=time] [max_size=size];
Default value: none
Use fields : http
directive specifies the cache path and some other parameters. The cached data is stored in the file, and the hash value of the proxy url is used as the key and file name. The levels parameter specifies the number of cached subdirectories, for example:
proxy_cache_path /data/nginx/cache levels=1:2 keys_zone=one:10m;
The file name is similar to:
/data/nginx/cache/c/29/b7f54b2df7773722d382f4809d65029c
levels specifies the directory structure. You can use any 1 or 2 digit number as the directory structure, such as x, x:x, or x:x:x For example: "2", "2:2", "1:1:2", but it can only be a third-level directory at most.
All active keys and metadata are stored in the shared memory pool. This area is specified with the keys_zone parameter. One refers to the name of the shared pool, and 10m refers to the size of the shared pool.
Note that each defined memory pool must have a unique path, for example:
proxy_cache_path /data/nginx/cache/one  levels=1   keys_zone=one:10m;
proxy_cache_path /data/nginx/cache/two  levels=2:2  keys_zone=two:100m;
proxy_cache_path /data/nginx/cache/three levels=1:1:2 keys_zone=three:1000m;
If the cached data is not requested within the time specified by the inactive parameter, it will be deleted. The default inactive is 10 minutes. A process called cache manager controls the cache size of the disk. It is used to delete inactive caches and control the cache size. These are defined in the max_size parameter. When the current cache value exceeds the value specified by max_size, it exceeds its size. The last least used data (LRU replacement algorithm) will be deleted. The size of the memory pool is set in proportion to the number of cached pages. The metadata size of a page (file) is determined by the operating system. For example, it is 64 bytes under freebsd/i386 and 128 bytes under freebsd/amd64.
proxy_cache
Syntax: proxy_cache zone_name;
Default value: none
Use fields: http, server, location
Set the name of a cache area. The same area can be used in different places.
After 0.7.48, the cache follows the "expires", "cache-control: no-cache", "cache-control: max-age=xxx" header fields of the backend, 0.7. After version 66, "cache-control: "private" and "no-store" headers are also followed. nginx will not process the "vary" header during the caching process. In order to ensure that some private data is not seen by all users, later The client must set the "no-cache" or "max-age=0" header, or the proxy_cache_key contains user-specified data such as $cookie_xxx. Using the cookie value as part of the proxy_cache_key can prevent private data from being cached, so it can be used in different locations. Specify the value of proxy_cache_key separately to separate private data and public data.
The caching directive relies on proxy buffers (buffers). If proxy_buffers is set to off, the cache will not take effect.
proxy_cache_valid
Syntax: proxy_cache_valid reply_code [reply_code …] time;
Default value: none
Use fields: http, server, location
Set different cache times for different responses, for example:
proxy_cache_valid 200 302 10m;
proxy_cache_valid 404   1m;
Set the cache time to 10 minutes for response codes 200 and 302, 404 code Cache for 1 minute.
If you only define time:
proxy_cache_valid 5m;
Then only responses with codes 200, 301 and 302 will be cached.
Similarly You can use any parameter for any response.
proxy_cache_valid 200 302 10m;
proxy_cache_valid 301 1h;
proxy_cache_valid any 1m;
2. Define a simple nginx cache server
[root@nginx ~]# vim /etc/nginx/nginx.conf
proxy_cache_path /data/nginx/cache/webserver levels=1:2 keys_zone=webserver:20m max_size=1g;
  server {
    listen    80;
    server_name localhost;
    #charset koi8-r;
    #access_log logs/host.access.log main;
    location / {
        proxy_pass   http://webservers;
        proxy_set_header x-real-ip $remote_addr;
        proxy_cache webserver;
        proxy_cache_valid 200 10m;
    }
}3. Create a new cache directory
[root@nginx ~]# mkdir -pv /data/nginx/cache/webserver
4. Reload the configuration File
[root@nginx webserver]# service nginx reload
nginx: the configuration file /etc/nginx/nginx.conf syntax is ok
nginx: configuration file /etc/nginx/nginx.conf test is successful
重新载入 nginx:                      [确定]
5. Let’s test it (Google Chrome)
Note, when you test with Google Chrome, you can Press f12 to call the development tool and select the network option. We can see the response headers. Here we can see whether we are requesting cache, but we can’t see it yet. Let’s configure it and test it again.
6. Cache variable description
$server_addr
Server address, this value can be determined after completing a system call, if you want to bypass System call, you must specify the address in listen and use the bind parameter.
$upstream_cache_status
In version 0.8.3, its value may be:
miss Missed
expired - expired. The request is sent to the backend.
updating - expired. Because proxy/fastcgi_cache_use_stale is being updated, the older version of the response will be used.
stale - expired. When using proxy/fastcgi_cache_use_stale, the backend receives stale responses.
hit Hit
[root@nginx ~]# vim /etc/nginx/nginx.conf
proxy_cache_path /data/nginx/cache/webserver levels=1:2 keys_zone=webserver:20m max_size=1g;
  server {
    listen    80;
    server_name localhost;
    #charset koi8-r;
    #access_log logs/host.access.log main;
    #增加两头部
    add_header x-via $server_addr;
    add_header x-cache $upstream_cache_status;
    location / {
        proxy_pass   http://webservers;
        proxy_set_header x-real-ip $remote_addr;
        proxy_cache webserver;
        proxy_cache_valid 200 10m;
    }
}7. Reload the configuration file
[root@nginx ~]# service nginx reload
nginx: the configuration file /etc/nginx/nginx.conf syntax is ok
nginx: configuration file /etc/nginx/nginx.conf test is successful
重新载入 nginx:                      [确定]
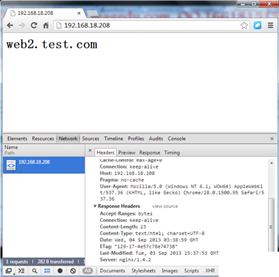
8. Test it

注,从图中我们可以看到,我们访问的服务器是192.168.18.208,缓存命中。大家可以看到是不是很直观啊。下面我们看一下缓存目录。
9.查看一下缓存目录
[root@nginx ~]# cd /data/nginx/cache/webserver/f/63/
[root@nginx 63]# ls
681ad4c77694b65d61c9985553a2763f
注,缓存目录里确实有缓存文件。
The above is the detailed content of How to configure nginx page cache. For more information, please follow other related articles on the PHP Chinese website!

Hot AI Tools

Undresser.AI Undress
AI-powered app for creating realistic nude photos

AI Clothes Remover
Online AI tool for removing clothes from photos.

Undress AI Tool
Undress images for free

Clothoff.io
AI clothes remover

Video Face Swap
Swap faces in any video effortlessly with our completely free AI face swap tool!

Hot Article
Hot Tools

Notepad++7.3.1
Easy-to-use and free code editor

SublimeText3 Chinese version
Chinese version, very easy to use

Zend Studio 13.0.1
Powerful PHP integrated development environment

Dreamweaver CS6
Visual web development tools

SublimeText3 Mac version
God-level code editing software (SublimeText3)
Hot Topics


 How to configure nginx in Windows
Apr 14, 2025 pm 12:57 PM
How to configure nginx in Windows
Apr 14, 2025 pm 12:57 PM
How to configure Nginx in Windows? Install Nginx and create a virtual host configuration. Modify the main configuration file and include the virtual host configuration. Start or reload Nginx. Test the configuration and view the website. Selectively enable SSL and configure SSL certificates. Selectively set the firewall to allow port 80 and 443 traffic.
 How to check the name of the docker container
Apr 15, 2025 pm 12:21 PM
How to check the name of the docker container
Apr 15, 2025 pm 12:21 PM
You can query the Docker container name by following the steps: List all containers (docker ps). Filter the container list (using the grep command). Gets the container name (located in the "NAMES" column).
 How to start containers by docker
Apr 15, 2025 pm 12:27 PM
How to start containers by docker
Apr 15, 2025 pm 12:27 PM
Docker container startup steps: Pull the container image: Run "docker pull [mirror name]". Create a container: Use "docker create [options] [mirror name] [commands and parameters]". Start the container: Execute "docker start [Container name or ID]". Check container status: Verify that the container is running with "docker ps".
 How to check whether nginx is started
Apr 14, 2025 pm 01:03 PM
How to check whether nginx is started
Apr 14, 2025 pm 01:03 PM
How to confirm whether Nginx is started: 1. Use the command line: systemctl status nginx (Linux/Unix), netstat -ano | findstr 80 (Windows); 2. Check whether port 80 is open; 3. Check the Nginx startup message in the system log; 4. Use third-party tools, such as Nagios, Zabbix, and Icinga.
 How to create containers for docker
Apr 15, 2025 pm 12:18 PM
How to create containers for docker
Apr 15, 2025 pm 12:18 PM
Create a container in Docker: 1. Pull the image: docker pull [mirror name] 2. Create a container: docker run [Options] [mirror name] [Command] 3. Start the container: docker start [Container name]
 How to check nginx version
Apr 14, 2025 am 11:57 AM
How to check nginx version
Apr 14, 2025 am 11:57 AM
The methods that can query the Nginx version are: use the nginx -v command; view the version directive in the nginx.conf file; open the Nginx error page and view the page title.
 How to configure cloud server domain name in nginx
Apr 14, 2025 pm 12:18 PM
How to configure cloud server domain name in nginx
Apr 14, 2025 pm 12:18 PM
How to configure an Nginx domain name on a cloud server: Create an A record pointing to the public IP address of the cloud server. Add virtual host blocks in the Nginx configuration file, specifying the listening port, domain name, and website root directory. Restart Nginx to apply the changes. Access the domain name test configuration. Other notes: Install the SSL certificate to enable HTTPS, ensure that the firewall allows port 80 traffic, and wait for DNS resolution to take effect.
 How to start nginx server
Apr 14, 2025 pm 12:27 PM
How to start nginx server
Apr 14, 2025 pm 12:27 PM
Starting an Nginx server requires different steps according to different operating systems: Linux/Unix system: Install the Nginx package (for example, using apt-get or yum). Use systemctl to start an Nginx service (for example, sudo systemctl start nginx). Windows system: Download and install Windows binary files. Start Nginx using the nginx.exe executable (for example, nginx.exe -c conf\nginx.conf). No matter which operating system you use, you can access the server IP
