
 Operation and Maintenance
Nginx
nginx+keepalived high availability master-slave configuration method
Operation and Maintenance
Nginx
nginx+keepalived high availability master-slave configuration method
nginx+keepalived high availability master-slave configuration method

1. System environment and software version
centos 6.6 x64
keepalived-1.2.18.tar.gz
nginx-1.6.2.tar.gz
Master server: 192.168.38.64
Slave server: 192.168.38.66
vip:192.168.38.100
2. nginx installation (master-slave Installation is consistent)
1. Install dependent environment
Copy code The code is as follows:
yum install gcc gcc-c make automake autoconf libtool pcre pcre-devel zlib zlib-developenssl openssl-devel
##2.Upload nginx to the opt directory
3. Unzip and install
  # tar -zxvf nginx-1.6.2.tar.gz

  # cd nginx-1.6.2
  # ./configure --prefix=/opt/nginx (prefix=/opt/nginx 这个指定的是 nginx目录)
  # make && make install
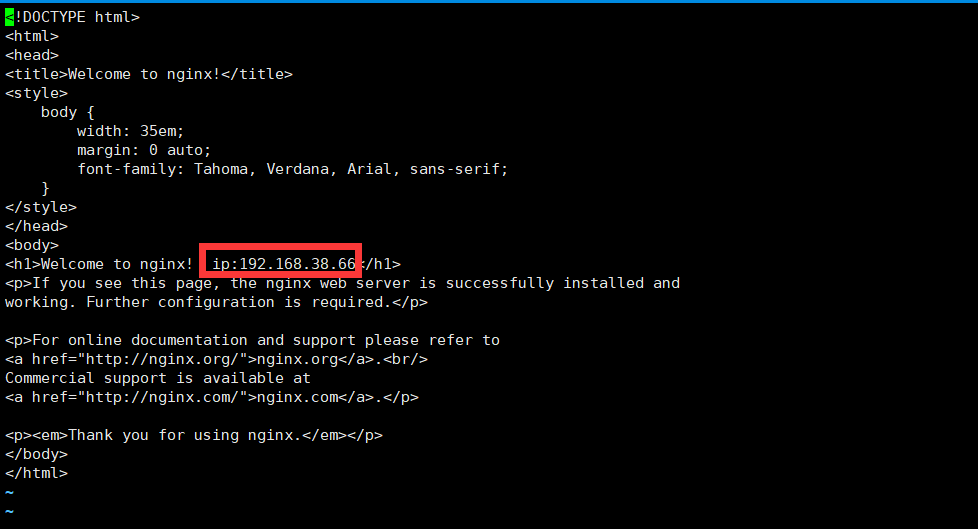
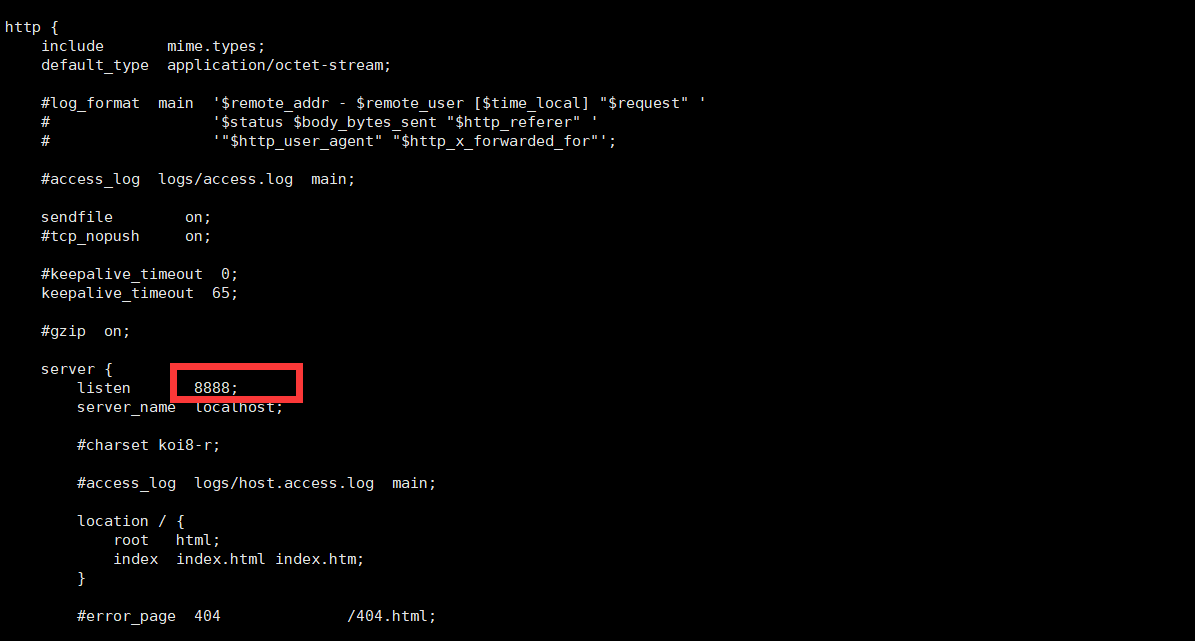 ##vi /opt/nginx/html/index.html
Configuration test: /opt/nginx/sbin/nginx -t The following interface appears, indicating that the configuration is OK
 Start: /opt/nginx/sbin/nginx
Restart: /opt/nginx/sbin/nginx -s reload
Stop: /opt/nginx/sbin/nginx -s stop
6. Start nginxvi /etc/rc.local
Join: /opt/nginx/sbin/nginx
7. Modify the firewall open portvi /etc/sysconfig/iptables
Add: -a input -p tcp -m state --state new -m tcp --dport 8888 -j accept
Restart the firewall:service iptables restart
8. ProblemProblems encountered when starting nginx
##vi / etc/ld.so.conf
9.nginx load balancing
nginx load balancing Mainly done by the upstream module
Modify the nginx configuration filevi /data/nginx/conf/nginx.confAdd the following content: (the name web_pools Variable) upstream web_pools {
server 10.0.6.108:7080weight=1;
server 10.0.0.85:8980weight=1;
} where weight is the weight and backup is the backup server. The backup server will start only after other servers are down. 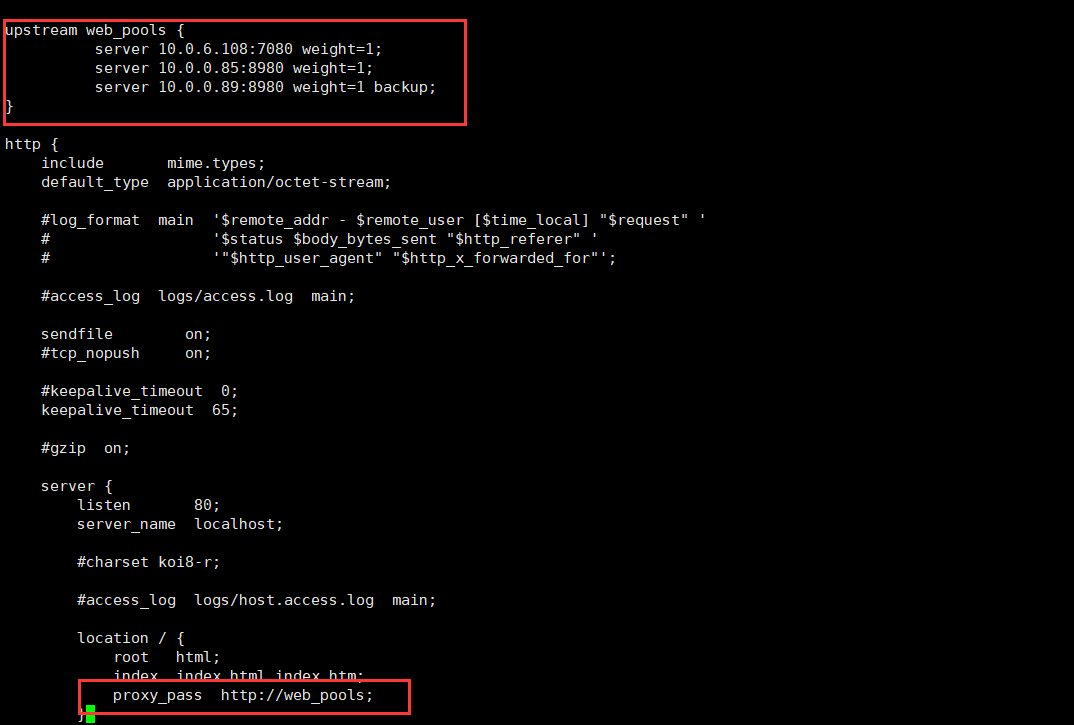
3. Keepalived installation
1. Upload keepalived to the opt directory
2. Unzip and installtar -zxvf keepalived-1.2.18.tar.gz cd keepalived-1.2.18 ./configure --prefix=/opt/keepalived make && make install
cp /opt/keepalived/etc/rc.d/init.d/keepalived /etc/init.d/
  cp /opt/keepalived/etc/sysconfig/keepalived /etc/sysconfig/
  ln -s /opt/sbin/keepalived /usr/sbin/
  ln -s /opt/keepalived/sbin/keepalived /sbin/
chkconfig keepalived on
5.
Modify the keepalived configuration filevi /etc/keepalived/ keepalived.conf
! configuration file for keepalived (!、#都是注释)
global_defs { #全局配置
notification_email {
acassen@firewall.loc
failover@firewall.loc
sysadmin@firewall.loc
}
notification_email_from alexandre.cassen@firewall.loc
smtp_server 192.168.200.1
smtp_connect_timeout 30
router_id lvs_01 #这个配置要唯一
}
vrrp_script chk_nginx {
script "/etc/keepalived/nginx_check.sh" ## 检测 nginx 状态的脚本路径
interval 2 ## 检测时间间隔
weight -20 ## 如果条件成立,权重-20
}
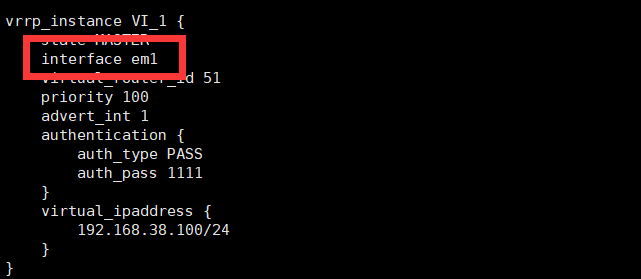
vrrp_instance vi_1 { #实例 vi_1 名字可以随意 但是不建议修改
state master # 主服务器master 从服务器 backup
interface em1 # em1 网卡
virtual_router_id 51 #virtual_router_id 主备要一致
priority 100 # 优先级 数字越大 优先级越高 priority 的值 主服务器要大于 从服务器
advert_int 1 #设定master与backup负载均衡器之间同步检查的时间间隔,单位是秒
authentication { # 主从通信 验证类型及密码
auth_type pass #设置vrrp验证类型,主要有pass和ah两种
auth_pass 1111 #设置vrrp验证密码,在同一个vrrp_instance下,master与backup必须使用相同的密码才能正常通信
}
## 将 track_script 块加入 instance 配置块
track_script {
chk_nginx ## 执行 nginx 监控的服务
}
virtual_ipaddress {
192.168.38.100/24 #vrrp ha 虚拟地址 如果有多个vip,继续换行填写
}
} 6. Write nginx status detection script
  #!/bin/bash

  a=`ps -c nginx –no-header |wc -l`
  if [ $a -eq 0 ];then
    /opt/nginx/sbin/nginx
    sleep 2
    if [ `ps -c nginx --no-header |wc -l` -eq 0 ];then

      killall keepalived
    fi
  fi
chmod x/etc/keepalived/nginx_check.sh
7. Note: the differences between keepalived master and slave configuration files

 10. Test
Start the master-slave nginx and keepalived services
Master From the server respectively: ip add | grep 192.168.38.100
can be seen on 192.168.38.64
## and at the same time on 192.168.38.66

When you kill keepalived on the master server, the slave server

When you start keepalived on the master server again, there will be results on the master server. , no results from the server.
当杀死 nginx后,keepalived则会自动启动 nginx服务
11. keepalived脑裂 (ip add | grep 192.168.38.100 在主从都有结果)
解决方案:防火墙问题
iptables-iinput4-pvrrp-jaccept

service iptables save

service iptables restart
The above is the detailed content of nginx+keepalived high availability master-slave configuration method. For more information, please follow other related articles on the PHP Chinese website!

Hot AI Tools

Undresser.AI Undress
AI-powered app for creating realistic nude photos

AI Clothes Remover
Online AI tool for removing clothes from photos.

Undress AI Tool
Undress images for free

Clothoff.io
AI clothes remover

Video Face Swap
Swap faces in any video effortlessly with our completely free AI face swap tool!

Hot Article
Hot Tools

Notepad++7.3.1
Easy-to-use and free code editor

SublimeText3 Chinese version
Chinese version, very easy to use

Zend Studio 13.0.1
Powerful PHP integrated development environment

Dreamweaver CS6
Visual web development tools

SublimeText3 Mac version
God-level code editing software (SublimeText3)
Hot Topics
 1667
1667
 14
1426
52
1328
25
1273
29
1255
24
14
1426
52
1328
25
1273
29
1255
24

 How to start containers by docker
Apr 15, 2025 pm 12:27 PM
How to start containers by docker
Apr 15, 2025 pm 12:27 PM
Docker container startup steps: Pull the container image: Run "docker pull [mirror name]". Create a container: Use "docker create [options] [mirror name] [commands and parameters]". Start the container: Execute "docker start [Container name or ID]". Check container status: Verify that the container is running with "docker ps".
 How to configure nginx in Windows
Apr 14, 2025 pm 12:57 PM
How to configure nginx in Windows
Apr 14, 2025 pm 12:57 PM
How to configure Nginx in Windows? Install Nginx and create a virtual host configuration. Modify the main configuration file and include the virtual host configuration. Start or reload Nginx. Test the configuration and view the website. Selectively enable SSL and configure SSL certificates. Selectively set the firewall to allow port 80 and 443 traffic.
 How to check the name of the docker container
Apr 15, 2025 pm 12:21 PM
How to check the name of the docker container
Apr 15, 2025 pm 12:21 PM
You can query the Docker container name by following the steps: List all containers (docker ps). Filter the container list (using the grep command). Gets the container name (located in the "NAMES" column).
 How to check whether nginx is started
Apr 14, 2025 pm 01:03 PM
How to check whether nginx is started
Apr 14, 2025 pm 01:03 PM
How to confirm whether Nginx is started: 1. Use the command line: systemctl status nginx (Linux/Unix), netstat -ano | findstr 80 (Windows); 2. Check whether port 80 is open; 3. Check the Nginx startup message in the system log; 4. Use third-party tools, such as Nagios, Zabbix, and Icinga.
 How to create containers for docker
Apr 15, 2025 pm 12:18 PM
How to create containers for docker
Apr 15, 2025 pm 12:18 PM
Create a container in Docker: 1. Pull the image: docker pull [mirror name] 2. Create a container: docker run [Options] [mirror name] [Command] 3. Start the container: docker start [Container name]
 How to check nginx version
Apr 14, 2025 am 11:57 AM
How to check nginx version
Apr 14, 2025 am 11:57 AM
The methods that can query the Nginx version are: use the nginx -v command; view the version directive in the nginx.conf file; open the Nginx error page and view the page title.
 How to configure cloud server domain name in nginx
Apr 14, 2025 pm 12:18 PM
How to configure cloud server domain name in nginx
Apr 14, 2025 pm 12:18 PM
How to configure an Nginx domain name on a cloud server: Create an A record pointing to the public IP address of the cloud server. Add virtual host blocks in the Nginx configuration file, specifying the listening port, domain name, and website root directory. Restart Nginx to apply the changes. Access the domain name test configuration. Other notes: Install the SSL certificate to enable HTTPS, ensure that the firewall allows port 80 traffic, and wait for DNS resolution to take effect.
 What to do if nginx server is hung
Apr 14, 2025 am 11:42 AM
What to do if nginx server is hung
Apr 14, 2025 am 11:42 AM
When the Nginx server goes down, you can perform the following troubleshooting steps: Check that the nginx process is running. View the error log for error messages. Check the syntax of nginx configuration. Make sure nginx has the permissions you need to access the file. Check file descriptor to open limits. Confirm that nginx is listening on the correct port. Add firewall rules to allow nginx traffic. Check reverse proxy settings, including backend server availability. For further assistance, please contact technical support.
