

How to automatically enable or disable setting time zone in Windows 11

When Windows users encounter an application not working properly, they usually think of various reasons, such as trying to restart the application, etc. But actually time zone may also be the reason behind it. Initially we had to set the time zone manually in Windows system but in Windows 11 there is an option where you can allow Windows to set the time zone automatically. To automatically enable time zone settings on your system, check out this article, which details two ways to do it.
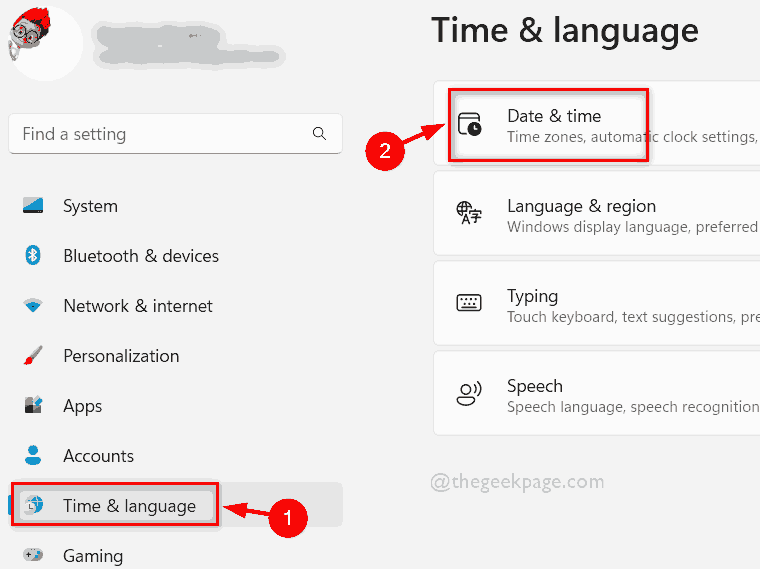
How to automatically enable or disable setting time zone in Windows 11 using the Settings app
Step 1: Open## by pressing the Windows I keys simultaneously #Set up the application.
Step 2: Then, select theTime and Language option in the left menu of the Settings app as shown below.
Step 3: After selecting the time and language, click theDate and time option on the right side of the settings window.
Set Time Zone Automaticallytoggle button to toggle it Open as shown below.
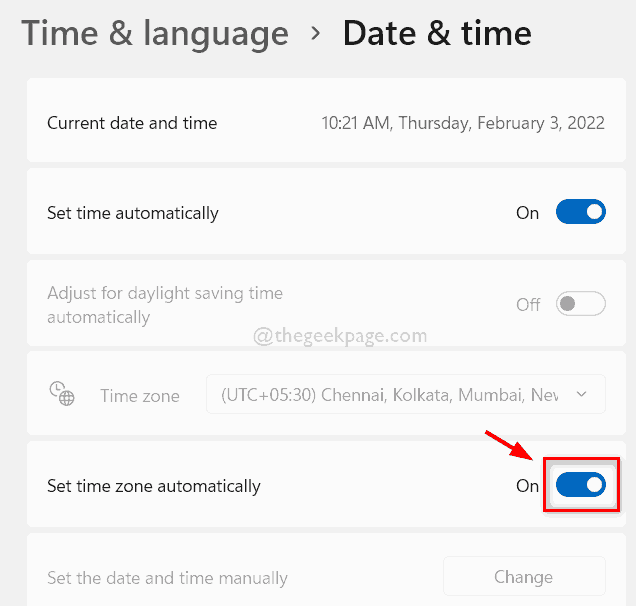
Automatically set time zonetoggle button Turn it off as shown in the screenshot below.

Note: Please keep a backup of your registry files before proceeding with this method, This allows you to recover it in the event of a problem that could completely damage your system.
Step 1: Press theWindows R keys simultaneously on your keyboard to open the Run dialog box.
Step 2: Then, typeregedit in the Run box and press the Enter key to open the Registry Editor.
Step 3: Please accept the UAC prompt by clicking the Yes button to continue.

Enter key to get there.
NOTE: Please make sure the address bar is empty before pasting the copy path given below.
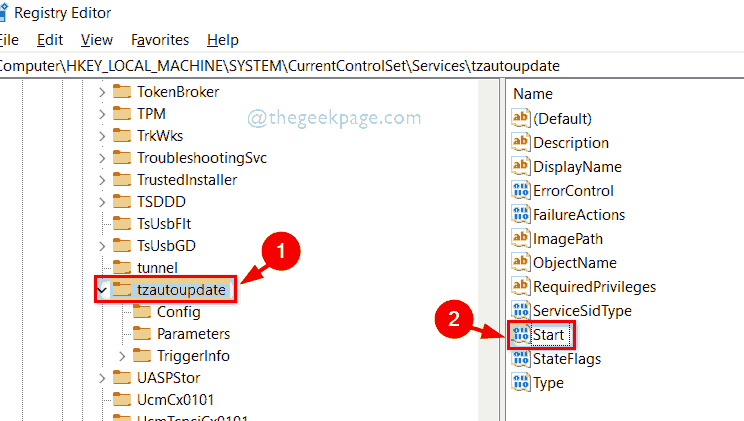
HKEY_LOCAL_MACHINE\SYSTEM\CurrentControlSet\Services\tzautoupdate
tzautoupdate registry key on the left side of the Registry Editor.
Step 6: Then, on the right side of the Registry Editor, double-clickStart dword value to open it.
3 in the ValueData field and click OK Button to enable the Automatically set time zone option on your system as shown below.
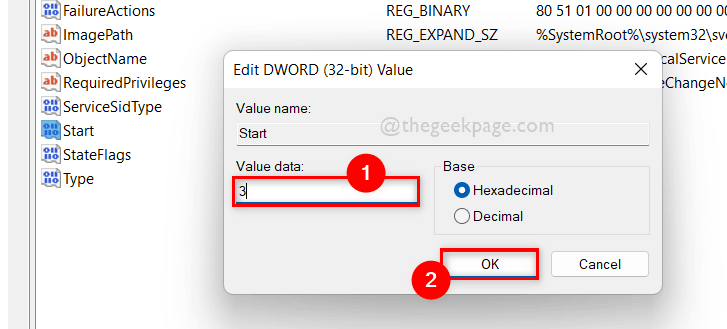
Value Data field to 4, then Click the OK button as shown below.

The above is the detailed content of How to automatically enable or disable setting time zone in Windows 11. For more information, please follow other related articles on the PHP Chinese website!

Hot AI Tools

Undresser.AI Undress
AI-powered app for creating realistic nude photos

AI Clothes Remover
Online AI tool for removing clothes from photos.

Undress AI Tool
Undress images for free

Clothoff.io
AI clothes remover

Video Face Swap
Swap faces in any video effortlessly with our completely free AI face swap tool!

Hot Article
Hot Tools

Notepad++7.3.1
Easy-to-use and free code editor

SublimeText3 Chinese version
Chinese version, very easy to use

Zend Studio 13.0.1
Powerful PHP integrated development environment

Dreamweaver CS6
Visual web development tools

SublimeText3 Mac version
God-level code editing software (SublimeText3)
Hot Topics


 How to disable and remove HP Wolf Security on Windows 11
Dec 14, 2023 pm 06:49 PM
How to disable and remove HP Wolf Security on Windows 11
Dec 14, 2023 pm 06:49 PM
HP devices usually come with security software pre-installed, and many people wonder how to disable HPWolfSecurity on Windows 11. The reason for this is that this software can cause certain problems and conflict with other applications, so today we will show you how to disable it. Is HPWolfSecurity bloatware? This is a legitimate application from HP, but it often comes pre-installed and causes performance issues and conflicts with other security software, which is why many people consider it bloatware. How to disable HPWolfSecurity on Windows 11? 1. Use the system tray icon to find HPWolfSecurity in the system tray
 7 Ways to Fix Printer Access Denied Error in Windows 11
May 10, 2023 pm 03:43 PM
7 Ways to Fix Printer Access Denied Error in Windows 11
May 10, 2023 pm 03:43 PM
Connecting your Windows computer to external devices such as printers can make things easier for you. However, you may encounter several problems when trying to collect computers from external devices such as printers. Users complain about Windows 11 printer access denied error. Many situations can cause this issue, including hardware issues, driver issues, and more. Therefore, this article will discuss the cause of the problem and how to solve it. Windows 11 printer access denied error prevents you from using the printer to perform any action on your computer. This indicates that there is not a good connection between the computer and the printer. Likewise, printer errors may cause Windows to be unable to connect to the printer Access Denied error 0x0000011b.
 Fix: Snipping Tool notification missing in Windows 11, 10
May 16, 2023 pm 06:34 PM
Fix: Snipping Tool notification missing in Windows 11, 10
May 16, 2023 pm 06:34 PM
Snip&Sketch is an excellent Windows screenshot tool. Microsoft has added tons of new cool features and shortcuts to make this tool almost indispensable for users. However, you may have noticed an issue after taking the screenshot, the preview notification does not appear in the notification panel! There are many reasons that could be the source of the problem. So, no need to waste more time, just follow these solutions to find a quick solution. Fix 1 – Check notification settings You may have blocked Snip & Sketch notification settings. 1. You have to open settings. So, press Windows key + I key at the same time. 2. Now, go to “System” from the left pane. 3. On the right side, click All Options
 Ghost Specter Windows 11 Superlite: Download and Installation Guide
May 05, 2023 am 09:10 AM
Ghost Specter Windows 11 Superlite: Download and Installation Guide
May 05, 2023 am 09:10 AM
Updating the operating system to the latest Windows 11 poses a challenge for many PCs due to insufficient system requirements. Therefore, Microsoft released a modified version, GhostSpectreWindows11Superlite, compatible with every PC. Therefore, we will discuss how to download and install it. Likewise, if your PC meets the Windows 11 system requirements, you can read further about obtaining a Windows 11 custom ISO. What is Ghost Windows 11? GhostSpectreWindows11 is a modified version called LightWindows11. This is because of the installed
 How to enable or disable taskbar thumbnail previews on Windows 11
Sep 15, 2023 pm 03:57 PM
How to enable or disable taskbar thumbnail previews on Windows 11
Sep 15, 2023 pm 03:57 PM
Taskbar thumbnails can be fun, but they can also be distracting or annoying. Considering how often you hover over this area, you may have inadvertently closed important windows a few times. Another disadvantage is that it uses more system resources, so if you've been looking for a way to be more resource efficient, we'll show you how to disable it. However, if your hardware specs can handle it and you like the preview, you can enable it. How to enable taskbar thumbnail preview in Windows 11? 1. Using the Settings app tap the key and click Settings. Windows click System and select About. Click Advanced system settings. Navigate to the Advanced tab and select Settings under Performance. Select "Visual Effects"
 Fix issue where Windows 11 display language cannot be changed
May 07, 2023 am 10:10 AM
Fix issue where Windows 11 display language cannot be changed
May 07, 2023 am 10:10 AM
The display language is the front-end language in which users can read and view system screen content. Windows 11 releases updated versions regularly, but sometimes this causes some unexpected things to change. Many Windows users have noticed a change in Windows 11 systems where they cannot change their display language. They're not sure why this is happening. We suspect this may be due to a recent Windows version being installed on the system or having sync settings enabled to remember preferences for different devices. Don't worry if you encounter such problems when changing the display language. In this article, we have explained below some solutions that will help users to resolve this issue and be able to change the display language. build
 Windows 11 doesn't recognize Bootrec? Apply this simple fix
May 20, 2023 pm 01:50 PM
Windows 11 doesn't recognize Bootrec? Apply this simple fix
May 20, 2023 pm 01:50 PM
The boot sector is a critical part of the drive that takes over shortly after the computer boots. When you have a problem, bootrec is here to help. But what should you do if bootrec is not recognized in Windows 11? The boot sector contains the MBR or Master Boot Record, which helps locate the operating system on the drive and load it. Moreover, its issues may prevent you from booting Windows 11 efficiently or at all. Speaking of issues, many are reporting Bootrec/Fixboot access denied messages and we have detailed this issue in a separate tutorial. In this case, it is recommended that you run the bootrec command to eliminate this issue. If you encounter when running the command
 How to enable or disable Core Isolation Memory Integrity in Windows 11, 10
Apr 27, 2023 pm 10:43 PM
How to enable or disable Core Isolation Memory Integrity in Windows 11, 10
Apr 27, 2023 pm 10:43 PM
Today, most Windows users use virtual machines. When core isolation is disabled on their systems, security risks and attacks are to be expected. Even if core isolation is set, memory integrity is disabled if the user upgrades the system. If core isolation is enabled, the system will be protected from attacks. For people who frequently use virtual computers, it is highly recommended that they enable it. If you are looking for instructions on how to enable or disable Core Isolated Memory Integrity on any Windows 11 system, this page can help. How to Enable or Disable Core Isolation Memory Integrity in Windows 11 using the Windows Security app Step 1: Press the Windows key and type Windows Security